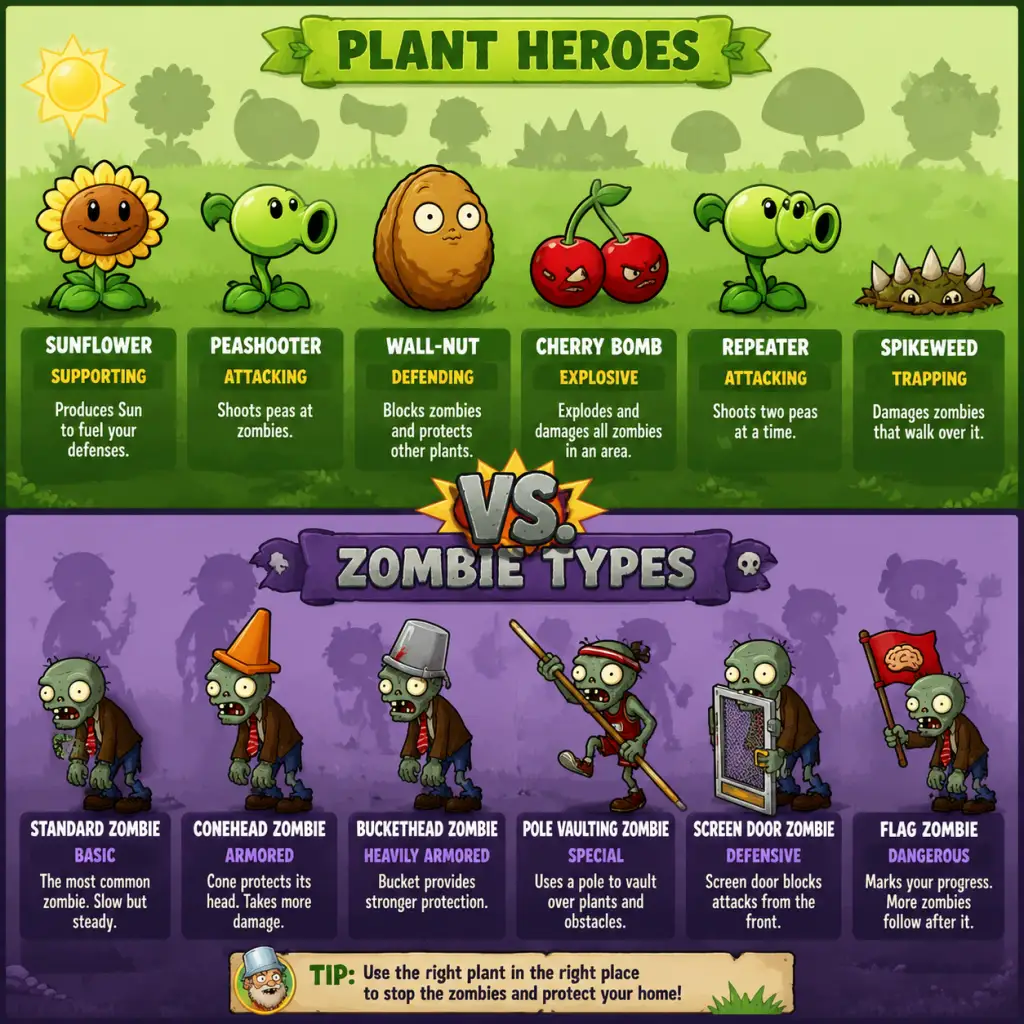
Characters & Roles
Characters & Roles – Plants vs. Zombies
In Plants vs. Zombies, you do not control a single character; instead, your arsenal of plants functions as your "party" of defenders. Each plant has a unique role, strengths, weaknesses, and unlock conditions. This guide covers every playable plant in the original 2009 game, organized by role, plus a summary of the zombie enemies you'll face.
1. Offensive Plants (Damage Dealers)
These plants directly damage zombies. They are your primary source of killing power.
| Plant | Unlock | Role | Strengths | Weaknesses | Playstyle / Synergy |
|---|---|---|---|---|---|
| Peashooter | Level 1-1 | Basic ranged | Cheap (100 sun), continuous damage | Low damage per hit, no splash | Early game staple; stack multiples. Synergizes with Torchwood to double damage. |
| Repeater | Level 1-8 | Rapid fire | Fires two peas per shot; good DPS | Costs 200 sun; still no splash | Place behind Torchwood for increased fire rate and damage. |
| Gatling Pea | Purchase from Crazy Dave's shop (after Level 3-4) | Heavy rapid fire | Fires four peas per shot; highest DPS of pea family | Very expensive (250 sun); requires upgrade from Repeater | Ultimate offensive plant; best with Torchwood. Use in late game and Survival. |
| Snow Pea | Level 1-5 | Slowing support | Slows zombies by 50%; effective against fast zombies | Low damage per shot | Always pair with Peashooter or Repeater. Stack with Torchwood? No – Torchwood cancels freeze. Use separately. |
| Cabbage-pult | Level 1-10 | Lobbed | Jumps over low obstacles (e.g., screen doors), lobbed arc | Slightly slower fire rate and lower damage than Peashooter | Good against shield zombies. Use behind defensive plants. |
| Kernel-pult | Level 1-12 | Lobbed with utility | 25% chance to stun (butter); kernels do less damage | Inconsistent damage, slower fire | Place in front of Cob Cannon? No. Use to stall zombies. Synergizes with Torchwood? No – only pea stuff. |
| Melon-pult | Level 2-7 | Splash damage | Splash area damage; high damage; slows zombies slightly (winter melon) | Expensive (300 sun), slow attack | The best mass damage plant. Use with Winter Melon for AoE slow. Key for Survival. |
| Winter Melon | Level 4-5 | Splash + slow | Chills and damages multiple zombies; slows them significantly | Very expensive (400 sun), slow fire | Upgrade from Melon-pult. Essential for endless modes. |
| Threepeater | Level 3-2 | Three-lane attack | Fires in three adjacent lanes at once | Costs 325 sun; each pea does normal damage | Place in middle lane to cover three lanes. Use Torchwood in middle for three lanes of enhanced damage. |
| Chomper | Level 2-2 | Instant kill | Can instantly eat a zombie, completely destroying it | Long re-chew (42 sec); vulnerable while chewing; only one zombie at a time | Great for eliminating high-health zombies (Gargantuars). Protect with Tall-nut or Pumpkin. |
| Spikerock | Level 3-7 | Area denial + damage | Destroys multiple small zombies; can take hits from Gargantuars; damages cars | Expensive (250 sun), no effect on flying zombies | Place in front of a row of defense to kill weak zombies. Synergizes with Spikeweed (upgrade). |
| Spikeweed | Level 2-5 | Area damage | Cheap (100 sun), destroys Gargantuars after 3 steps; damages any zombie that walks over it | Single-use; crumbles after taking damage | Use in lanes with many weak zombies. Can be replanted quickly. |
| Cob Cannon | Level 4-9 | Massive AoE | Long cooldown, but deals massive damage to a 3x3 area; can target anywhere | Requires two Kernel-pults to upgrade; very expensive (500 sun); manual targeting | Ultimate crowd control. Use to wipe groups of Gargantuars or huge waves. Needs protection. |
| Doom-shroom | Level 2-3 | Super explosive | Devastating area damage (9x9); can kill multiple Gargantuars | Leaves a crater that prevents planting for 90 sec; self-destructs | Emergency nuke. Use when a lane is overrun. Plant on a flower pot. |
| Cherry Bomb | Level 1-6 | Instant AoE | Kills all zombies in a small area quickly | Very expensive (150 sun) for one use, short range | Great for dealing with large clusters early on. |
| Potato Mine | Level 1-2 | Instant single target | Cheap (25 sun); destroys first zombie that steps on it; recharges quickly | Must arm (14 sec); only works once; range is one tile | Perfect early cheap defense. Can be used as a quick emergency hit. |
| Jalapeno | Level 3-3 | Full lane fire | Clears an entire lane of zombies; also melts ice | Single-use, expensive (125 sun) | Save for when a lane is completely stacked. |
| Ice-shroom | Level 3-4 | Freeze all | Freezes all zombies on screen for about 5 sec; prevents new zombies from entering | Long freeze? Actually only temporary; does no damage | Excellent stalling tool. Use in Survival to buy time. |
| Hypno-shroom | Level 2-6 | Mind control | Hypnotizes a zombie to fight for you; it will attack other zombies | Only works on zombies that eat it (e.g., pole vaulters, peons); one-time use; expensive (75 sun for a trick) | Best used on strong zombies (Buckethead, Gargantuar) – they become powerful allies. |
| Grave Buster | Level 4-1 | Grave removal | Destroys one grave instantly; no sun cost | Only works on graves; no offense | Essential in graveyard levels. |
| Marigold | Level 3-6 | Money maker | Produces coins when placed (does not fight) | Useless for defense; costs sun | Only use in Last Stand or Coin collection levels. |
2. Defensive Plants (Tanks & Barriers)
These plants block or slow zombies, protecting your offensive line.
| Plant | Unlock | Role | Strengths | Weaknesses | Playstyle / Synergy |
|---|---|---|---|---|---|
| Wall-nut | Level 1-3 | Basic wall | Blocks zombies for a while; cheap (50 sun) | Not very durable; destroyed eventually | Standard defense. Place in front of attackers. |
| Tall-nut | Level 2-1 | High wall | Much higher health; can block Bungee zombies and jumping zombies | Expensive (125 sun), can be bypassed by ladder zombies | Pair with Pumpkin for extra protection. |
| Pumpkin | Level 3-8 | Protective shell | Covers any plant with extra health; can be placed on anything; recharged | Expensive (125 sun), not a plant itself | Perfect for protecting high-value plants like Gatling Pea or Melon-pult. |
| Garlic | Level 4-6 | Lane shuffler | Zombies that eat it are forced to change lanes | Low health; kills after one or two bites; only works on eating zombies | Use to redirect zombies to a kill zone. |
| Torchwood | Level 2-3 | Buff station | Doubles damage of peas passing through; turns peas into fire peas | Costs 175 sun; no attack on its own; burns Snow Pea freeze | Place in front of Peashooter, Repeater, or Gatling Pea lines. |
| Fume-shroom | Level 1-7 (night) | Short-range AoE | Fumes damage zombies in a small area (3 tiles) ignoring shields | Cannot shoot over wall-nuts; nighttime only? Actually any level | Good against grouped zombies. Use with Pumpkin. |
| Glow-shroom | Level 1-11 (night) | Light + defense | Produces light that reveals zombies? Actually only produces tiny light; small damage | Low damage, temporary | Mainly for night levels to provide light; attack is secondary. |
| Scaredy-shroom | Level 1-8 (night) | Long-range | Very long range; high damage | Hides when a zombie is within 5 tiles; costs 75 sun | Place in back rows with Pumpkin front to keep safe. |
| Sun-shroom | Level 1-5 (night) | Sun producer | Generates small sun (15) early; later full sun (25) after time | Slow initial production; small suns early | Essential for night levels. |
| Puff-shroom | Level 1-3 (night) | Cheap dmg | Free, airborne spore; good early night defense | Very low damage; dies in about 15 seconds | Place on first row to buy time. |
| Mushroom Garden – not a plant, but a minigame item. |
3. Economy Plants (Sun Producers)
Sun is the currency to place plants.
| Plant | Unlock | Production | Notes |
|---|---|---|---|
| Sunflower | Level 1-1 | Produces 1 large sun (25 sun) every 24 sec | Standard sun factory. Plant multiple. Use Imitater for more. |
| Twin Sunflower | Level 2-8 | Produces 2 large suns (50 sun total) per cycle twice as fast? Actually produces two suns at once; total output 50 sun per cycle | Upgrade from Sunflower; expensive (150 sun+upgrade cost) |
| Sun-shroom | Level 1-5 (night) | Starts small (15) then full (25) after a while | Night only; but can be used anywhere after unlocking? Only in night levels originally |
| Marigold | Level 3-6 | Produces coins (not sun) | Only for money; not useful for defense. |
4. Instant-Use & Miscellaneous Plants
These have unique effects.
| Plant | Unlock | Effect |
|---|---|---|
| Coffee Bean | Level 2-8 | Wakes up shrooms during the day |
| Umbrella Leaf | Level 4-7 | Deflects Bungee Zombies |
| Flower Pot | Level 1-4 | Allows planting on roof |
| Imitater | Crazy Dave's shop after level 3-4 | Copies a plant's ability; you get two of the same plant |
5. Zombies – The Antagonists
While not playable, understanding zombies is crucial. Key types:
- Basic Zombie – Slow, low health.
- Conehead Zombie – Extra health.
- Buckethead Zombie – Very tough.
- Pole Vaulting Zombie – Jumps over first plant.
- Digger Zombie – Digs under plants.
- Ladder Zombie – Places ladder to bypass walls.
- Bungee Zombie – Steals a plant from above.
- Balloon Zombie – Flies over everything (needs Cactus or Blover).
- Catapult Zombie – Throws boulders that break plants.
- Gargantuar – Huge health, carries Imp.
- Zomboni – Crushes plants, leaves ice trail.
- Yeti – Rare, appears only in certain levels.
- Dr. Zomboss – Final boss in his giant mech.
- Level 1-1: Peashooter, Sunflower, Wall-nut.
- Level 2-1: Unlock Tall-nut, Snow Pea.
- Level 3-4: Unlock Roof levels and Imitater.
- Level 4-5: Winter Melon.
- Level 5-10: Final boss vs Dr. Zomboss.
- Survival and Puzzle modes unlock after adventure completion.
- Standard early game: Sunflowers + Peashooters + Wall-nuts.
- Night levels: Puff-shroom + Sun-shroom + Fume-shroom.
- Pool levels: Lily Pad + Tangle Kelp + Cattail.
- Roof levels: Flower Pot + Cabbage-pult + Melon-pult.
- Survival Endless: Twin Sunflower (lots), Winter Melon, Cob Cannon, Tall-nut with Pumpkin, Garlic, and Spikerock.
- Grave levels: Grave Buster essential; use Starfruit or Melon-pult for damage.
- Always plan your sun economy first. Place 6-8 Sunflowers early.
- Use defensive plants to protect offensive ones.
- Combine Torchwood with Peashooter lines for massive damage.
- Use Snow Pea or Winter Melon to slow fast zombies.
- Save Cherry Bombs and Jalapenos for emergencies.
- In endless modes, maintain a steady income and replace plants as needed.
6. Unlock Progression
Plants are unlocked by completing levels, purchasing from Crazy Dave's shop, or as rewards. Key milestones:
7. Recommended Builds & Synergies
8. Tips for Success
This covers all playable characters (plants) and their roles. Each plant has a niche; mastering when to use each is the key to winning.