Game Settings
Game Settings Guide for Warframe
This guide covers every settings category in Warframe. Proper configuration can significantly improve performance, readability, and combat responsiveness. Recommendations are provided for low-end, mid-range, and high-end hardware, along with notes on settings that are frequently misconfigured.
---
1. Graphics Settings
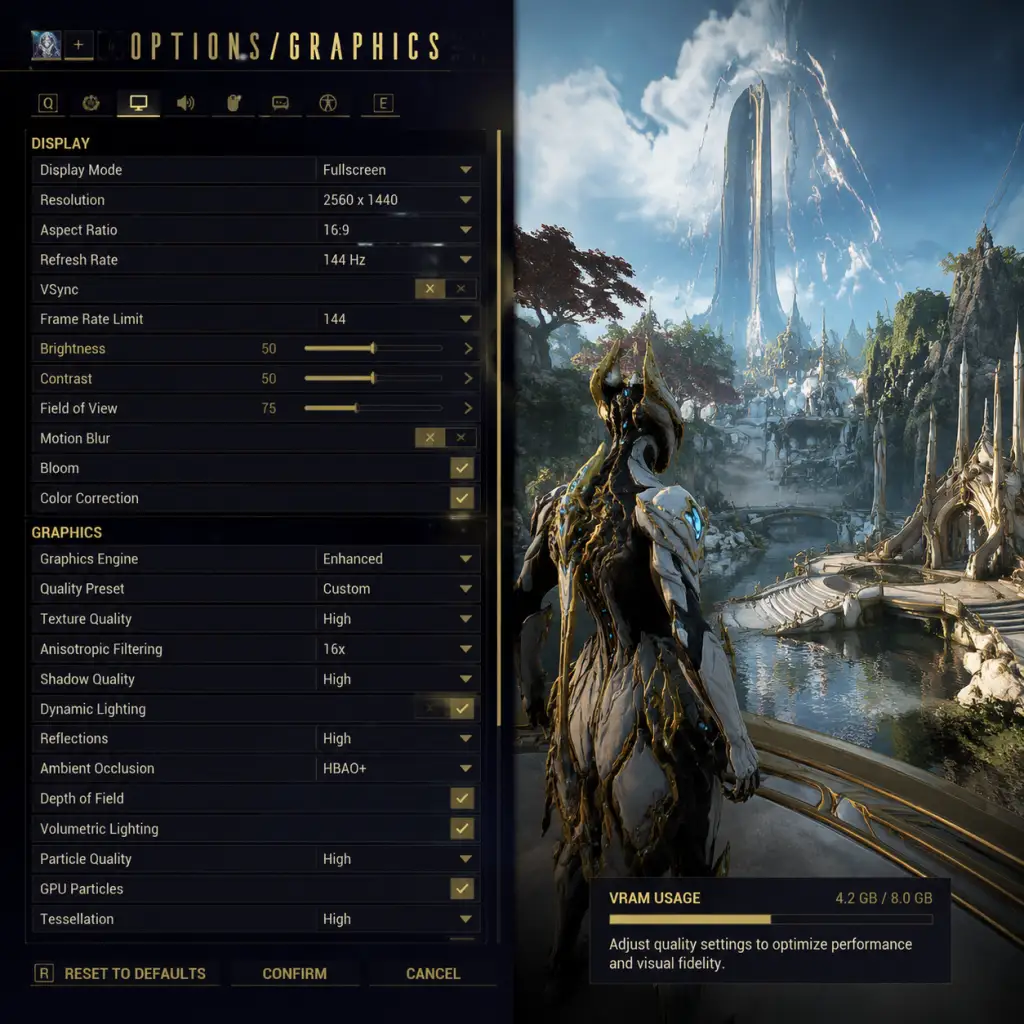
Graphics settings are found under Options > Video.
#### Display & Resolution
- Display Mode: Choose Fullscreen for best performance. Borderless Fullscreen is convenient for alt-tabbing but may introduce input lag on some systems. Windowed is only for troubleshooting.
- Resolution: Set to your monitor’s native resolution. On weaker hardware, lowering resolution (e.g., 1600×900 or 1366×768) yields the largest performance gain.
- Refresh Rate: Match your monitor’s native rate (e.g., 60Hz, 144Hz). Warframe supports high refresh rates.
- VSync: Turn off unless you experience screen tearing. If you must enable it, use Fast VSync (Nvidia) or Enhanced Sync (AMD) if available in your driver.
#### Quality Presets
Warframe offers presets: Low, Medium, High, and Custom. Start with Custom for fine-grained control.
| Setting | Low-End (e.g., iGPU, GT 1030) | Mid-Range (GTX 1060 / RX 580) | High-End (RTX 3070+) | Notes |
|---|---|---|---|---|
| Texture Quality | Low (0.5) | Medium (1.0) | High (2.0) | Uses VRAM; Low reduces crashes on 2GB cards. |
| Shadow Quality | Off | Medium | High | Shadows tank FPS; Off is recommended for competitive play (visibility). |
| Volumetric Fog | Off | Off | On (if FPS >120) | Extremely demanding; minor visual gain. |
| Volumetric Lighting | Off | Low | High | Heavy performance hit; keep Low if above 60 FPS target. |
| Ambient Occlusion | Off | Off | High (SSAO or HBAO+) | Adds depth; costs ~10-15% FPS. |
| Depth of Field | Off | Off | On (cinematic) | Blurs background; harmful for aiming. Keep Off for gameplay. |
| Motion Blur | Off | Off | Off | Always Off – impairs visibility in fast combat. |
| Bloom | Off | Low | On | Can obscure enemies; Off recommended for PvP or serious play. |
| Anti-Aliasing | FXAA | TAA (low) | TAA (high) or SMAA | FXAA is sharpest but jagged; TAA blurs slightly. |
| Particle Quality | Low | Medium | High | Affects ability effects; High can be distracting. |
| Decals | Low | Medium | High | Bullet holes, blood; minimal performance impact. |
| Anisotropic Filtering | 4x | 8x | 16x | Free performance – always set to 16x if possible. |
| Dynamic Resolution | On (target 30–45 FPS) | Off | Off | Automatically lowers resolution to maintain FPS target. Helpful on low-end. |
| Local Reflections | Off | Off | On | Heavy; water effects only. |
| Triple Buffering | On if VSync forced | Off | Off | Only useful with VSync. |
| GPU Particles | Off | On | On | Transfers particle physics to GPU; reduces CPU load. |
| NVIDIA Reflex | N/A | On (if supported) | On + Boost | Reduces input latency. Requires RTX 20xx+ or GTX 900+. |
- Default: 78. Increase to 85–95 for better peripheral awareness. Lower values improve FPS slightly but feel claustrophobic.
- Dynamic Resolution – If enabled, the game may look very blurry in busy scenes. Disable it unless you desperately need frames.
- Motion Blur and Depth of Field – Both are notoriously detrimental to gameplay clarity. Always turn them Off.
- Volumetric Fog – A massive FPS killer in open areas (Orb Vallis, Plains of Eidolon). Keep Off.
- Anisotropic Filtering – Nearly zero performance cost; cranking it to 16x improves distant texture sharpness dramatically. Many players leave it low by mistake.
- Master Volume: 100% (adjust OS volume separately).
- SFX Volume: 100% – all gameplay sounds.
- Music Volume: 50–70% – music is atmospheric but can drown out cues.
- Voice Volume: 100% – operator, lotus, and transmissions.
- Ambient Volume: 80% – background noises; lower to hear footsteps.
- Dialogue Volume: 100% – quest and hub dialogue.
- UI Volume: 50% – button clicks and menu sounds; not critical.
- Use Spatial Audio: On (Windows Sonic / Dolby Atmos / DTS Headphone:X). Essential for directional awareness, especially in stealth or PvP (Conclave).
- Enable Microphone: Off if not using voice chat.
- Input/Output Device: Select your correct audio device.
- Spatial Audio must be enabled in Windows Sound settings (Spatial Sound format) AND in Warframe. Many players miss the Windows side – check both.
- If you experience crackling or audio desync, try lowering the Sample Rate in Windows (24-bit, 44100 Hz) and ensure no other apps use exclusive mode.
- Key Binding: Use the built-in remapping. Important binds to consider:
- Mouse Sensitivity: Start at 10–15 (in-game) with 800 DPI. Adjust for comfortable 180-degree turn in one swipe. Higher sensitivity for twitch aiming in PvP.
- Invert Mouse: Off unless you prefer flight-sim style.
- Controller: If using gamepad, enable Context Action for contextual interactions.
- Controller Type: Auto-detect works for most. Manually set if stick mapping is wrong.
- Vibration: On for immersion, Off for competitive edge (reduces distraction).
- Trigger Dead Zone: Default 0.25. Lower if triggers are too sensitive.
- Aim Assist: On (especially for new players). Off for precise manual aim.
- Button Layout: Customize as needed. Many PC players use keyboard + mouse for Warframe due to ability spam.
- Toggle Sprint – The default hold-to-sprint can cause fatigue. Enable toggle in Controls > Toggle Sprint. Your fingers will thank you.
- Scroll Wheel for Weapon Swap – Some players accidently scroll and swap weapons mid-fight. Consider disabling the scroll wheel for weapon swap and using number keys instead.
- Controller Aim Sensitivity – Default is often too high; lower to 3–5 for better tracking.
- Colorblind Mode: Found under Options > Gameplay > Color Blind Mode. Options: Protanopia, Deuteranopia, Tritanopia. Changes energy colors, minimap icons, and damage numbers. If you have any form of color vision deficiency, enable this immediately – default red/green can be lost in particle effects.
- Subtitle Size: Under Options > Audio > Subtitle Size. Options: Small, Medium, Large. Large is recommended for better readability in cutscenes.
- HUD Scale: Under Options > HUD > HUD Scale. Adjust from 50% to 200%. Useful for 4K monitors where HUD can be tiny.
- UI Opacity: Under Options > HUD > UI Opacity. Default 80%. Increase to 100% for clarity, or reduce for immersion.
- Screen Shake: Under Options > Gameplay > Screen Shake Intensity. Default 100%. Reduce to 0% if you suffer from motion sickness or want maximum stability during explosions.
- Auto-Melee: No native toggle. Use macro software if needed.
- Toggle Crouch: Enable under Controls > Toggle Crouch (instead of hold).
- Colorblind Mode affects energy color – if you have normal vision, leave it Off because it desaturates some elements.
- Screen Shake reduction is highly recommended even without motion sickness – it improves aiming during chaotic moments.
- Text Language: Choose your preferred UI language. Changing this restarts the game.
- Voice Language: Sets voiceover language (e.g., English, French, Japanese). Separate from text.
- Subtitle Language: Defaults to text language. Can be set to a different language for learning purposes.
- Voice and Text languages can be mixed. Some players set text to English but voice to Japanese for the anime appeal. Be aware that not all content is voiced in all languages (older quests may lack Japanese voice).
- Changing voice language requires a restart; plan ahead.
- Region: Choose the closest server region for lowest latency. Options: North America, Europe, Asia, Oceania, South America. Changing requires a restart.
- Port Forwarding: Not set in-game. If you experience constant disconnects, forward UDP ports 4950 & 4955 (official recommendations) on your router.
- UDP Port: Default 4950. Only change if conflict with another service.
- Maximum Transmission Unit (MTU): Leave at 0 (auto). Only adjust if you have a known MTU issue.
- Network Aggressiveness: Default is Medium. Set to High if you have stable wired internet (reduces matchmaking wait times). Set to Low if on Wi-Fi or mobile hotspot to avoid timeouts.
- NAT Punchthrough: Always enabled.
- Ping Limit: Default 350 ms. Lower to 200 ms for better match quality, but you may have longer wait times. Set to 300 if you play from regions with sparse playerbase.
- Voice Chat: Disable if you use third-party chat (Discord). If you use in-game voice, set Push-to-Talk and assign a key.
- Region selection is often misconfigured by players who travel or use VPNs. Always match your actual geographical region for stable connections.
- Ping limit – Setting it too low (e.g., 100 ms) can prevent you from finding any public games in less populated regions. Start with 250 and lower gradually.
- Network Aggressiveness – Setting to High on unstable connections (Wi-Fi) can cause frequent disconnects. Stick to Medium unless you are wired.
- Sprint Interrupts Reload: On by default. Keep On – it prevents accidental reload cancels.
- Auto-Use Key on Press: Off. Having it Off means you hold the interact key; On means a single tap activates. Personal preference.
- Show Damage Numbers: On (recommended for feedback). Off for cleaner HUD.
- Show Status Effects: On (shows debuffs on enemies).
- Show Objective Marker: On.
- Show Ability HUD: On (displays ability timers and energy).
- Minimap Rotation: Rotating (default) or Fixed. Rotating follows your orientation; Fixed is static north-up. Personal preference.
- Screen Shake Intensity: Already covered in Accessibility.
- Color Blind Mode: Already covered.
- Chat Window Duration: Default 8 seconds. Can be extended to 15 for easier reading during combat.
- Auto-Repair Orbital Extractors: Off – do repairs manually only when needed.
- Enable Context Action: On for contextual interact prompts (e.g., Hack console vs Pick up item).
- Pause on Menu: Off (Warframe is online-only; cannot truly pause).
- Show Clan/Guild Invites: On.
- Enable Loot Radar: On – highlights resources and mods through walls.
- Show Tutorials: Off after you complete the tutorial.
- Companion: Show Companion Nameplates – On.
- UI Settings:
- Matchmaking Privacy: Public, Friends Only, Invite Only, Solo. Set to Public for co-op, Solo for farm runs with pause (only real pause in Solo mode).
- Auto-Use Key on Press – Many new players leave it Off and then wonder why they can’t rapidly hack consoles. Set to On for faster interactions.
- Sprint Interrupts Reload – If Off, you can start reloading and sprint without cancelling. However, if you accidentally hit reload while sprinting, it will cancel. Most veterans leave it On.
- Show Damage Numbers – In high-level content with millions of damage, numbers can clutter. Consider turning Off after you’ve learned enemy scaling.
#### Special Attention Points
---
2. Audio Settings
Found under Options > Audio. Proper audio is crucial for detecting enemy footsteps, ability sounds, and environmental cues.
Special Attention:
---
3. Controls Settings
Located under Options > Controls. Warframe supports keyboard & mouse, gamepad (Xbox/PlayStation/Switch Pro), and joysticks.
#### Keyboard & Mouse
- Ability 1–4: Default 1–4. Many players rebind to Q/E/R/F for easier access during movement.
- Melee Attack: Default E (or mouse button). Remap to a side mouse button for smoother flow.
- Sprint: Default Shift. Toggle Sprint recommended to avoid holding shift constantly.
- Roll/Dodge: Default Ctrl/Shift. Remap to a thumb button on mouse if possible.
- Reload: Default R. Keep accessible.
- Use/Interact: Default X.
#### Gamepad (Controller)
#### Special Attention
---
4. Accessibility Settings
Accessibility options are sparse in Warframe but improving.
Special Attention:
---
5. Language Settings
Under Options > Language. Warframe supports multiple text and voice languages.
Special Attention:
---
6. Network Settings
Under Options > Network. Proper configuration reduces lag and disconnects.
Special Attention:
---
7. Gameplay Settings
Under Options > Gameplay.
- HUD Scale: Adjust as per accessibility.
- UI Opacity: 100% for clarity.
- Show Extraction Timer: On.
- Show Ability Prompt: On.
Special Attention:
---
Summary of Optimal Settings by Hardware
| Hardware Tier | Graphics Preset (Custom) | Resolution | Key Tweaks |
|---|---|---|---|
| Low-End (e.g., Intel HD 620, GT 1030) | Textures Low, Shadows Off, Volumetric Fog Off, AA FXAA, Dynamic Res On (target 30 FPS) | 720p or 900p | Disable all post-processing; reflection off; use low particles. |
| Mid-Range (e.g., GTX 1060, RX 580, GTX 1660) | Textures Medium, Shadows Medium, Volumetric Off, AA TAA Low, Dynamic Res Off | 1080p | Keep fog and reflections off; enable NVIDIA Reflex (if Nvidia). |
| High-End (e.g., RTX 3060+, RX 6700 XT+) | Textures High, Shadows High, Volumetric On, AA TAA High, Depth of Field Off, Motion Blur Off | 1440p or 4K | Enable NVIDIA Reflex + Boost; can try ray tracing (if supported, though Warframe has no RT) – instead use highest settings. |
| Console (PS5/XSX) | Dynamic 4K, high-quality shadows, ambient occlusion | 4K (upscaled) | Motion blur off; depth of field off; fov 85. |
| Console (PS4/XO) | 1080p, medium shadows, volumetric fog off | 1080p | Same as low-end PC recommendations. |
| Nintendo Switch | Docked: 720p, low textures, shadows off; Handheld: 720p dynamic | 720p | Reduce effects to minimum; turn off dynamic resolution if blur bothers you. |
| Mobile (iOS/Android) | Graphics options limited; set Quality to Performance | Native | Disable bloom and shadows if available; lock 30 FPS. |
Final Setup Checklist
Before launching into your first mission, verify these settings:
- [ ] Graphics: Motion Blur OFF, Depth of Field OFF, Volumetric Fog OFF, Field of View 85+.
- [ ] Audio: Spatial Audio ON, Music at 50–70%.
- [ ] Controls: Toggle Sprint ON, sensitivity comfortable, keybinds personalized.
- [ ] Accessibility: Subtitle size Large, screen shake 0% (if desired).
- [ ] Network: Region correct, ping limit 250 ms, NAT aggressive High (wired) or Low (Wi-Fi).
- [ ] Gameplay: Auto-Use Key on Press ON, Sprint Interrupts Reload ON, Show Damage Numbers ON.
Taking these five minutes to configure Warframe will drastically improve your gameplay experience and performance. Adjust each setting to your personal preference and hardware, especially the graphics options that are commonly misconfigured (motion blur, dynamic resolution, volumetric fog). Happy hunting, Tenno!