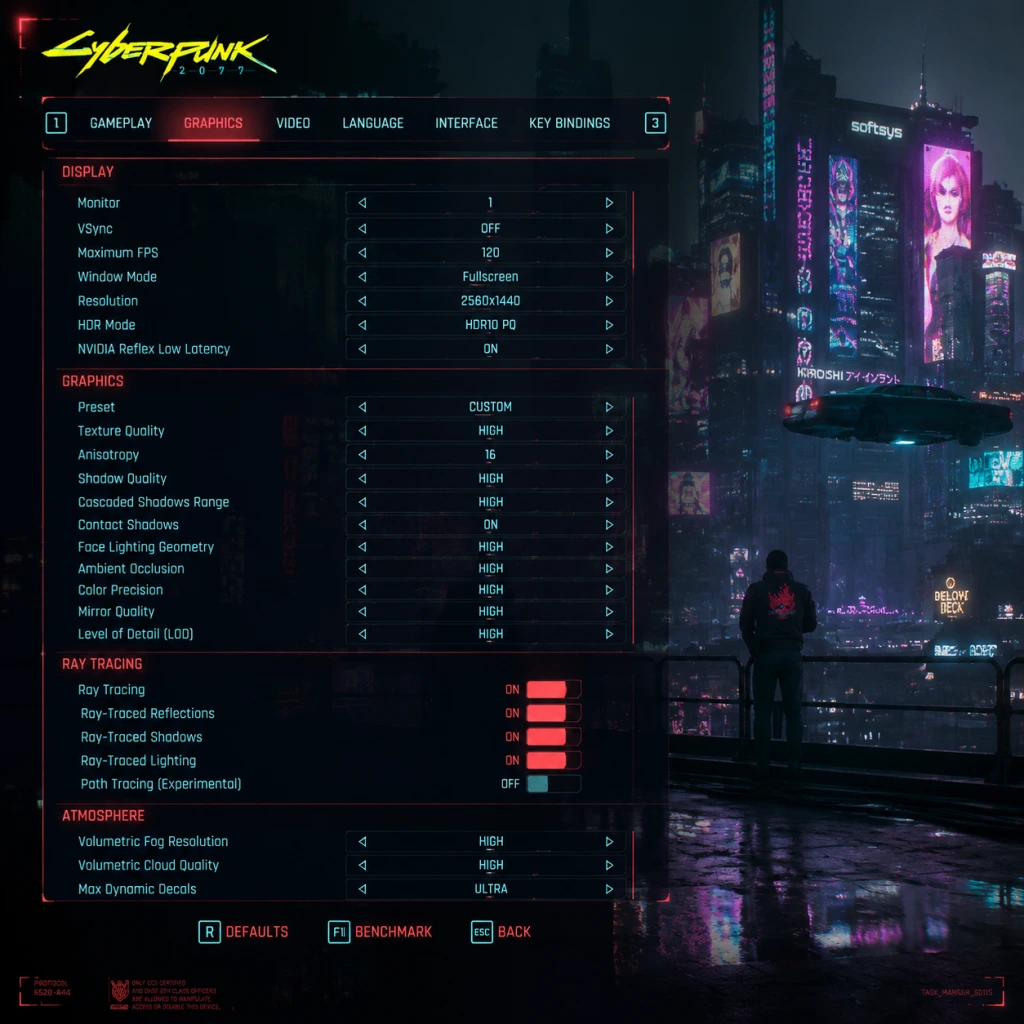
Game Settings
Game Settings Guide for Cyberpunk 2077
This guide covers every major settings category in Cyberpunk 2077: Graphics, Audio, Controls, Accessibility, Language, Network, and Gameplay. We provide recommended configurations for different hardware tiers (Low, Medium, High, Ultra/Ray Tracing) and highlight settings that are frequently misconfigured or need special attention.
---
1. Graphics Settings
Graphics are the most performance-intensive settings. Cyberpunk 2077 supports a wide range of hardware, from legacy GPUs to the latest ray-tracing beasts. Below are the key settings and their impact.
1.1 Quick Presets & Hardware Recommendations
| Hardware Tier | Example GPU / Platform | Recommended Preset | Notes |
|---|---|---|---|
| Low | GTX 1050 Ti / RX 570 / Xbox One / PS4 | Low | Turn off ray tracing, use FSR 2.0+ (Quality) if available. |
| Medium | GTX 1660 Super / RTX 2060 / RX 5600 XT | Medium | Keep ray tracing off. Use DLSS (Quality) or FSR (Quality). |
| High | RTX 3070 / RX 6800 / Xbox Series X | High | Enable ray tracing (low preset for reflections/shadows). DLSS Balanced. |
| Ultra / RT | RTX 4080 / RX 7900 XTX / PS5 (Performance mode) | Ultra + RT Psycho | Full ray tracing (Psycho for reflections, Ultra for shadows/lighting). DLSS Performance or FSR Performance. |
1.2 Critical Graphics Settings Explained
#### Resolution & Scaling
- Resolution: Native 1080p/1440p/4K. Lower resolution for higher FPS.
- Dynamic Resolution Scaling: On consoles, this is automatic. On PC, you can set min/max resolution scales.
- DLSS (NVIDIA) / FSR (AMD) / XeSS (Intel): Crucial for performance. Set to Quality for best image fidelity, Balanced for even gain, Performance for maximum FPS. DLSS 3 Frame Generation (RTX 40 series) can double FPS but adds latency – enable only if your base FPS is 60+.
- RT Reflections: High performance cost. Medium-Reflections is recommended for most AMD GPUs; NVIDIA can handle Ultra/Psy cho.
- RT Lighting: Set to Medium for a good balance. Ultra is very heavy.
- RT Shadows: Low impact, enable if you have spare GPU headroom.
- RT Sun Shadows: Similar to RT Shadows, can be kept off.
- Path Tracing (RT Overdrive): Available only on high-end RTX 40 series. Requires DLSS 3 Frame Generation to playable FPS. Not recommended for competitive or smooth play.
- Field of View (FOV): Default 80°. Increase to 90-100 for better peripheral vision, but may cause VRAM strain. Adjust slowly.
- Volumetric Fog & Clouds: High CPU/GPU cost. Set to Low or Medium on mid-range hardware.
- Screen Space Reflections (SSR): High quality is fine, but Ultra can be heavy. Medium is a good sweet spot.
- Ambient Occlusion (AO): Use Lumen or RT AO if available, else FidelityFX AO (medium/high).
- Crowd Density: Low helps CPU performance, especially in crowded areas like the market. Set to Medium or High on powerful CPUs.
- Texture Quality: High uses 4-6 GB VRAM. Low uses 2 GB. Medium is the default.
- Level of Detail (LOD): Set to Medium or High. Ultra increases pop-in distance but hits VRAM.
- Motion Blur & Depth of Field: Many turn these off for clarity and performance. Disable if you find them nauseating.
- Film Grain & Chromatic Aberration: Purely aesthetic, disable for a cleaner image.
- VSync: Turn off if using G-Sync/FreeSync. Otherwise, enable in fullscreen mode to avoid screen tearing.
- Window Mode: Use Fullscreen for best performance. Borderless Window can cause input lag.
#### Ray Tracing (RT)
#### Other Graphical Settings
1.3 Misconfiguration Pitfalls
---
2. Audio Settings
Audio quality affects immersion and gameplay feedback. Cyberpunk 2077 supports various audio standards.
2.1 Audio Options
| Setting | Recommendation | Notes |
|---|---|---|
| Master Volume | 70-80% | Leave some headroom for dynamic range. |
| Music Volume | 80% | Keeps the iconic soundtrack prominent. |
| SFX Volume | 100% | Critical for combat cues (gunfire, footsteps). |
| Dialogue Volume | 100% | Don't reduce – story is essential. |
| Dynamic Range | Headphones: Small / Speakers: Medium / Home Theater: Large | Misconfigured range can make dialog hard to hear. Use Headphone (Small) for most setups. |
| Audio Quality | High | Uses more bandwidth, no performance hit. |
| Speaker Configuration | Stereo, 5.1, 7.1, or Headphones | Headphones is the safest; don't use 5.1 if you only have stereo speakers. |
| Subtitles | Always on | Large text, optional speaker name. |
| Hearing Impaired Mode | On | Adds visual cues for off-screen sounds. |
2.2 Special Attention Points
- Dynamic Range: Many players complain that dialogue is too quiet compared to explosions. Set to Small (Headphones) – even if you use speakers – to avoid this issue. The 'Large' setting is intended for home theater setups with dedicated center channels.
- Audio Language: If you want the original English voice acting but localized subtitles, set Language to English and text to your language.
---
3. Controls Settings
Controls can be fully remapped on PC and partially on consoles. We recommend the following adjustments for better responsiveness.
3.1 Input Device & Sensitivity
| Setting | PC Recommendation | Console Recommendation |
|---|---|---|
| Mouse Sensitivity | Start at 5, adjust incrementally. | N/A |
| Controller Sensitivity (Horizontal/Vertical) | N/A | 5-7 for both. |
| Invert Y-Axis | Off (unless you're used to it) | Off (toggle if needed) |
| Aim Assist (Controller) | N/A | On (default) – helps with tracking. |
| Look Deadzone (Controller) | N/A | 0.10 – larger deadzone reduces drift but delays response. |
| Mouse Smoothing | Off – causes input lag. | N/A |
| Mouse Acceleration | Off – makes aim inconsistent. | N/A |
| Stick Deadzone (Controller) | N/A | 0.10-0.15 |
3.2 Key Rebinding Tips
- Quickhack Toggle: Bind to a convenient mouse button or a keyboard key (e.g., Q or E).
- Jump: Spacebar is fine, but some prefer Mouse Wheel Down (avoid if you use scroll for weapon swap).
- Crouch/Slide: Ctrl or Left Shift – avoid toggling if you use shift for sprint.
- Vehicle Controls: If you use a controller for driving, consider separate keybindings for vehicles vs on-foot.
- Mouse Smoothing and Acceleration: Both should be OFF for consistent aiming. They are on by default in some PC versions. Turn them off in the .ini file or via the settings menu.
- Raw Input: Ensure "Raw Mouse Input" is enabled (PC only). This bypasses Windows mouse acceleration.
- Controller Vibration: Turn off if you want precise aiming in gunfights.
- Text Size: Small / Medium / Large. Choose Large for easier reading of UI elements.
- HUD Size: Normal / Large. Large reduces UI clutter.
- Colorblind Filters: Deuteranopia, Protanopia, Tritanopia. Apply via Interface > Colorblind Mode.
- Subtitle Background: Enable to improve readability against bright backgrounds.
- High Contrast Mode: Highlight enemies and objects (Interface > High Contrast).
- Controller Scheme: Choose Standard, Southpaw (left-handed), or Custom remap.
- Auto-Equip Weapons: Off (prevents accidental weapon changes during looting).
- Hold vs Toggle Crouch: Toggle is easier on hands.
- Quick Hacks: Enable "Hold to confirm" (in Gameplay > Quickhacks) to avoid accidental hacking.
- Photo Mode Pause: Disable to keep game running during photo mode (default: pause).
- Subtitle Display: Always on, with speaker name and background.
- Audio Language: Separate from subtitle language – useful for learning or preference.
3.3 Misconfiguration Pitfalls
---
4. Accessibility Settings
Cyberpunk 2077 offers several features to accommodate players with disabilities.
4.1 Visual Accessibility
4.2 Audio & Input Accessibility
4.3 Text & Language
---
5. Language Settings
Cyberpunk 2077 supports full localization in multiple languages.
| Setting | Explanation |
|---|---|
| Interface Language | Menus, UI text. |
| Audio Language | Voice acting – English, French, German, Japanese, etc. |
| Subtitles | Text language – can differ from audio. |
| Subtitle Size | Small / Medium / Large. |
| Subtitle Background | On/Off for readability. |
---
6. Network Settings
Cyberpunk 2077 is a single-player game, but it has limited online features (telemetry, photo sharing, cloud saves).
6.1 Network Options
| Setting | Recommendation | Notes |
|---|---|---|
| Enable Telemetry | Off | Sends usage data to CDPR – minor privacy concern. |
| Anonymous Usage Data | Off | Same as above. |
| Automatically Sync Saves (Cloud) | On (if you want cross-progression on multiple devices) | Requires GOG/Steam account. Off for privacy. |
| Allow Photo Sharing | Off | Prevents uploading screenshots to CDPR servers. |
| In-Game Browser | On | Used for some in-game terminals. No performance impact. |
| Mod Support (PC) | On | Enables mod integration via REDmod (if installed). |
6.2 Special Considerations
- Cloud Saves: If you play on PC and console (via cross-save with GOG), ensure cloud sync is on. On console, it's automatic if you're signed into an account.
- Offline Play: Cyberpunk 2077 works fully offline after initial installation. Disable all network features if you have strict data caps.
---
7. Gameplay Settings
These settings affect how the game plays, from difficulty to combat assist.
7.1 Difficulty & Game Rules
| Setting | Description | Recommendation |
|---|---|---|
| Difficulty | Easy / Normal / Hard / Very Hard | Normal for balanced first playthrough. Hard adds bullet sponge enemies. |
| Auto-Loot | Automatically pick up items when near bodies/containers | Off – prevents accidental pickup of junk that crowds inventory. |
| Quickhack Mode | Tap to execute / Hold to confirm | Hold – avoids accidental hacking. |
| Breach Protocol | Manual / Automatic | Automatic – simplifies the hacking minigame. |
| Crowd Density | Affects number of NPCs in hubs | Medium for performance; High for immersion on strong CPUs. |
| Ragdoll Physics | On / Off | On for fun, off to reduce CPU load. |
7.2 Combat & Movement
- Aim Assist (Controller): Set to Standard for fine-tuning. Strong can be too sticky.
- Snap to Cover (Controller): Off – you can manually enter cover by pressing a button.
- Weapon Auto-Recharge (Tech Weapons): Enable – these weapons benefit from automatic charging.
- Mantle Obstacles: On – allows vaulting over low walls.
- Vehicle Camera: Set to Third Person for easier driving (or First Person for immersion).
- Radio Station: Off – to avoid distraction during exploration (tune in when you want atmosphere).
- Minimap Rotation: Off (static north) / On (rotates with camera). Personal preference.
- Compass Display: Always on – helpful for navigation.
- Quest Tracker: On – shows current objective on HUD.
- Damage Numbers: On – helps gauge weapon effectiveness.
- Enemy HP Bars: On – essential for tactical awareness.
- Auto-Loot: New players often leave it on and end up with thousands of trash items, slowing inventory management. Turn it off.
- Difficulty: Very Hard can be frustrating early on due to low damage output. Stick to Normal until you unlock cyberware and perks.
- Quickhack Mode (Tap): You can accidentally hack innocent civilians, causing police aggression. Use Hold mode.
- Profile Your Settings: After changing graphics, run the built-in benchmark (Settings > Graphics > Run Benchmark). It provides a relative performance score and identifies bottlenecks.
- Save & Test: Adjust one group of settings at a time (e.g., only ray tracing) and test in a busy area like the Afterlife or a firefight.
- Console Players: Most graphics settings are locked, but you can still adjust FOV, controls, and accessibility. Use Performance mode for smoother 60 FPS.
- Mods: If you install visual mods, recheck settings – some mods override built-in options.
7.3 HUD & Interface
7.4 Misconfiguration Traps
---
8. Final Advice
Armed with these settings, you can tailor Cyberpunk 2077 to your hardware and playstyle for the best experience in Night City.