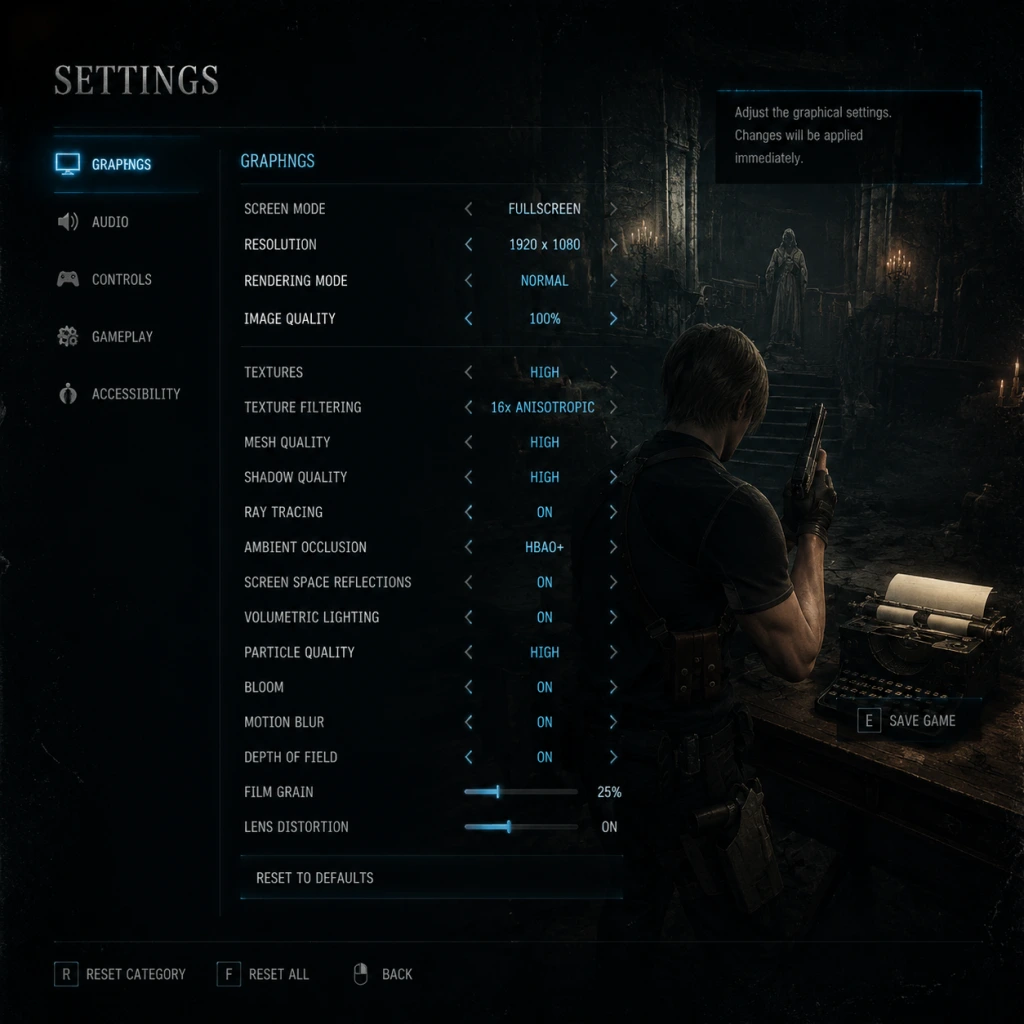
Game Settings
Resident Evil 4 (2023 Remake) – Game Settings Guide
This guide covers all settings for the Resident Evil 4 (2023 Remake) on PC, PlayStation 5, Xbox Series X|S, and PlayStation 4 / Xbox One. The 2005 original has very limited settings; those are noted separately at the end. Settings are grouped by category with optimal recommendations for different hardware tiers and platform-specific quirks.
---
1. Graphics Settings
#### 1.1 Display & Resolution
- Display Mode: Fullscreen (PC) for best performance; Borderless Windowed for quick alt-tabbing (adds slight latency).
- Resolution: Match native monitor/TV. For 1080p, use 1920×1080; for 4K, 3840×2160. On consoles, these are fixed.
- Refresh Rate: Set to max your display supports (e.g., 60Hz, 120Hz, 144Hz). Enable V-Sync if screen tearing occurs; otherwise disable for lower input lag.
- HDR: On supported displays, enables high dynamic range. Calibrate in-game (follow on-screen instructions) – set peak brightness around 800–1000 nits for most HDR TVs.
- Upscaling (PC): Options: FSR 2, FSR 3, DLSS (NVIDIA), XeSS (Intel), or TAAU. For best quality/image fidelity: DLSS Quality (if available) > FSR 2 Quality > TAAU. For performance: DLSS Performance or FSR 2 Performance.
- VRS (Variable Rate Shading): Optional, can boost FPS slightly with minimal visual impact. Enable on mid-range GPUs.
#### 1.2 Quality Presets (PC)
| Preset | Recommended GPU | Expected FPS (1080p) | Notes |
|---|---|---|---|
| Low | GTX 1060 / RX 580 | 60 FPS | Use only for very old hardware; reduces texture quality, shadows, effects. |
| Medium | RTX 2060 / RX 5600 XT | 60 FPS | Good balance; disable ray tracing. |
| High | RTX 3060 / RX 6600 XT | 60 FPS | With ray tracing off. For 1440p, use DLSS/FSR Quality. |
| Ultra | RTX 3070 Ti / RX 6800 | 60 FPS+ | Enable ray tracing: Medium reflections, shadows. Use DLSS Quality at 4K. |
| Max | RTX 4080 / RX 7900 XTX | 60 FPS+ | Ray tracing: High reflections, shadows. Use DLSS Performance at 4K for 60 FPS. |
#### 1.3 Detailed Graphics Options (PC)
- Texture Quality: Low (2GB VRAM), Medium (4GB), High (6GB), Ultra (8GB+). Set as high as VRAM allows without exceeding your GPU's VRAM budget. On 8GB cards, use High to avoid stutters.
- Texture Filtering (Anisotropic Filtering): High (16x) recommended for clarity. Minimal FPS cost.
- Shadow Quality: Low (blocky), Medium, High, Ultra. High is good for most; Ultra is expensive. On low-end GPUs, set to Low.
- Ambient Occlusion (SSAO vs HBAO+): HBAO+ looks better but costs FPS. Use SSAO on medium/low cards.
- Volumetric Lighting: Medium looks fine; High/Ultra reduces FPS noticeably. Turn off on low-end.
- Reflections: Screen Space Reflections (SSR) + Ray Traced Reflections (if enabled). For performance, use SSR only (Medium quality). Ray tracing is heavy – set to Low or Medium only on high-end.
- Ray Tracing: On/Off. Toggle for reflections, shadows, and global illumination. Easy to misconfigure: Enabling ray tracing without sufficient GPU power (RTX 3070 or better) will tank FPS. Recommended: Off on mid-range; Low/Medium on high-end; High only on RTX 4080+.
- Mesh Quality: High recommended. Low reduces detail on distant objects.
- Shader Cache: Pre-caches on launch. Do not skip; may cause stutter during gameplay.
- Motion Blur: Personal preference. Off for clarity; On for cinematic feel. Slight performance hit.
- Depth of Field: Off for competitive multiplayer? Single-player only; on looks good but costs a few FPS.
- Lens Flare / Bloom: Mostly cosmetic; disable for tiny FPS gain.
- VSync: On prevents tearing but adds input lag (1-3 frames). Off on high refresh rate monitors if you can tolerate tearing. Use Fast Sync or G-Sync/FreeSync if available.
- Frame Rate Limit: Set to monitor refresh rate (e.g., 60, 120, 144) or use unlimited. On low-end, cap at 30 or 40 for consistency.
- PS5 / Xbox Series X: Performance Mode (60 FPS, lower resolution ~1080p-1440p with TAA upscaling) vs Resolution Mode (30 FPS, native 4K or higher settings). Ray tracing only available in Resolution Mode on Series X/PS5 (RT reflections at low quality). Some updates added 120Hz/VRR support.
- Xbox Series S: Performance Mode only (60 FPS, ~1080p upscaled). Ray tracing not available.
- PS4 / Xbox One: Fixed 30 FPS, lower textures and shadows. Settings cannot be changed.
- Master Volume: Adjust to taste.
- Music Volume: Sets background music. Recommended 80-100% for atmosphere.
- SFX Volume: Weapon sounds, footsteps, enemies. Keep high (80-100%) to hear combat cues.
- Voice Volume: Dialog and cutscenes. Set to 100%.
- Speaker Configuration: Stereo (TV speakers), 5.1, 7.1 (Surround). Headphones: Stereo with virtual surround (Dolby Atmos for Headphones if supported).
- Audio Output Format: Linear PCM (best), Dolby Atmos, DTS:X. Choose based on your setup.
- Dynamic Range: Wide (more dramatic difference between quiet and loud) or Narrow (compressed). Use Wide for surround sound; Narrow for small speakers/headphones to avoid missing quiet sounds.
- Subtitle Display: On/Off. Recommended On for accessibility.
- Closed Captions: On adds descriptions of sound effects (e.g., "chainsaw revs"). Helpful for hearing difficulties.
- Controller Type: Choose between Type A (default), Type B (inverted shoulder buttons for aiming/shooting), Type C (custom). Most players use Type A.
- Aim Assist (Controller only): On (soft lock-on to enemies) vs Off. Recommended On for beginners; Off for advanced players seeking precise aim.
- Aim Acceleration: Adjusts how fast reticle moves when tilting analog stick. Default is fine; lower for precision, higher for speed.
- Aim Sensitivity (X/Y): Set to a value you're comfortable with. Common range: 3-6 (out of 10). Start at 4.
- Camera Sensitivity (X/Y): Similar to aim. Lower for stable camera during exploration.
- Vibration: On/Off. On adds immersion (feeling gun recoil, footsteps). Off saves battery on wireless controllers.
- Invert Y-Axis: Some players prefer inverted (pushing up looks down). Default is normal.
- Button Mapping: Can rebind almost every action. Useful for accessibility (e.g., change run to L3 if holding X is uncomfortable).
- Keyboard Controls (PC): Default WASD movement, mouse for aiming, scroll wheel for weapon switching. Many players rebind knife to a side mouse button for quick use.
- QTE Type: Hold vs Tap. Hold is easier (just press and hold the button until bar fills). Tap requires repeated presses. Switch to Hold if you struggle with rapid tapping.
- QTE Difficulty: Normal (standard timing) vs Easy (longer windows). Recommended for accessibility or younger players.
- Difficulty: Choose between Assisted, Standard, Hardcore, Professional (and New Game+). Assisted: auto-aim, slower enemies, more resources. Professional: limited saves, harder enemies. Start with Standard for first playthrough.
- Auto-Aim: Separate toggle for controller. On ensures some lock-on. Available only on Assisted/Standard difficulties?
- Colorblind Modes: Protanopia, Deuteranopia, Tritanopia. Adjusts HUD colors (health, ammo, item highlights). Tested well.
- Subtitles & Closed Captions: Already in audio section.
- Text Size: Increase for easier reading on 4K TVs or small screens.
- High Contrast UI: Bright outlines on interactable objects. Helpful for low vision.
- Screen Shake Reduction: Reduces camera shake from explosions or hits. On suggested for motion sickness.
- Button Held vs Toggle: For run/crouch/aim. Hold (required to hold button continuously) vs Toggle (press once to run, press again to stop). Toggle reduces strain on fingers.
- White Knuckle (Xbox) / Tension (PlayStation): Controller trigger resistance for weapons (adaptive triggers). Can be turned off if uncomfortable.
- Stealth Indicator: Shows eye icon when enemies detect you. Useful for stealth approaches.
- Voice Language: English (default), Japanese, French, German, Spanish (Latin American/Castilian), Italian, Portuguese (Brazilian), Russian, etc. Note: Japanese voice syncs to lip movements in Japanese version; otherwise mouths may not match. For the original 2005 version, only English and Japanese are available.
- Subtitle Language: Separate from voice. Choose your preferred reading language.
- Menu Language: Changes all text. For 2023 Remake, supported languages vary by region (full list on Capcom website).
- Audio Text Language: When picking up notes/documents, the voiceover reads them in the selected language.
- Online / Offline Mode: The game is primarily single-player, but you might connect for leaderboards, Mercenaries mode rankings, or automatic updates. Set to Online to sync achievements/leaderboards. Offline for no interruptions.
- Cross-Platform: Not applicable – no multiplayer.
- Login to RE NET (Capcom ID): Optional. Links your game to Capcom's community site for stats, challenges, and rewards (e.g., costume unlock). Requires internet. If you don't want to, skip.
- Update Check: Game checks for updates on start. Recommended to enable for bug fixes and new content (e.g., Separate Ways DLC).
- Data Sharing: For analytics. Can be disabled.
- Auto-QTE: Automatically succeeds simple QTEs (like opening doors) when turned on. Off for manual control; on if you find QTEs tedious.
- Attaché Case Auto-Sort: When enabled, items automatically rearrange to fill gaps when you combine/open cases. Disable for manual sorting (tactical placement).
- Weapon Auto-Equip: On – automatically equips the best weapon for a situation? Not exactly; it's more for quick switching from case. Toggle off if you want to keep current weapon.
- Quick Turn Sensitivity: How fast you can 180° turn. Adjust to taste.
- Aim Weapon While Moving: Default: On (you can aim and walk slowly). Set to Off to lock movement while aiming (more classic Resident Evil feel).
- Camera Auto-Center: Automatically recenters camera behind Leon after aiming. On feels smoother for most; off gives more freedom.
- Camera Distance: Set further back for wider view (recommended default).
- Auto-Pickup Ammo: Automatically picks up ammo when walking over it. On reduces manual input; off forces you to press a button (can accidentally pick up unwanted items).
- Knife Durability Indicator: Shows remaining durability on HUD. On for planning melee attacks.
- Parry Timing Window: In the remake, perfect parry window can be adjusted? Actually no separate slider; but you can adjust difficulty (affects enemy damage and parry window size). So difficulty indirectly affects parry ease.
- Adaptive Trigger (PS5) / Impulse Trigger (Xbox): On adds resistance when using weapons. Off if you find it tiring.
- Chat / Voice Chat: Not applicable.
- Auto-Save Frequency: The game autosaves at checkpoints, chapter transitions, and some key events. You can also manually save at typewriters. No setting to change frequency, but you can adjust difficulty to affect autosave intervals? Not directly.
- Save Slots: You can have multiple saves. Use different slots for different difficulties or branching choices (e.g., before boss fights).
- Profile / Player Name: Not required; but on PC, your Steam/EGS name is used.
- Graphics: Very limited: Resolution (640×480, 800×600, 1024×768), Texture Quality (Low/High), Shadow Quality (Low/High), Anti-Aliasing (Off/On). Recommended: max resolution for your display, High textures, High shadows, AA On.
- Audio: Volume sliders only.
- Controls: Fixed control scheme (Type A, B, C). Aim assist toggle for controller. No remapping.
- Language: English/Japanese only. Subtitles can be toggled.
- Network: No online features.
Special attention: The VRAM usage bar at the top of the settings screen is critical – do not exceed your GPU's VRAM, or you'll experience stuttering and crashes. If the bar is yellow/orange, reduce texture quality or resolution.
#### 1.4 Console Graphics Options
---
2. Audio Settings
Easy to misconfigure: Dynamic Range set to Wide on TV speakers can make dialogs too quiet. If you struggle to hear conversations over ambient sound, set to Narrow.
---
3. Controls Settings
#### 3.1 Controller / Keyboard Layout
Special attention: Aim Assist is easy to misconfigure – if you find aiming sticky or fights too easy, turn it off. Conversely, if you miss shots frequently, enable it.
#### 3.2 Quick Time Events (QTE)
---
4. Accessibility Settings
---
5. Language Settings
Easy to misconfigure: If you accidentally set voice to a language you don't understand, you may miss crucial story cues. Verify before starting.
---
6. Network Settings (PC & Consoles)
---
7. Gameplay Settings
Special attention: Attaché Case Auto-Sort can be annoying if you organize items in a specific order (e.g., healing items top row, ammo bottom). Turn it off to keep your layout.
---
8. Saving & Profile Settings
---
9. Settings Specific to Resident Evil 4 (2005 Original)
---
10. Optimal Settings Quick Reference (PC 2023 Remake)
| Hardware Tier | Resolution | Preset | Ray Tracing | Upscaling | Target FPS |
|---|---|---|---|---|---|
| Low (GTX 1060) | 1080p | Low | Off | FSR 2 Balanced | 60 |
| Mid (RTX 2060) | 1080p | Medium | Off | FSR 2 Quality | 60 |
| High (RTX 3060 Ti) | 1440p | High | Off | DLSS Quality | 60 |
| Ultra (RTX 4080) | 4K | Max | Medium | DLSS Performance | 60 |
| Enthusiast (RTX 4090) | 4K | Max | High | DLSS Quality | 60-90 |
---
11. Troubleshooting Common Setting Issues
- Game crashes on startup: Reset graphics settings to Low, disable ray tracing, verify integrity of game files (Steam/EGS).
- Stuttering during gameplay: Check VRAM usage; reduce texture quality. Also, disable VRS if enabled. Ensure shader cache completed.
- Audio desync: Set audio output format to Linear PCM (if available). Lower speaker configuration to Stereo.
- Controller not working: On PC, ensure Steam Input is enabled (if using Steam) or use Xbox/PlayStation native driver. For PS5 controller, use wired mode for best compatibility.
- HDR looks washed out: Calibrate HDR in-game; ensure Windows HDR is on (Win+Alt+B to toggle). On console, check TV HDR settings (use Game mode).
---
This guide should help you fine-tune Resident Evil 4 for your hardware and preferences. Always test settings in the village area (first combat encounter) to gauge performance and adjust accordingly. Save your changes before diving into the main game.