Getting Started
Introduction
Welcome to Baldur's Gate 3! As a brand-new player, you're stepping into a vast RPG that rewards creativity, patience, and curiosity. This guide will help you survive your first hour, avoid common traps, and set you up for a smooth adventure. We'll cover character creation, controls, UI, early objectives, and a crash course in what not to do.
Character Creation
The first 10–15 minutes are spent building your hero. Don't worry – you can respec later (after meeting Withers in the Dank Crypt). Choose what feels fun, not what seems "optimal."
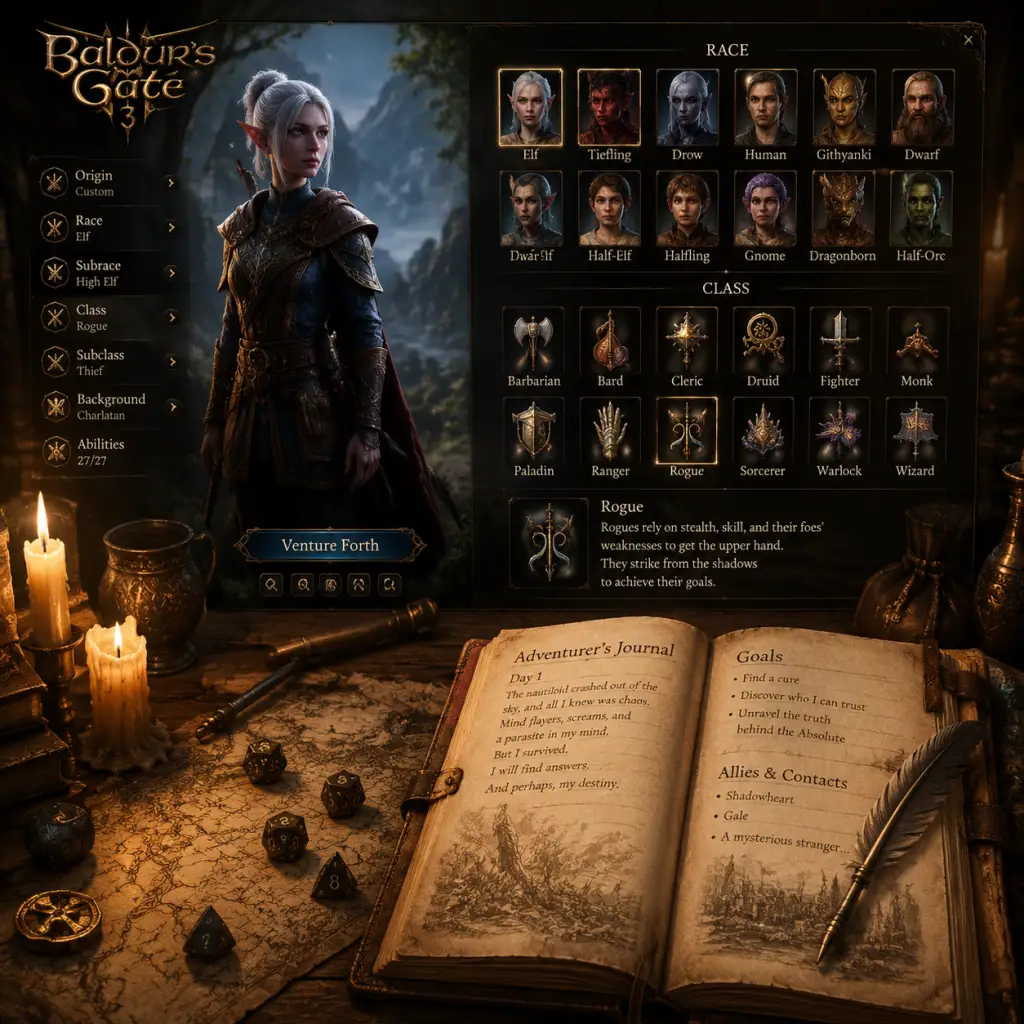
Step 1: Choose Origin or Custom
- Origin Characters have predefined backstories, quests, and voice acting. Strong for roleplay. Examples: Shadowheart, Astarion, Gale.
- Custom Character gives full freedom over race, class, appearance. Best for first-time players who want to learn at their own pace.
- Races provide bonuses (e.g., Half-Elf gets darkvision and charisma).
- Subraces add flavor: Wood Elf gets stealth, High Elf gets a cantrip.
- Tip: Darkvision (ability to see in the dark) is extremely useful – pick a race that has it (Dwarf, Elf, Half-Elf, Tiefling, Drow).
- Fighter – simplest melee class, great for beginners.
- Cleric – healer and support, can wear heavy armour.
- Wizard – powerful but needs intelligence and careful spell management.
- Rogue – sneaky, good for traps and dialogue.
- Warlock – strong cantrips and short-rest spells.
- Our recommendation: Start with a Fighter (Battle Master or Champion) or a Cleric (Life Domain) to learn the ropes.
- Background gives skill proficiencies (e.g., Soldier gives Athletics and Intimidation).
- Pick one that matches your character concept – no wrong choice.
- Use the "Point Buy" system or the default array (easier).
- Prioritize your class's main stat: Strength (Fighter), Charisma (Warlock), Dexterity (Rogue).
- Don't dump Constitution – it affects hit points and concentration.
- Cosmetics are permanent without mods, but you can change appearance later via magic mirror in camp (after patch 3).
- Choose a name and confirm.
- You're aboard a Mind Flayer Nautiloid. The ship is crashing.
- Follow the tutorial prompts: move with WASD (PC) or left stick (console).
- Press Space (PC) or X (PlayStation) / A (Xbox) to interact.
- You wake up on the beach (Wilderness area).
- Loot everything: pick up crates, barrels, bodies – all have useful items (camp supplies, gold, weapons).
- Find companions: Shadowheart is nearby (on the beach). Rescue her from the pod by interacting with the console. She joins your party.
- Explore the ruin: to the north is a ruined temple. Inside, you can find Lae'zel (Githyanki warrior) trapped in a cage. Free her by shooting the lock (use ranged weapon) or dialogue.
- Collect the first waypoint: activate the “Roadside Cliffs” waypoint to fast travel later.
- Your party has 2–3 members now. Stick together.
- Don't rush into fights. Use stealth (press C on PC, hold down on d-pad on console) to scout.
- First enemies: weak intellect devourers and imps. Kite them one by one.
- Rest often: Press T (PC) or open the camp menu to take a short rest (heals some health). Long rest (full heal and restore spells) at a campfire or bedroll.
- Save frequently: F5 quick save (PC) or manual save in menu (console). Save before every major decision.
- Head northwest from the crash site. Follow the road. You'll encounter a gate guarded by tieflings.
- Dialogue options: be polite – no need to fight.
- Enter the Grove: this is your first safe hub. Don't attack anyone here except the tiefling who provoked you (but avoid it).
- Meet Zevlor (tiefling leader) – accept his quest to find a druid healer.
- First major objective: Find Halsin (druid) or help the tieflings.
Step 2: Select Race and Subrace
Step 3: Pick a Class
Step 4: Choose Background
Step 5: Assign Ability Scores
Step 6: Appearance and Finalize
First Hour Walkthrough
Starting Cinematic (0–5 min)
Escape the Ship (5–15 min)
1. Wake up in a pod. Use the console to open the door.
2. Find a weapon – there's a sword on a corpse near the starting room.
3. Meet Commander Zhalk – you can ignore him or fight. Avoid fighting him as a beginner; he's tough. Just run past.
4. Unlock the helm – use the Transponder (a glowing lever) at the ship's helm after a small puzzle. Or attack the intellect devourers.
5. Use the Transponder – a cutscene triggers. You crash-land.
Crash Site (15–30 min)
Early Combat & Survival (30–45 min)
Reach the Druid Grove (45–60 min)
Controls on All Platforms
PC (Keyboard + Mouse)
| Action | Key |
|---|---|
| Move | WASD |
| Interact | E |
| Jump | Space |
| Shove | F |
| Hide/Crouch | C |
| Select all party | Backspace |
| Quick save | F5 |
| Quick load | F8 |
| Open inventory | I |
| Open journal | J |
| Open map | M |
| Open character sheet | C (hold) or K |
| Short rest | T |
| Long rest | L (in camp) |
| Switch character | Tab or click portrait |
| Group/ungroup | G |
| Use consumable | Drag to hotbar or right-click |
PlayStation 5
| Action | Button |
|---|---|
| Move | Left stick |
| Camera | Right stick |
| Interact | X |
| Jump | Triangle |
| Shove | Circle (hold) |
| Hide | Down on d-pad (hold) |
| Quick menu | L1 |
| Wheel of actions | R2 |
| Open inventory | Touchpad (left) |
| Open map | Touchpad (right) |
| Journal | Options button |
| Short rest | L1 + Square |
| Long rest | R1 (in camp) |
| Switch character | L2 + D-pad up/down |
| Group/ungroup | L1 + Triangle |
Xbox Series X|S
| Action | Button |
|---|---|
| Move | Left stick |
| Camera | Right stick |
| Interact | A |
| Jump | Y |
| Shove | B (hold) |
| Hide | Down on d-pad (hold) |
| Quick menu | LB |
| Wheel of actions | RB |
| Open inventory | View button (left) |
| Open map | Menu button (right) |
| Journal | Options button |
| Short rest | LB + X |
| Long rest | RB (in camp) |
| Switch character | LT + D-pad up/down |
| Group/ungroup | LB + Y |
UI Overview
Main HUD Elements
- Top left: Party portraits – click to select a character. Right-click for additional commands.
- Top center: Mini-map with fog of war.
- Bottom center: Action bar – your equipped weapons, spells, items, and cantrips. Drag items here for quick use.
- Bottom left: Hotbar for consumables (potions, scrolls). Press number keys (PC) or use D-pad (console).
- Bottom right: End turn (in combat) and camera controls.
- Right side: Character status (health, conditions, buffs/debuffs).
- Turn order shows at the top of the screen. Each character has an icon with initiative number.
- Action Points (green circle) – you have one action and one bonus action per turn. Movement (yellow circle) is separate.
- Spell slots (blue diamonds) – shown under character portrait during casting.
- Tooltips: Examine enemies with right-click (PC) or hold R3 (console) to see resistances, immunities, and lore.
- Dialogue wheel (PC) shows choices; console uses radial menus.
- World tooltips: hover over objects (chests, levers, loot) to see names and interact prompts.
- Distance indicator: a yellow outline when you're close enough to interact.
- Loot everything – even rotten food (can be turned into camp supplies).
- Talk to every NPC – they give quests, lore, or hints.
- Save often – especially before dialogue checks (F5 on PC, manual save on console).
- Use short rests – free healing after every combat.
- Examine enemies before attacking to see weaknesses.
- Explore off the main path – hidden treasures and optional bosses await.
- Upgrade gear – buy or find better weapons/armor. Check traders.
- Manage inventory – sell junk, keep potions, scrolls, and camp supplies.
- Attacking neutral NPCs – like the tieflings, druids, or guards. Entire factions can become hostile.
- Fighting higher-level enemies – skull icons on enemy portraits mean they outlevel you. Run away.
- Skipping long rests – you'll miss companion scenes and camp events. Rest after every big fight or story beat.
- Ignoring camp supplies – you need 40 total to long rest. Pick up food, alcohol, and supply packs.
- Selling magical items – many have unique uses or are needed for quests. Check before selling.
- Standing in fire / acid – environmental hazards hurt. Use jump (Space) to avoid.
- Forgetting to heal – use Healing Word (cleric), potions, or short rests.
- Regretting class choices – you can respec at Withers for 100 gold (any time after Dank Crypt).
Combat UI
Navigation & Interaction
Essential Early Objectives
1. Survive the Nautiloid – escape the crash.
2. Assemble a party – recruit Shadowheart, Lae'zel, and eventually Gale, Astarion, and Wyll.
3. Reach the Druid Grove – to get quests, traders, and a safe camp.
4. Find a healer – talk to Nettie (druid) about your tadpole infection, or follow Halsin's quest.
5. Unlock fast travel waypoints – each activates a teleport point for quick movement.
6. Visit the Dank Crypt (west of crash site) – loot useful items and meet Withers (who can resurrect dead party members for a fee).
7. Long rest at camp – triggers story events and companion dialogues.
8. Learn lockpicking – find a set of thieves' tools and use Astarion or a rogue to open chests.
9. Complete side quests – rescue the artist's wife (in the Grove), help the tieflings, etc.
10. Kill the goblins outside the Grove – optional but gives good loot and experience.
What to Do First and What to Avoid
✅ Do First
❌ What to Avoid
Early Resource Priorities
| Resource | Priority | Why & How |
|---|---|---|
| Gold | High | Buy gear, respec, resurrect companions. Loot corpses, sell unwanted items, complete quests. |
| Camp Supplies | High | Needed for long rest. Collect food, drink, barrels. |
| Healing Potions | High | Emergency heal. Found in crates, dropped by enemies, bought from traders. |
| Thieves' Tools | Medium | Required to unlock chests and doors. Pick up from dead goblins or buy. |
| Poison & Acid Vials | Low | Useful for combined attacks (throw at enemies). But not essential early. |
| Scrolls | Medium | Powerful one-time spells. Keep for tough fights or utility (e.g., Misty Step). |
| Arrows & Bolts | High if ranged | Ranged characters need ammo. Loot from archers. |
| Lockpicks | High | Same as Thieves' Tools – needed for exploration. |
| Potions of Speed | Very High | Rare but incredible – give an extra action for 3 turns. Use sparingly. |
Common Beginner Mistakes
1. Not saving – death or failed dialogue can cost hours. F5 is your best friend.
2. Neglecting long rests – you need them to recover all spell slots, hit dice, and advance companion stories. Don't be afraid to rest.
3. Wasting spell slots on out-of-combat heals – use short rests first, then potions, only then spells.
4. Charging into fights – use stealth, set ambushes, separate enemies with ranged pulls.
5. Not using consumables – scrolls, potions, grenades, and arrows are powerful. Hoarding is common; use them liberally.
6. Ignoring the environment – high ground gives attack bonuses. Chasms can insta-kill enemies if shoved. Explosive barrels can be shot.
7. Selling everything – keep at least one copy of each unique item. Some are needed for quests later.
8. Overlooking the camp chest – your party has a shared stash in camp (the glowing chest). Transfer items there to free inventory.
9. Not talking to all companions – you can recruit up to 4 in the first hour. Talk to everyone at camp.
10. Rushing the main quest – take your time. The game scales with your level, and side content is rich.
Day-One Checklist (First Play Session)
Aimed at completing before you reach the Goblin Camp or level 4.
- [ ] Complete character creation (custom or origin).
- [ ] Escape the Nautiloid (win the tutorial).
- [ ] Rescue Shadowheart on the beach.
- [ ] Loot the crash site (beach, dead thralls, crates).
- [ ] Free Lae'zel from the cage near the ruin.
- [ ] Explore the Dank Crypt (locate at X:-100, Y:380 on map). Enter, find Withers’ tomb, avoid traps.
- [ ] Recruit Gale (appears at the ruined temple).
- [ ] Recruit Astarion (beneath the stone arch near the beach).
- [ ] Reach the Druid Grove – activate its waypoint.
- [ ] Talk to Zevlor (tiefling leader) and Nettie (druid healer).
- [ ] Take a long rest at the Grove camp – triggers dialogue.
- [ ] Complete one side quest (e.g., rescue the tiefling kid, or explore the Underdark entrance).
- [ ] Upgrade gear – buy a decent weapon from the druid vendor (Dammon).
- [ ] Save the game (manual save before moving to the next area).
- [ ] Have fun! And remember: save often, experiment, and embrace failure as part of the story.
> Pro Tip: Explore every building, cave, and corner of the map. Some of the best items are hidden in plain sight. Good luck, adventurer!