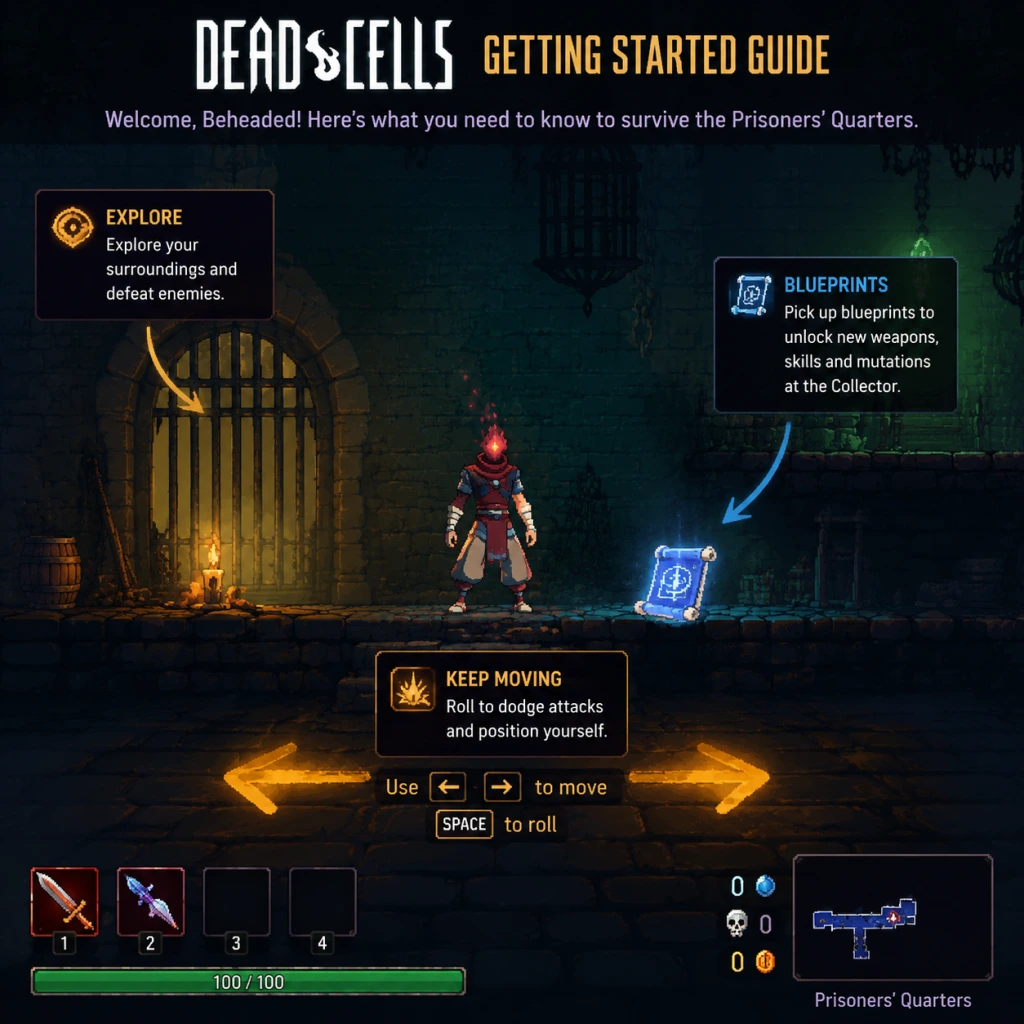
Getting Started
Dead Cells: Complete Getting Started Guide for New Players
This guide is designed to help brand-new players survive their first hours in Dead Cells. No prior roguelike or metroidvania experience is required. We’ll cover everything from controls and UI to what to do (and avoid) during your first hour, plus a day-one checklist.
---
1. First Hour Walkthrough – What to Expect
Dead Cells begins with your character – the Prisoner – awakening inside a dungeon. There is no character creation; you control a nameless, shambling corpse that grows stronger through each run.
Your first run (0–10 minutes):
1. Movement & Basic Combat – Start in the Prisoners' Quarters. Move right, slash enemies with your starter sword, and dodge their attacks. You’ll quickly find a bow (ranged weapon) and a shield. Try both.
2. First Scroll of Power – Around the first few rooms you’ll see a glowing scroll. Pick it up – this permanently increases your damage with a specific color (Brutality/red, Tactics/purple, Survival/green). Choose the color that matches your main weapon for now.
3. First Teleportation Rune – After a few biomes you’ll encounter a rune that lets you teleport between certain platforms. It’s required for progression.
4. First Boss (The Concierge) – Usually reached after 20–30 minutes if you’re efficient. He’s slow, has a charge attack, and a fire wave. Dodge, don’t block.
5. Death – You will die. That’s normal. When you die, you return to the starting area but keep any Cells (blue currency) and blueprints you collected.
After death (10–20 minutes):
- Spend Cells at the Collector (the giant head in the start area). Prioritize health flask upgrades and permanent stat boosts.
- If you found a blueprint, take it to the Collector to unlock that item for future runs.
- Re-enter the Prisoners' Quarters and continue exploring.
---
2. Controls (All Platforms)
Dead Cells uses a standard action-platformer layout. Key mapping can be customized in Settings.
| Action | PC (Keyboard) | PlayStation | Xbox | Switch |
|---|---|---|---|---|
| Move | A / D or Arrow Keys | Left Stick | Left Stick | Left Stick |
| Jump | Space | Cross (X) | A | B |
| Roll / Dodge | Shift | Circle (O) | B | A |
| Attack (Main Weapon) | Left Mouse Click | R1 | RB | R |
| Attack (Secondary) | Right Mouse Click | R2 | RT | ZR |
| Interact / Pick Up | E | Triangle (Y) | Y | X |
| Use Skill 1 | Q | L1 | LB | L |
| Use Skill 2 | R | L2 | LT | ZL |
| Use Health Flask | 1 | D-Pad Up | D-Pad Up | D-Pad Up |
| Switch Weapon | Scroll Wheel | D-Pad Left/Right | D-Pad Left/Right | D-Pad Left/Right |
| Pause / Map | Esc | Options | Menu | + |
---
3. UI Overview
Your screen is packed with information. Here’s a breakdown:
- Health Bar (top left): Your current HP. Next to it, the number of health flask charges (flasks refill at safe spots).
- Gold & Cells (top center): Gold (gold coins) for shops/rerolls; Cells (blue orbs) are spent for permanent upgrades.
- Weapon Slots (bottom center): Two weapon slots (main & secondary). Active skills (two) are below the health bar.
- Mutations (bottom left): Active passive buffs (up to three). You can change them between biomes.
- Map (top right, toggle with Esc/Start): Shows explored rooms, secrets, and locked doors.
- Enemy Health Bars (above enemies): Shows remaining HP; larger enemies have more segments.
- Scroll Count (bottom right): The number of Power Scrolls you’ve collected this run (determines your damage).
- Combo Meter (center, below health): Disappears quickly; maintain hits to deal bonus damage.
- Explore every room – Dead Cells rewards exploration: treasure, scrolls, hidden walls, and lore rooms.
- Pick up every Power Scroll – These double your damage for a specific color. Commit to one color early (e.g., Brutality if using melee).
- Use your shield – A perfect parry (tap block just before hit) stuns enemies and negates damage. Practice on weak foes.
- Spend Cells every run – Even if you die, Cells you collected are saved. Always visit the Collector before starting a new run.
- Learn enemy attack patterns – Each enemy has a tell. Watch their wind-up animation before dodging.
- Heal sparingly – Health flasks are limited. Only heal when you’re about to die or before a tough fight.
- Don’t hoard Cells – Spending them on permanent upgrades is better than dying with a full wallet. You lose nothing by spending.
- Don’t spread your scroll colors – Putting points into multiple colors makes you weak in all. Pick one and stick with it (e.g., all red for Brutality).
- Don’t ignore the map – Getting lost wastes time. Check the map frequently for missed doors or paths.
- Don’t skip biome exits – Each biome has an exit to the next area. Don’t backtrack too much.
- Don’t use cursed chests early – Opening them gives a powerful item but curses you (die in one hit for 10 kills). Avoid until you’re comfortable.
- Don’t run into unknown rooms – Peek around corners to avoid ambushes.
---
4. Essential Early Objectives (Your First Few Runs)
Do not worry about beating the final boss. Focus on these milestones:
1. Unlock the Vine Rune – Found in the Promenade of the Condemned. Allows you to climb vine-covered walls. Opens many new paths.
2. Unlock the Teleportation Rune – Found in the Toxic Sewers or Ramparts. Lets you teleport between blue doors.
3. Unlock the Ram Rune – Found in the Graveyard. Lets you break cracked floors.
4. Reach and Defeat the Concierge – The first boss. Drops a boss cell (difficulty enhancer) and a blueprint.
5. Upgrade your Health Flask – Spend 20 Cells to get a second charge. Later, 50 Cells for a third, etc.
6. Unlock 2–3 useful weapons – Prioritize swords, bows, and shields with good synergy.
---
5. What to Do First (Golden Rules for New Players)
---
6. What to Avoid (Common Beginner Mistakes)
---
7. Early Resource Priorities
Your primary currencies are Cells and Gold. Here’s how to spend them effectively:
| Resource | Priority Use | Why |
|---|---|---|
| Cells | 1. Health Flask upgrades | More heals = longer runs |
| Cells | 2. Permanent weapon/ability unlocks | Expand your arsenal |
| Cells | 3. Stat-boosting upgrades (e.g., +damage) | Eventually needed, but flask first |
| Gold | 1. Rerolling weapon modifiers at the Blacksmith | Better affixes (e.g., +poison damage) |
| Gold | 2. Buying new weapons from shops | Only if you have a weak loadout |
| Gold | 3. Health potion refills | Rarely needed early; save gold |
---
8. Common Beginner Mistakes (Detailed)
1. Ignoring Mutations – Mutations are passive bonuses that can drastically change combat. Early on, try:
- Ygdar Orus Li Ox – Revive once after death (only active if you haven’t used a mutation slot).
- Kill Rhythm – Faster attack speed after a dodge.
- Recovery – Heal a portion of damage taken (works with flask too).
2. Not Using the Parry – Parrying is not required but makes many enemies trivial. Spend 5 minutes in the first biome just parrying basic enemies.
3. Rushing Through Biomes – Dead Cells punishes speed. Take your time, clear rooms, and gather scrolls.
4. Forgetting to Change Mutations – Before entering a new biome, you can swap mutations at a “Mutation Station” (found at the start of most biomes). Adjust based on upcoming enemies (e.g., use “Counterattack” against bosses).
5. Not Breaking Secret Walls – Look for cracked walls or suspicious patterns. Use a roll or explosion to break them for loot.
---
9. Day-One Checklist
Complete these tasks within your first few runs (1–2 hours of play):
- [ ] Complete your first full run to the Concierge (even if you die).
- [ ] Unlock the Teleportation Rune (from Promenade of the Condemned).
- [ ] Unlock the Vine Rune (from Toxic Sewers or Ramparts).
- [ ] Spend 20 Cells to upgrade your health flask to 2 charges.
- [ ] Unlock two weapons from the Collector (e.g., a sword and a bow).
- [ ] Successfully parry at least 10 enemy attacks.
- [ ] Collect at least 5 Power Scrolls in one run (any color).
- [ ] Explore the “Clock Tower” biome (unlocked after getting a rune).
- [ ] Change your mutations at a station at least once.
- [ ] Save and quit properly (option in pause menu) – the game saves even mid-run.
Pro Tip: Don’t get discouraged by death. Each run makes you stronger permanently. The first boss kill may take 5–10 attempts. It’s normal.
---
10. Final Advice
Dead Cells is about learning through failure. Every death teaches you an enemy pattern, a route, or a weapon combo. Focus on having fun with the fluid movement and combat. Once you unlock a few permanent upgrades and runes, the game opens up dramatically. Good luck, and don’t forget to roll!