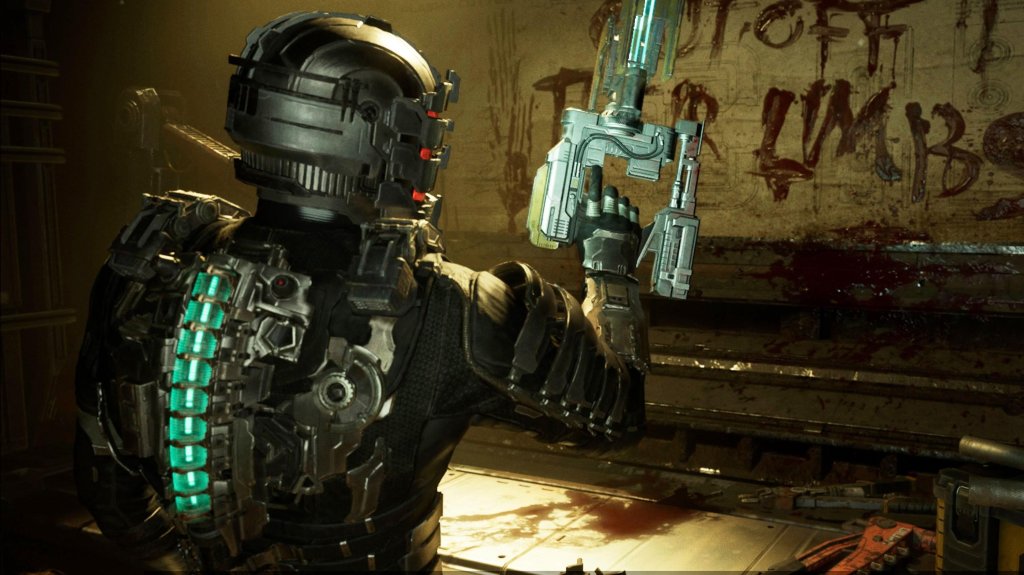
Core Gameplay
Overview
Dead Space (2023 Remake) is a third-person survival horror game focused on strategic dismemberment, resource management, and atmospheric exploration. You play as Isaac Clarke, an engineer stranded on the infested USG Ishimura. The core gameplay loop is simple: explore→survive→upgrade→progress. Combat is deliberate, requiring you to sever Necromorph limbs rather than aim for the head or center mass. Progression is linear but with moderate backtracking and optional areas. Upgrades are tied to nodes, credits, and schematics. There is no traditional leveling system; growth comes from weapon upgrades, suit upgrades, and acquiring new tools (Stasis, Kinesis, weapons). Endgame offers New Game+ and a Chapter Select for cleanup.
This guide breaks down the gameplay into four tiers based on typical player progression: Early Game (Chapters 1–3), Mid Game (Chapters 4–8), Late Game (Chapters 9–11), and Endgame (Chapter 12 + New Game+). For each tier we cover gameplay loop, combat, interaction systems, progression, exploration, missions, economy, and character growth.
---
Early Game (Chapters 1–3)
Main Gameplay Loop
The early game establishes the survival horror rhythm. You enter a new area (e.g., the Hangar Bay or Medical Deck), explore corridors for supplies (ammo, credits, health packs, nodes), fight small groups of Necromorphs (Slashers, Leapers), solve simple puzzles (use Kinesis to move objects, use the Locator to find objective), and then proceed to the next objective marker. Resources are scarce; you will often have to decide whether to buy a node or save credits for a weapon schematic.
Combat / Interaction Systems
- Plasma Cutter (starting weapon): Best for early game. Fire horizontally to sever arms, legs, and tentacles. Requires 2-3 shots to kill a Slasher. Aim for limbs to conserve ammo.
- Kinesis (acquired Chapter 1): Pick up environment objects (pipes, explosive canisters) and launch them at enemies. Use to grab faraway items or solve puzzles (e.g., pull a crate to reach a vent).
- Stasis (acquired Chapter 2): Slows enemies down. Use on fast enemies (Leapers) or in tough situations. Recharge stasis at certain stations or find stasis packs.
- Melee: Stomp (alt-fire on controller) to crush fallen enemies. Use stomp to break containers and loot. Melee attacks are weak; avoid using in combat except for finishing off downed Necromorphs.
- Zero-Gravity (first encountered Chapter 3): Jump from platform to platform using magnetic boots. You can shoot while floating. No evasion except moving to cover.
- Linear path with occasional locked doors (requires later upgrades like Level 3 clearance or a new weapon). Early game progression is strictly chapter-based; you cannot backtrack to previous chapters until Chapter Select after beating the game.
- Objectives are shown on a holographic trail (press Right Stick or hold F on PC). Follow the blue line to the main mission.
- Main quests: Each chapter has one primary objective (e.g., "Find Dr. Mercer" in Chapter 2). No side quests per se, but there are optional crew logs, text logs, and schematic pickups.
- Side objectives: Some areas have optional objectives like "Retrieve the RIG of ..." or "Access a locked locker" that require backtracking later with upgraded clearance. Early game only has a few such items (e.g., the Level 1 Lockbox on the Bridge).
- Credits are scarce: 200–500 per chapter. Spend on nodes (10,000 credits) or weapon upgrades at the Bench. Early game: save credits for the Line Gun schematic (Chapter 3) or the Rotary Saw? Actually the Line Gun is found, not bought. The Force Gun appears later. Focus on buying nodes for your Plasma Cutter.
- Nodes are rare; you find 2-3 per chapter. Use them on the Plasma Cutter first (Damage > Reload Speed > Capacity).
- Suit upgrades: First suit upgrade (Level 2) found late Chapter 3 (crew quarters). Increases inventory slots from 6 to 9. No other suits until mid game.
- Weapon upgrades: Only have Plasma Cutter until Chapter 3 (you can pick up the Line Gun near the end of Chapter 3). Upgrade paths: Damage (most important), Reload Speed, Capacity, Special (optional).
- Controller users: Remap Stasis to LB/L1 for quick access. PC: bind Kinesis to mouse side button.
- Aim for the legs first – Slashers become crawlers, easier to stomp.
- Always carry at least 6 ammo for your primary weapon; stockpile health packs for later.
- Platforms: All platforms play identically; PC has higher framerate (60+), but controls are equally responsive.
- Weapon variety:
- Stasis becomes critical: use on multiple enemies or to stop charging Brute (tank enemy).
- Kinesis for combat: impaling enemies with pipes kills weaker ones instantly.
- Necromorph variants: Lurkers (tentacles on walls) – shoot the yellow sacs. Infectors (flying, reanimate corpses) – prioritize with Stasis + Plasma Cutter.
- Zero-G areas increase (Chapter 4, 6, 8). Aim for Necromorphs' limbs while airborne. Use boost (B button or R2) to dodge.
- Clearance levels: You acquire Level 2 clearance in Chapter 5 (from the Bridge). This opens earlier locked lockers and doors. Level 3 comes in Chapter 7.
- Plot advancement: Each chapter adds a new area (Engineering, Hydroponics). The ishimura is interconnected; you will revisit previous locations to access new rooms.
- Upgrade stations: Benches appear frequently. Stores (vending machines) sell ammo, health, nodes, and sometimes new weapon schematics.
- Optional logs: Over 70 logs total. Mid game you can find signature examples: "Mercer's Log" in Chapter 5, "Kendra's log" early Chapter 6.
- Side objectives: "You Can't Run" achievement – complete all optional zero-gravity jumps (3 in mid game). Also find the Peng treasure (Chapter 6) for credits.
- Lockers: Many require Level 2 clearance; contain nodes, credits, and schematics.
- Credits per chapter: 800–1200. Spend wisely: prioritize nodes (10k each) and upgrade your primary weapon. The store sells Ammo Packs for weaker weapons (Pulse Rifle) – avoid buying unless desperate.
- Schematics: You can buy the Contact Beam (Chapter 7) for 60,000 credits – expensive but powerful. Usually skip until late game.
- Suit upgrades: Level 3 Suit (Engineering RIG) available in Chapter 6; costs 50,000 credits. Increases inventory to 12 slots and provides more armor. Save credits for this.
- Weapon specialization: You should have 2-3 weapons upgraded. Focus on your favorite. Upgrade Plasma Cutter fully first, then Line Gun for crowd control.
- Stasis and Kinesis upgrade: Buy nodes in the Stasis tree to increase duration and recharge speed. Kinesis tree increases damage for thrown objects and pull distance.
- Always carry a damage node – if you find a bench, upgrade immediately.
- Use the environment: Explosive canisters (red) are plentiful – shoot them near enemies for one-shot kills.
- Reserve Stasis for Brutes and Lurkers – don't waste on basic enemies.
- Backtrack to previous areas after getting Level 2 clearance to find nodes and credits.
- Weapon pairings:
- Stasis duration maxed out lasts about 8 seconds. Use on Nest enemies (spawners) to shut them down.
- Kinesis used to move explosive pods away or pull ammo from dead enemies.
- Boss fights: Chapter 10 has the Hive Mind (first phase) – shoot yellow sacs while dodging tentacles. Chapter 11 has The Valor's Nest – wave-based with multiple Hunters (regenerators).
- Plot chapters: Linear but with some back-and-forth within the same chapter (e.g., Chapter 9: return to the Bridge).
- Clearance Level 3 opens everything. Late game you can access all locked doors from earlier chapters if you backtrack via Chapter Select later.
- Final weapon upgrade: Capacitor (special upgrade) for your primary weapon can be found or bought.
- All optional content is accessible if you have the clearance. Late game is the best time to grab any missed logs or collectibles, but you cannot return to Chapter 11 after leaving until postgame.
- The Peng collectible chain completes in Chapter 9 (if you started mid game).
- Text logs for lore: especially those concerning Marker symbol interference.
- Credits are abundant: 2,000–4,000 per chapter. You can afford most upgrades. Save at least 100k credits for New Game+ suit (Level 6).
- Nodes: 4-6 per chapter. Spend on Stasis and Kinesis if not already done.
- Suit upgrades: Level 4 Suit (Vintage Suit) available in Chapter 9 for 100,000 credits. Best defensive suit with 15 inventory slots. You can also find the Level 5 Suit (Advanced) in Chapter 11 hidden area – gives 18 slots and best armor.
- Weapon upgrades: Max out one weapon; second weapon partially. The Plasma Cutter + Contact Beam combination is powerful for late game.
- Special upgrades: Use the Explorer's Kit (found) to increase weapon capacity without nodes? No, that's only in Dead Space 2.
- For the Hunter (regenerator) in Chapter 11: Use Stasis then slice off its legs; it will crawl and you can ignore it while escaping.
- When fighting the Hive Mind: Shoot the glowing tentacles and the main bulb when exposed. Use contact beam alt fire for massive damage.
- Save before entering the Centrifuge puzzle (Chapter 9) – it's a maze with constant enemy spawns.
Progression
Exploration & Quests/Missions
Economy
Character / Build Growth
Actionable Advice
---
Mid Game (Chapters 4–8)
Main Gameplay Loop
Areas become larger, with more backtracking (e.g., returning to Medical from the Bridge). You have multiple weapons (Plasma Cutter, Line Gun, maybe Pulse Rifle or Force Gun). The loop expands: explore, fight mixed enemy types (Slashers, Leapers, Infectors, Lurkers), solve environmental puzzles (use Stasis to freeze fans, Kinesis to pull power cores), manage ammo and health more carefully because enemies are more numerous.
Combat / Interaction Systems
- Line Gun – horizontal primary fire for crowd control, alternate fire (proximity mine) for traps.
- Pulse Rifle (buy from store Chapter 5) – rapid fire, good for Swarmers, but ammo hungry.
- Force Gun (Chapter 6) – knockback, breaks limbs on contact, secondary fire is a kinetic blast.
Progression
Exploration & Quests/Missions
Economy
Character / Build Growth
Actionable Advice
---
Late Game (Chapters 9–11)
Main Gameplay Loop
Pacing intensifies. Enemies include Divider (splits into many pieces), Guardian (stationary, shoots pods), and Tentacle enemies (giant ones in vents). Areas are linear but have combat arenas (e.g., the Government Sector, the Crew Quarters revisited). Resource management becomes easier if you have upgraded weapons; you'll have more ammo but enemies take more hits. The loop: enter arena → waves of Necromorphs → use Stasis and Kinesis strategically → loot bodies → move forward.
Combat / Interaction Systems
- Plasma Cutter (fully upgraded) is still viable.
- Contact Beam (if purchased) – alt fire is a laser that stuns or kills any non-Boss enemy in one shot with full upgrade.
- Ripper (found in Chapter 8) – primary fire launches a blade that flies in a circle; great for tight corridors.
Progression
Exploration & Quests/Missions
Economy
Character / Build Growth
Actionable Advice
---
Endgame (Chapter 12 + New Game+)
Main Gameplay Loop
Chapter 12 is the final, linear gauntlet. You face endless waves of Slashers, Brutes, and the final boss (the Hive Mind full form). The loop is pure survival: move through corridors, kill everything, use all resources. After beating the boss, you can start New Game+ (same difficulty, retain all upgrades, weapons, and credits) or Chapter Select to finish collectibles.
Combat / Interaction Systems
Final boss: Hive Mind has a weak point on its head and body. Use Stasis on its tentacle slams. Contact Beam or Line Gun with detonation modules work best.
No new weapons in Chapter 12. You have your full arsenal.
Environmental hazards: Fire, vacuum (suit oxygen), and explosive clouds. Use Kinesis to pull oxygen tanks.
Progression
No further upgrades during the final chapter. The game ends after the last cutscene.
New Game+: Start a fresh playthrough on the same difficulty. You keep all weapons, upgrades, credits, nodes, and suit level (Level 5). Enemies are slightly stronger (same health pool, but more spawns).
Chapter Select: After finishing, you can replay any chapter to find missed logs, schematics, or achievements. Your upgrades persist.
Exploration & Quests/Missions (Postgame)
Completionist objectives: Find all 74 logs, 13 schematics, 10 Peng collectibles. Unlock "Max Overdrive" achievement (max all upgrades).
No new economy in postgame. You can farm nodes by replaying chapters with high enemy density (e.g., Chapter 6 Hydroponics).
Character / Build Growth
Level 6 Suit (New Game+ only) – found in the first store after Chapter 1. Costs 200,000 credits. Provides maximum inventory (18 slots) and highest armor. Equivalent to the Level 5 suit from the original.
Max upgrades: You can fully upgrade all weapons by the end of New Game+ (need ~80 nodes). Suit upgrades also maxed.
No new abilities – all tools obtained in first playthrough.
Endgame Structure
Chapter 12 is short (~30 min). After credits, you get a Summary screen with completion percentage.
New Game+ offers the same experience but with increased difficulty (more Necromorphs per encounter, sometimes faster enemies). You can choose to skip puzzles you already solved (e.g., the asteroid mining puzzle).
Platinum trophy / 100% requires full clear on impossible? Actually there's an Impossible difficulty mode (one life) – not tied to New Game+. Play on lower difficulty first to learn.
Actionable Advice
For New Game+, prioritize the Level 6 suit first – it makes the early chapters trivial.
Save stasis and contact beam ammo for the final boss – you don't want to run out.
Use Chapter Select after your first playthrough to grab any missed nodes – nodes are finite per playthrough, but farming them in New Game+ is more efficient.
Platforms**: On PC, enable vsync to avoid screen tearing during boss fights. Console players should use performance mode (60 FPS) for best responsiveness.
---
Summary Table: Key Differences by Tier
| Aspect | Early Game (Ch1-3) | Mid Game (Ch4-8) | Late Game (Ch9-11) | Endgame (Ch12+NG+) |
|---|---|---|---|---|
| Enemy Types | Slashers, Leapers, Infectors | Lurkers, Brutes, Guardians | Dividers, Hunters, Tentacles | All (final boss) |
| Weapons Available | Plasma Cutter, Line Gun | Pulse Rifle, Force Gun, Contact Beam | Ripper, Contact Beam (upgraded) | All maxed |
| Suit Level | 1–2 | 2–3 | 3–5 (best | 5–6 (max) |
| Credits per Chapter | 200–500 | 800–1200 | 2000–4000 | 4000+ (farming) |
| Node Droprate | 1–2 | 2–3 | 4–6 | 4–6 (NG+ more) |
| Clearance | Level 1 | Level 2 | Level 3 | All |
| Exploration Backtrack | Limited | Some | Extensive | Full (via Chapter Select) |
Conclusion
Dead Space's core gameplay is a masterclass in survival horror. By understanding the progression tiers, you can optimize your resource use and combat strategy. Remember: always dismember, conserve ammo, upgrade your Plasma Cutter first, and never underestimate the power of Stasis + Kinesis. Good luck, Engineer.