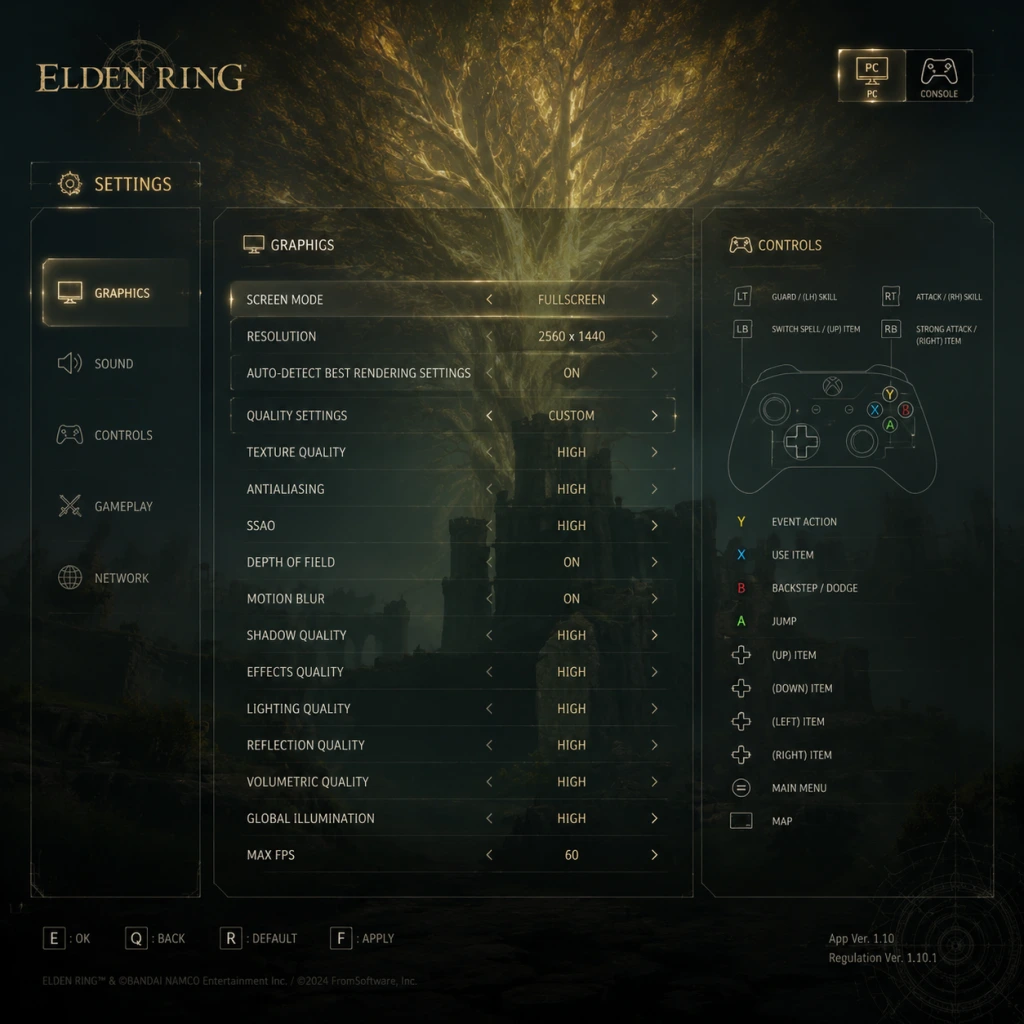
Game Settings
Game Settings Guide for Elden Ring
This guide covers every settings menu in Elden Ring for PC (Steam), PlayStation 4/5, and Xbox One/Series X|S. We explain each option, give optimal values for performance and quality across different hardware tiers, and highlight the settings most commonly misconfigured by new players. All references to controller actions use Xbox layout (A/B/X/Y); PlayStation equivalents are listed in parentheses.
---
Graphics Settings (PC Only - Also Present on Consoles, but Limited)
Elden Ring uses the same engine as Sekiro (DirectX 12). The graphics menu is identical on all platforms, but PC offers more granular controls. Consoles have fixed presets (Performance or Quality Mode on PS5/XSX).
#### Setting Descriptions & Recommendations
| Setting | Options | Purpose | Recommendation |
|---|---|---|---|
| Screen Mode | Fullscreen, Windowed, Borderless | Fullscreen provides best performance; Borderless is best for multi-monitor setups. | Fullscreen |
| Resolution | Based on monitor/TV | Native resolution matters most for clarity. | Native; avoid upscaling unless necessary. |
| Graphics Quality Preset | Minimum, Low, Medium, High, Maximum | Quick set for all sub-settings. | Start here, then fine-tune. |
| Texture Quality | Low – Maximum | Affects sharpness of surfaces. VRAM dependent. | High (4GB VRAM) or Maximum (8GB+ VRAM) |
| Antialiasing Quality | Low, Medium, High, Maximum | Smooths jagged edges. | High (TAA) – best balance. Maximum adds SMAA but blurrier. |
| SSAO | Off – High | Ambient occlusion adds depth to shadows. | Medium – subtle but important for immersion. |
| Depth of Field | Off – High | Blurs distant objects; can cause headaches. | Off (recommended for clarity; many turn this off) |
| Motion Blur | Off – Strong | Blurs during movement; hides low framerate but nauseates some. | Off (most players disable for precision) |
| Shadow Quality | Low – Maximum | Resolution and distance of shadows. | High – good balance. Maximum expensive. |
| Lighting Quality | Low – Maximum | Affects dynamic light sources. | High – noticeable improvement. |
| Effects Quality | Low – Maximum | Particle effects, magic, fire. | Medium or High – lower for performance. |
| Volumetric Quality | Low – Maximum | Fog, mist, smoke. | Medium – heavy performance cost at High+. |
| Reflection Quality | Low – Maximum | Screen-space reflections on water and shiny surfaces. | Medium – high cost for little gain. |
| Water Surface Quality | Low – Maximum | Ripples, reflections on water. | Low – performance eater; small visual impact. |
| Shader Quality | Low – Maximum | Overall shader complexity. | High – keep. |
| Global Illumination Quality | Low – Maximum | Bounces light; costly. | Medium – balanced. |
| Grass Quality | Low – Maximum | Density of grass/foliage. | Medium – low for performance (looks sparse). |
| Ray Tracing | Not present | No ray tracing in Elden Ring. | N/A |
| Hardware Tier | Example GPU | Resolution | Preset | Key Manual Tweaks |
|---|---|---|---|---|
| Low-End | GTX 1060 6GB, RX 580 | 1080p | Low | Set Shadows to Low, Volumetrics to Low, Grass to Low. Turn off Motion Blur and Depth of Field. |
| Medium-End | RTX 2060, GTX 1080 | 1440p / 1080p | Medium | Set Volumetrics to Medium, Shadows to High. Keep Motion Blur Off. |
| High-End | RTX 3080, RX 6800 XT | 1440p / 4K | High (or Maximum) | Turn off Motion Blur and Depth of Field. Set Volumetrics to Medium for stable 60 FPS at 4K. |
| Ultra-End | RTX 4090 | 4K | Maximum | All on Max, but still turn off Motion Blur. Expect 60 FPS; frame rate cap is 60. |
- Stay in Fullscreen mode.
- Disable Steam Overlay (right-click game in library → Properties → uncheck Enable Steam Overlay).
- Run the game from a fast SSD.
- PS4 / Xbox One: Fixed 30 FPS, no Quality/Performance toggle. Locked to 1080p.
- PS4 Pro / Xbox One X: Option to prioritize Framerate (target 60 FPS) or Resolution (target 4K checkerboard). Choose Framerate for smoother play.
- PS5 / Xbox Series X|S: Two modes:
- Series S: Only Performance mode (1440p 60 FPS) with minor visual cuts.
Console Graphics Options:
- Performance: 60 FPS prioritization (dynamic resolution ~1800p-2160p). Recommended.
- Quality: 4K native at 30 FPS with ray-traced-like lighting (no RT; improved AO/shadows). Avoid for action-heavy game like Elden Ring.
---
Audio Settings
| Option | Purpose | Recommendation |
|---|---|---|
| Master Volume | Overall volume | 70-80% to avoid ear fatigue during loud boss screams. |
| Music Volume | Background music | 100% – music is integral to atmosphere. |
| SFX Volume | Sound effects (combat, footsteps etc.) | 100% – important for hearing enemy attacks. |
| Voice Volume | NPC dialogue, cutscenes | 100% – but you may lower if subtitles are on. |
| Audio Output Mode | Headphones, TV, or Surround | Headphones – gives excellent spatial awareness. TV introduces small surround simulation. |
| Subtitles | On/Off | On – many NPC lines are crucial for lore. |
| Subtitle Background | Off, Low, High | High – makes text readable over bright backgrounds. |
| Narrator Audio Language | English, Japanese, etc. | Choose per preference; Japanese voice acting is widely praised. |
| Text Language | Multiple languages | Set to your preferred language. |
---
Controls Settings
#### Controller (Recommended)
Elden Ring was designed for a controller. The default layout is classic FromSoftware: RB (R1) = light attack, RT (R2) = heavy attack, LB (L1) = block/parry, LT (L2) = weapon skill. A (X) = jump, B (O) = dodge/roll/sprint, X (Square) = use item, Y (Triangle) = two-hand weapon.
Customizable Options:
- Camera Sensitivity (X & Y) – Default 5. Increase to 8+ for quicker target switching. Decrease if you feel nauseous.
- Invert Y Axis – Off (unless you prefer pull stick down to look up; classic flight sim style).
- Auto-Lock Target – On (recommended). When you press lock-on (R3), it automatically picks the nearest enemy. Off requires manually cycling with right stick. Most players prefer On.
- Camera Auto-Adjust – On (default). Camera centers behind you after a delay. Off gives full manual control. On is less disorienting.
- Lock-On Switch – Closest vs Current. When you press R3 again, Closest switches to the nearest enemy; Current keeps the same target. Closest is usually better for chaotic fights.
- Dodge Button – B (O) default. Some may prefer A (X) for Souls veterans. Change if uncomfortable.
- Confirm Button – A (X) for accept / B (O) for back. This can be swapped in settings (yes, a rare option). Ensure consistency.
- Controller Vibration – Off (recommended) – reduces rumble distraction and preserves battery. Some like it for immersion.
- Strong Attack – default is Shift+Left Click. Change to a side mouse button for quicker combos.
- Jump – default Spacebar. Fine.
- Dodge/Roll – default Ctrl. Many rebind to Spacebar (but then jump is Space too? Actually jump is Space by default; hold Space to sprint?). Ensure no conflicts.
- Item Use – default E. Safe.
- Two-Hand Weapon – default F. Good.
- Map – default M.
- Toggle Lock-On – default Middle Mouse Button. Good.
- Subtitles – On. Background opacity High.
- Colorblind Mode – Three options: Protanopia (red-blind), Deuteranopia (green-blind), Tritanopia (blue-blind). This changes UI tints (health bar, stamina bar, item icons). Enable if you have trouble distinguishing colors. No preview, so try all three.
- Text Size – Not adjustable (fixed small text). On PC, you can increase UI scale via config files, but not in game.
- Audio Cues – No settings; but the game does have distinct sound for item pickups, enemy aggro, etc. Important for those with visual impairments.
- Voice Language – choose between English and Japanese (and other regional dubs depending on your game version). Many prefer Japanese for more emotional acting.
- Text Language – sets all menus, items, descriptions, and subtitles. Switch freely.
- Subtitles Language – if different from text language. Example: Japanese voices with English subtitles.
#### Keyboard + Mouse (PC Only)
The game allows full key remapping in the Controls menu. Important bindings to consider:
Crucial: Set Disable Mouse Controls in Menus to On if your mouse cursor accidentally clicks and closes menus.
---
Accessibility Settings
Elden Ring has limited accessibility options, but a few are vital:
Note: There is no difficulty slider. The game’s challenge is part of the design. Use Summoning and Spirit Ashes as an unofficial easy mode.
---
Language Settings
---
Network Settings
| Option | Description | Recommendation |
|---|---|---|
| Play Online | Enable/disable multiplayer features. | On to see messages, bloodstains, and get invaded. Off for pure single-player. |
| Cross-Region Play | Perform Matchmaking (allow all regions) or No Matchmaking (only your own region). | Perform Matchmaking – larger pool for summoning/invading. |
| Password for Multiplayer | Set a password to restrict co-op/invasions to friends with same password. | Leave empty for random matchmaking. |
| Launch Setting | Play Online vs Play Offline. Same as above, but appears at title screen. | Choose Play Online for full experience. |
| Send Summon Sign / Invasion | Controlled in-game via items, not settings. | N/A |
---
Gameplay Settings
| Option | Description | Recommendation |
|---|---|---|
| Brightness | Adjust gamma until the icon on the right is barely visible. | Set per your display; do not make too dark. |
| HUD Display | Always On, Auto-Hide (HUD fades when idle), or Off. | Auto-Hide – reduces clutter; works well. |
| HUD Opacity | 0-100%. | 70-80% – clear but not intrusive. |
| Auto-Equip Items | When picking up a weapon/armor, automatically equip it if slot is empty. | Off (recommended) – prevents accidental equips of heavy gear. |
| Camera Auto-Adjust | Camera slowly rotates behind you when standing still. | Off – prevents unwanted camera swings; gives full control. |
| Auto-Lock Target | Explained earlier. | On – makes locking onto nearest enemy easier. |
| Lock-On Switch | Closest vs Current. | Closest – helps in crowds. |
| Confirm Button Mapping | Switch between A/B as confirm. | Depends on your platform muscle memory. On PlayStation, X is default confirm; O cancel. |
| Item Toggle | Default is hold down D-pad to switch items? Actually Elden Ring uses a quick pouch system for items. Not a setting. | - |
| Rune Level Display | Those who care about PvP level ranges. Not a setting. | - |
---
Special Attention Points
1. Motion Blur and Depth of Field – Many players hate these. They make the image blurry during combat, reducing clarity. Turn both Off immediately.
2. Auto-Lock Target – Default is On. If you find yourself targeting wrong enemies (e.g., locked onto a deer while fighting a boss), try switching to Current instead of Closest. Or practice manually cycling.
3. Audio Output Mode – Failing to set to Headphones ruins directional sound. This is the #1 misconfiguration in audio.
4. Brightness Calibration – Use the in-game calibration screen. A too-dark setting will make caves and night areas unplayable. Don't trust your monitor's default.
5. HUD Auto-Hide – Great for immersion, but if you need to constantly check HP/FP/Stamina, set to Always On.
6. Confirm Button Swapping – Only exists on console/PC with controller. If you switch between Souls games (which use circle/B as dodge), be consistent. Elden Ring allows swapping confirm/cancel; many prefer Dark Souls muscle memory (X=confirm, O=cancel on PlayStation).
7. Network Password – Do not leave a password if you want random co-op/invasions. And remember that passwords do not block invasions.
8. Console Performance vs Quality – On PS5/XSX, always select Performance mode for 60 FPS. The Quality mode's 30 FPS plus blurred motion makes boss fights much harder.
---
Quick Reference: Recommended Starting Settings
- Graphics: Use preset for your hardware, then turn Off Motion Blur and Depth of Field.
- Audio: Headphones mode, subtitles On.
- Controls: Auto-Lock On, Camera Auto-Adjust Off, Controller Vibration Off.
- Accessibility: Subtitles High Background, Colorblind mode if needed.
- Gameplay: Auto-Equip Items Off, HUD Auto-Hide On, Brightness calibrated.
- Network: Online, Cross-Region Matchmaking On, no password.
Apply these once before entering the Lands Between for a smoother, clearer journey. Good luck, Tarnished!