Core Gameplay
Core Gameplay Guide for Alan Wake
Overview
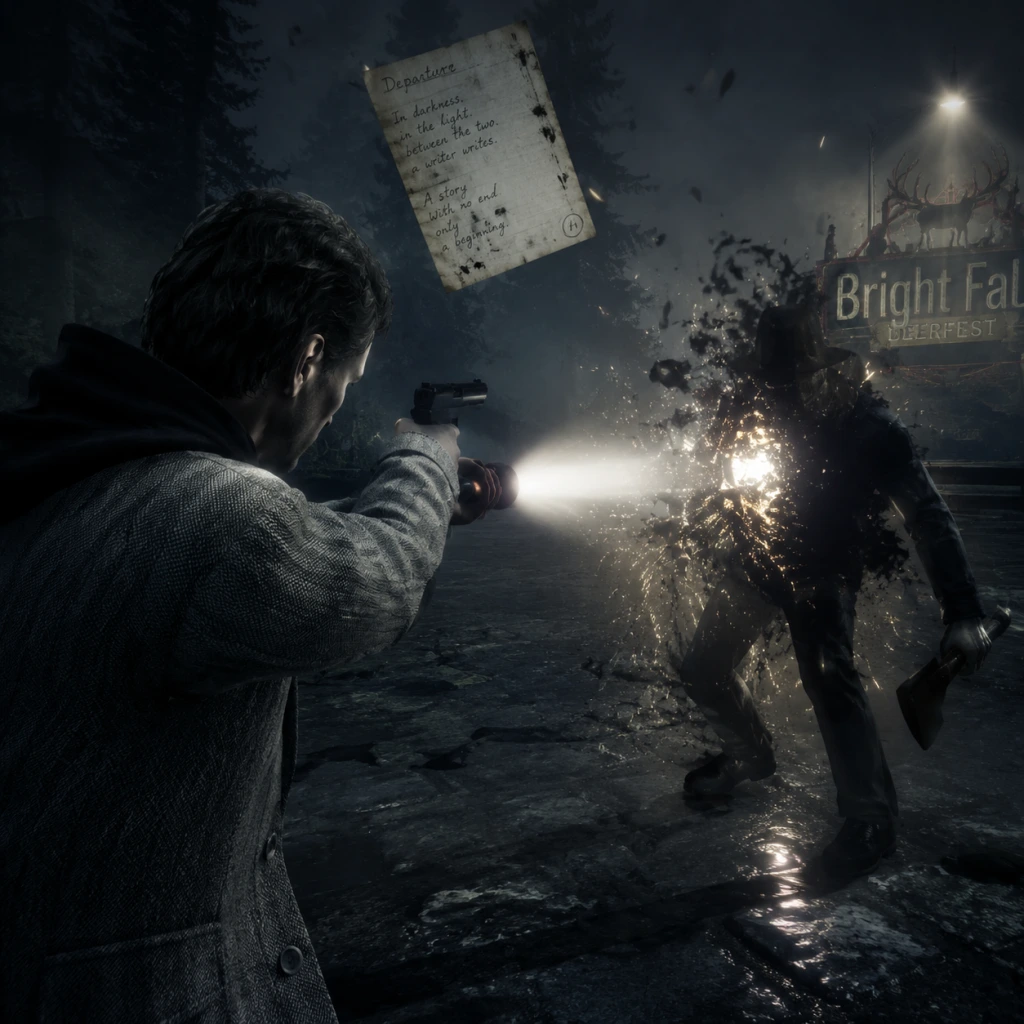
_Alan Wake_ is a psychological third-person shooter where light is your primary weapon against the supernatural “Taken.” The core gameplay loop alternates between exploration of the eerie Pacific Northwest, combat with darkness‑infused enemies, and unraveling a story through manuscript pages and radio/TV shows. The game is structured into six episodes (chapters), plus two DLC episodes (The Signal, The Writer) and a New Game+ mode in the Remastered version.
---
Main Gameplay Loop
1. Explore – Traverse forest paths, cabins, and small towns. Search for supplies (ammo, batteries, flares, flashbangs) and collectibles (manuscript pages, coffee thermoses, radios, TVs).
2. Encounter Darkness – The Taken appear. Use light to strip their immunity, then finish with firearms.
3. Push Forward – Solve environmental puzzles (generators, light towers), follow waypoints, and advance the linear story.
4. Narrative Rewards – Find manuscript pages to reveal future events; watch cutscenes; listen to dialog during walks.
---
Combat & Interaction Systems
The Light Mechanic
Every enemy is shielded by darkness. You must expose them with light before dealing damage.
- Flashlight: Default with infinite battery (drains quickly when focused). Hold left trigger to focus – destroys darkness faster but depletes battery. Collect batteries to recharge.
- Flares: Create a temporary safe zone; thrown flares can ignite Taken and stagger them.
- Flashbangs: Stun all enemies in a wide area, completely removing their shields for a short time.
- Light Sources: Streetlights, car headlights, and light towers. Standing in light gradually recharges your flashlight and drains nearby Taken.
- Revolver: Standard sidearm, slow fire rate, decent damage. Best for single enemies.
- Pump‑Action Shotgun: Devastating at close range; scarce ammo. Preferred for groups.
- Hunting Rifle (appears later): High damage, long range, very rare ammo. Good for sniping Taken from safety.
- Flare Gun (late game): Fires a flare that sticks to enemies, burning them over time. Excellent crowd control.
- Manuscript Pages: Scattered throughout. Reading them reveals plot clues and achievements. Some alter the narrative (e.g., “A page says a Taken will ambush from a shed – prepare”).
- Radios & Televisions: Activate to hear optional story content or psychological warnings.
- Thermos Flasks (100 total): Collectibles for achievement only; no gameplay effect.
- Signs/Doors: Some are interactive (open, read). No traditional quest log – story is driven by linear progression.
- Inventory: You carry a limited number of weapons (two long guns + pistol) and consumables (batteries, flares, flashbangs). Upgrades are rare – you find a shotgun in Episode 2, a hunting rifle in Episode 4, a flare gun in Episode 5.
- Health: No health bar. Screen turns red; find hidden first‑aid kits (limited) or rest in light to slowly regenerate (very slow). Much of the game is about avoiding damage.
- Narrative Unlocks: Each episode ends with a cliffhanger and a “Previously on…” recap. Completing an episode unlocks the next.
- Linear Paths: The game rarely branches. You follow a road, a trail, or a series of landmarks. No open world – but small hub areas (like the town of Bright Falls, the Cauldron Lake cabin) allow back‑tracking for collectibles.
- Side Objectives: None in the traditional sense. The only “side” content is finding all collectibles (thermoses, manuscript pages) for achievements/Trophies. No side quests from NPCs.
- Environmental Puzzles: Examples:
- Time of Day: Most of the game is set at night; daytime sections are brief intermissions where you explore safely (no enemies).
- No currency or shops. All resources are found in the world.
- Ammo: Revolver rounds are plentiful; shotgun shells are moderate; rifle rounds are very rare.
- Batteries: Common, but less so than ammo. Manage flashlight usage – don’t focus unnecessarily.
- Flares & Flashbangs: Uncommon. Use them wisely in large groups.
- First Aid Kits: Rare; often hidden in cabinets, drawers, or under beds.
- Setting: Cabin at Cauldron Lake → Bright Falls town. You learn controls, flashlight focus, and first combat.
- Combat: Only revolver and flashlight. Enemies are few (2–4 at a time). Learn to keep distance and focus light.
- Exploration: Mostly indoors; find manuscript pages and a few flares. Key puzzle: escape from the cabin attic.
- Progression: No weapon upgrades yet. The game teaches you to prioritize light over bullets.
- Health Management: You find one first‑aid kit in the cabin. A single hit takes about 1/3 health; two hits kill you. Learn to dodge (double tap movement).
- Resource Tips: Save ammunition; use flashlight focus only when necessary. Pick up every battery (they’re rare early).
- Example: In Episode 1, you must survive a Taken ambush in the woods. Use the environment (car headlights) to slow them, then fire when their shield drops.
- Setting: Bright Falls streets, a farmhouse, a mine, a dam. More outdoor areas with multiple enemies.
- Combat Upgrades: You acquire the pump‑action shotgun (Episode 2 – in a safe after solving a puzzle). Enemies appear in groups of 5–8, including armored Taken (need longer light exposure).
- New Consumables: Flashbangs appear for the first time (about Episode 3). Use them to stun a crowd and reload.
- Exploration: The town of Bright Falls is semi‑open – you can explore a few buildings. Collect thermoses and manuscript pages. One puzzle involves restarting a generator for a floodlight.
- Resource Economy: Ammo becomes more common, but so does enemy density. Prioritize shotgun ammo for close groups; revolver for isolated foes.
- Difficulty Spike: The first fight at the farmhouse (Episode 2) and the dam sequence (Episode 4) are notorious. Use light towers to create safe zones.
- Example: In Episode 3, during the “Night in the Woods” segment, you must defend a light‑protected area from waves. Throw flares at your feet to buy time while using the shotgun on approaching Taken.
- Setting: Dark forests, a construction site, the Cauldron Lake lodge, and the final confrontation. Ambient darkness is thicker; enemies spawn more aggressively.
- Weapon Upgrades: You find the hunting rifle (Episode 4/5) – excellent for sniping from a distance – and the flare gun (Episode 5). The flare gun’s burning effect is crucial for bosses.
- New Enemy Types:
- Resource Scarcity: Despite more enemies, ammo pickups are spaced out. Conserve shotgun and rifle rounds for weaker enemies; use revolver for most.
- Environmental Puzzles: Activating multiple generators, opening locked gates with combinations, and a long series of light‑platform puzzles in the final lodge.
- Example: In Episode 6, you face waves in a large arena. Use the central light tower to recharge and take cover behind pillars. Deploy flashbangs when surrounded, then focus fire on the boss’s weak points (glowing chest).
- Main Story Completion: After finishing Episode 6, the credits roll. There is no sandbox mode – the game ends, but you can replay any episode from the main menu (select episode).
- New Game+ (Remastered only): Unlocked after finishing the story. You carry over all weapons (shotgun, hunting rifle, flare gun) and all manuscript page discoveries into a fresh playthrough. Enemies are tougher and drop more resources. This is the optimal way to collect all thermoses and achievements.
- DLC Episodes:
- Endgame Goal: Achieve 100% completion (all manuscript pages, thermoses, achievements). The only “grind” is replaying chapters for missed collectibles. The game offers no New Game+ in the original Xbox 360/PC version (only Remastered).
- Example: After finishing the main game, load Episode 2 in New Game+ with the flare gun and hunting rifle. The early farmhouse fight becomes trivial – you can kill Taken from a safe distance. This makes collecting thermoses easier.
Weapons
Interaction Key Items
---
Progression & Character Growth
Alan Wake does not have XP, skill trees, or character levels. Progression is item‑based and narrative‑driven.
---
Exploration & Quests/Missions
- Power generators that need to be refueled or repaired to activate floodlights.
- Moving platforms (e.g., a gondola) that must be activated by flipping switches.
- Finding keys or combination codes (e.g., to a safe containing a shotgun).
---
Economy & Resources
---
Player Progression Tiers
Early Game (Episode 1 – “Nightmare” & start of Episode 2 – “Taken”)
Mid Game (Episode 2 – “Taken” to Episode 4 – “The Truth”)
Late Game (Episode 5 – “The Clicker” & Episode 6 – “Departure”)
- Poltergeists: Hurl objects (barrels, cars) – dodge and shoot them while avoiding flying debris.
- Birds (flocks of crows): Can be killed with a flare or flashlight before they attack.
- Boss Encounters: A giant Taken called the “Molten Man” (a burning truck) and a final boss (Mr. Scratch’s manifestation). Both require heavy use of flares and the flare gun.
Endgame (Post‑Main Story & DLCs)
- The Signal: Set inside a dark, twisted version of the story. You have only a flashlight and a special “light gun.” Puzzles revolve around using light to reveal hidden platforms. No new weapons.
- The Writer: More combat‑focused with Taken and Poltergeists. You regain your full arsenal partway through. Both DLCs take about 1–2 hours each and tie up narrative loose ends.
---
Summary Table: Progression Overview
| Tier | Weapons Obtained | Typical Encounters | Resource Availability | Key Mechanics Introduced |
|---|---|---|---|---|
| Early Game | Revolver | 2–4 Taken, small groups | Ammo scarce, batteries low | Flashlight focus, dodge, flares |
| Mid Game | Shotgun, flashbangs | 5–8 Taken, armored types | Ammo moderate, flares rare | Generators, light towers |
| Late Game | Hunting rifle, flare gun | Poltergeists, birds, bosses | Ammo tight, flashbangs key | Flare gun burn, boss patterns |
| Endgame | All weapons carried | Same but more health | Rich (NG+), DLC new ammo | New Game+, DLC puzzle variations |
Final Tips
- Always watch your flashlight battery. A dead battery in combat means death – never waste it on already‑dead enemies.
- Use the environment: lure Taken under streetlights or near lamp poles to drain their darkness for free.
- Pick up every manuscript page immediately; some reveal upcoming ambushes, giving you a split‑second heads‑up.
- In DLC (The Signal), light reveals invisible platforms – don’t rely on your gun for navigation.
This guide covers everything from your first steps in the cabin to 100% completion. Keep the light burning, Alan.