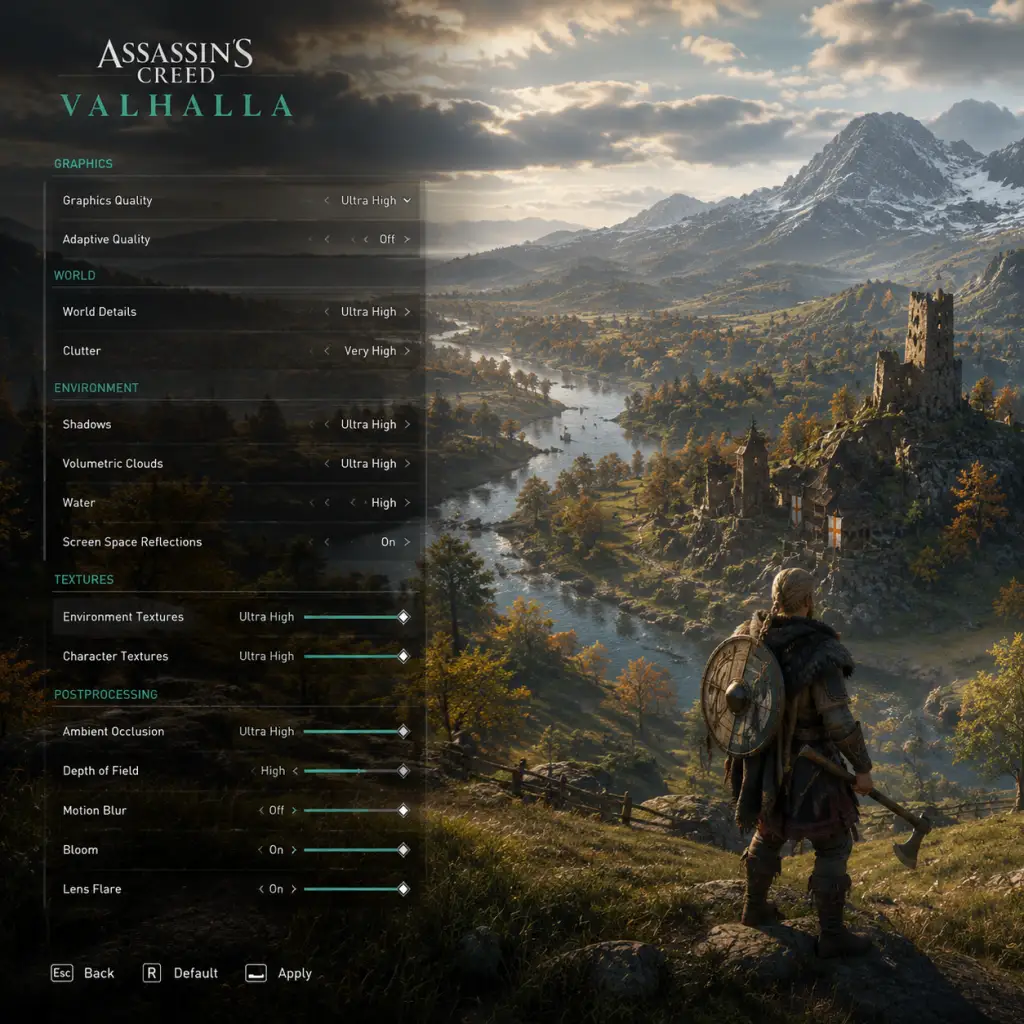
Game Settings
Graphics Settings for Assassin’s Creed Valhalla
This section covers all video and display options. The game uses the AnvilNext engine, which is GPU-intensive but offers a wide range of scalability.
Display Mode
- Windowed: For multi-monitor setups or debugging.
- Fullscreen: Recommended for best performance and lowest input lag.
- Borderless Windowed: Useful for alt-tabbing but may reduce performance slightly.
- Set to your monitor’s native resolution for sharpest image.
- Aspect ratio (16:9, 21:9, 32:9) is detected automatically. For ultrawide, note that cutscenes may have pillarboxing.
- Match your monitor’s maximum refresh rate (e.g., 60, 144, 240 Hz). Cannot exceed monitor capabilities.
- Off: Maximum FPS but screen tearing possible.
- On: Eliminates tearing, but caps FPS to refresh rate and may add slight input lag.
- Adaptive: Less input lag than On but still prevents tearing above refresh rate.
- Default 70° (vertical). Range: 55°–90°.
- Attention Point: A wide FOV (85°–90°) helps situational awareness but may cause fisheye effect on standard screens; reduce on consoles or lower-end PCs to maintain performance. Misconfiguration here can cause motion sickness for some players.
Resolution & Aspect Ratio
Refresh Rate
V-Sync
Field of View (FOV)
Graphics Quality Presets
Ubisoft provides four presets: Low, Medium, High, Ultra High. Custom below.
#### Individual Settings
| Setting | Description | Easy to Misconfigure? |
|---|---|---|
| World Quality | Governs draw distance, object density, and LOD. High affects distant village details. | Yes: Setting too low populates objects too early, breaking immersion. |
| Clutter | Grass, bushes, rocks density. Heavy performance hit. | Yes: Max setting cripples low-end GPUs. |
| Shadows | Cascade resolution and softness. Medium is a good balance. | Yes: Ultra has minimal visual gain over High but large performance cost. |
| Volumetric Clouds | Realistic clouds. Very heavy on GPU. | Yes: Can reduce FPS by 20%+; set to Medium or Low if struggling. |
| Water Quality | Reflections and refraction. High looks great but impacts coastal areas. | Minor impact. |
| Textures | Resolution of surfaces. VRAM hog; match to your GPU memory. | Yes: Exceeding VRAM causes stuttering – set to High for 6GB cards. |
| Anti-Aliasing | Options: Off, FXAA, SMAA, TAA, TAA+Sharpening. TAA recommended for clarity. | TAA can cause blur; enable Sharpening (0.5-1.0) to compensate. |
| Ambient Occlusion | Adds depth shadowing. Options: SSBC (medium quality), HBAO+, and Ultra HBAO+. HBAO+ is sweet spot. | Yes: Ultra HBAO+ costs performance but subtle improvement. |
| Screen Space Reflections | Reflective surfaces (water, metal). High impact on AMD GPUs. | Yes: Off on low-end; Medium on mid-range; High on high-end. |
| Depth of Field | Blurs background during cutscenes. Off for clarity or on for cinematic feel. | No major performance impact. |
| Motion Blur | Blurs during camera/character movement. Off recommended for competitive or sensitive players. | Yes: Can cause nausea; many prefer off. |
| Bloom | Brightness bloom from light sources. Subtle effect, small cost. | Usually fine left on. |
| Lens Flares | Anamorphic flare from sun. Personal preference. | No performance impact. |
| Chromatric Aberration | Adds color fringing. Off for sharp image. | Yes: Some dislike it; disable for cleaner visuals. |
| Tier | Spec Example | Preset | Custom Tweaks |
|---|---|---|---|
| Low (30 FPS) | GTX 1060 / RX 580 4GB, 8GB RAM | Medium | Set Clutter & Volumetric Clouds to Low, Shadows Medium, SSR Off, Textures Medium. Resolution 1080p. |
| Medium (60 FPS) | RTX 2060 / RX 5600 XT, 16GB RAM | High | Lower Volumetric Clouds to Medium, keep Ambient Occlusion HBAO+, Textures High. Resolution 1080p or 1440p with scaling. |
| High (60 FPS high quality) | RTX 3070 / RX 6800, 16GB RAM | Ultra High | Tweak Volumetric Clouds to High (not Ultra), Shadows High, Textures Ultra. Resolution 1440p or 4K with DLSS/FSR. |
| Ultra (60+ FPS 4K) | RTX 4080 / RX 7900 XTX, 32GB RAM | Custom | Max everything except perhaps Volumetric Clouds (High). Enable DLSS Quality (NVIDIA) or FSR Quality (AMD). Use Sharpening 0.5. |
- DLSS: NVIDIA RTX cards. Quality mode preserves image at lower render resolution. Recommended for 4K.
- FSR: AMD and all GPUs. Performance mode aggressive; Quality mode good for 1440p.
- XeSS: Intel ARC cards. Similar to DLSS.
- Attention Point: Using DLSS/FSR may cause flickering in distant objects; tweak sharpening or switch to TAA if distracting.
- Set to 70-100% and adjust other sliders relative.
- Controls combat, footsteps, ambient. Keep high for immersion.
- Crucial for story. Set to 100% unless you want subtitles only.
- Epic score. Lower if you prefer environment sounds.
- For cutscenes. Usually same as Master.
- Options: Headphones, 2.0, 5.1, 7.1. Headphones provides virtual surround via HRTF. Important: If using 5.1/7.1, make sure your system actually supports that channel count; misconfiguration leads to missing sounds. For stereo headsets, always choose Headphones.
- On/Off for spoken dialogue, including NPCs and ambient speech. Easy to miss: Enabling "Show Speaker Name" helps identify who is talking.
- Adds descriptions of sound effects (e.g., [gunfire], [wind howling]). Useful for accessibility.
- Mouse Sensitivity: Default 25. Adjust per your DPI. Start at 30 if you have a gaming mouse.
- Invert Y-Axis: Off normally, but for flight/traversal some prefer on.
- Mouse Smoothing: Off for raw input; on may reduce jitter.
- Aim Assist (Snap Aim): Helps lock onto targets. On for controllers; off for precision with mouse.
- Lock-On Target: Toggle or hold. Hold is more responsive.
- Crouch Mode: Toggle vs Hold. Toggle is recommended for stealth.
- Call Mount: Default Z (initially unbound from quick bar). Change to an easily reachable key (e.g., C).
- Use Raven: Default V. Fine but can be moved to middle mouse button.
- Quick Access Wheel: Tab. May conflict with inventory; rebind to Q if needed.
- Interact: E. Good default.
- Dodge: Spacebar. Consider binding to a side mouse button for faster reaction.
- Layout: Standard or Custom. Note: Swap left stick for movement and right stick for camera is default.
- Vibration: On for immersion, off for competitive or battery saving.
- Trigger Deadzone: Increase slightly if accidental aiming occurs.
- Aim Assist: Strong (console-like) or Light. Strong recommended for controller.
- Look Sensitivity: Start at 50% and adjust.
- Camera Acceleration: Default 50%. Higher speeds up turns when stick is fully tilted; can cause overshoot.
- Story: Very easy combat and enemy health. Best for narrative focus.
- Default: Balanced.
- Hard & Very Hard: Increased enemy damage, aggression, and health drain. Recommended for experienced players.
- Nightmarish: Enemies one-shot, Eivor fragile. Hardcore only.
- Auto-Loot: On by default – do not turn off.
- Auto-Equip Gear: Off (you want manual control).
- Guided Exploration vs. Pathfinding: Guided gives quest markers; Pathfinding disables compass markers but still shows objective location on map. Pathfinding is more immersive but may cause frustration.
- Enemy Scaling: Adjusts enemies to match your power level. Options: Off (easier early), Moderate, Hard (always challenging).
- HUD Presets: Customizable. Turn off minimap for immersion; enable health bar and stamina only.
- Damage Numbers: On/Off. Off for realism.
- Crosshair: Always On, Dynamic, Off. Keep On for ranged combat.
- Options: Protanopia, Deuteranopia, Tritanopia. Adjusts HUD colors (e.g., enemy highlights). Test in menu – works well but some UI elements may still be confusing.
- Subtitle Size: Small, Medium, Large. For readability choose Large.
- Subtitle Background: Subtle or Opaque. Opaque helps contrast.
- Choose from menu: English, French, Italian, German, Spanish, Japanese, etc. The game allows separate voice and subtitle languages.
- Download Required: Changing spoken language after installation may trigger a large patch (audio packs). Ensure you have space and bandwidth.
- Can differ from voice. For example, Japanese voices with English subtitles.
- Determines menus, quest logs, items. Typically same as platform language.
- Always Online: Not required for single-player but needed for Discovery Tour (educational mode) and Jomsviking recruiting.
- Ubisoft Connect Overlay: On by default. Disable if it causes performance stutter or FPS drops (common issue).
- Enable to sync progress across platforms (PC, Xbox). Note: PlayStation and PC do not cross-save.
- Options: Low, Medium, High (controls texture streaming). High recommended if you have fast internet (50+ Mbps). Low reduces streaming but increases pop-in.
- Off if you have privacy concerns.
- Guided: Full quest markers, compass on.
- Exploration: Hidden markers; you must discover objectives by exploring. More rewarding but time-consuming.
- Auto-Loot: On.
- Auto-Equip: Off (prevents unwanted gear changes).
- Show Loot Icons: Always or on interact. Useful to see valuables.
- Melee Assistance: Off (makes combat more precise). On for casual players.
- Stamina Display: Always or dynamic. Keep Always to manage stamina.
- Parry & Break Guard Timing: Default is tight; can be adjusted in Combat Settings (but no slider). Pro tip: Practice in training.
- Assassination Guaranteed: On (standard AC style). Off makes high-level enemies survive stealth attacks.
- Auto-Noise Level: Affects how bushes/grass mask your noise. Recommend default.
- Camera Sensitivity: Separate for on-foot and mounted.
- Camera Distance: Zoom out for wider view; zoom in for immersion. No perfect setting – adjust based on preference.
- Enable/Disable from pause menu. Always on.
---
Audio Settings
Master Volume
Sound Effects Volume
Dialogue Volume
Music Volume
Cinematics Volume
Speaker Configuration
Subtitles
Closed Captions
---
Controls Settings
Keyboard & Mouse
#### Important Keybinds to Customize
Controller (Xbox, PlayStation, Switch Pro)
Easy to Misconfigure: The "Raven" button (pressing R3) may interfere with crouch if not remapped. Consider swapping with O/B for easier access.
---
Accessibility Settings
Gameplay Difficulty
Combat Assistance
Difficulty Modifiers
Display Options
Colorblind Modes
Subtitle Size & Background
---
Language Settings
Spoken Language
Subtitle Language
Interface Language
Easy to Misconfigure: If you change spoken language in-game, the game will restart to apply. If you cancel mid-download, audio may be missing or broken. Always download full pack before switching.
---
Network Settings
Online Connection
Cloud Saves
Bandwidth
Data Sharing
---
Gameplay Settings
Difficulty & Assists (already covered, but note)
Exploration Mode
Loot & Gear
Combat
Stealth
Camera
Fast Travel
---
Special Attention Points During Setup
1. First Launch Stuttering: The game compiles shaders on initial load. Allow 5–10 minutes; do not skip or the game will stutter constantly.
2. VRAM Monitoring: Check your GPU memory usage in advanced graphics settings. If you exceed VRAM, set Textures down one notch.
3. Ultrawide Fixes: Native support is good but HUD may stretch. No in-game fix; community mods available.
4. Controller Detection: Some PCs fail to detect controller unless plugged before launch. Use Ubisoft Connect to verify.
5. Audio Language Pack: If you select a language without downloading the pack, voices will be silent. Download from in-game menu or Ubisoft Connect DLC tab.
6. Save Corruption Risk: Cloud saves can corrupt if internet disconnects during save. Disable cloud if you have frequent drops.
7. Mouse Input Delay: If you feel lag, turn off V-Sync and enable raw input (found in game files \.ini not in menu).
8. DLSS TAA Compared: DLSS Quality often looks better than TAA for 1440p and above; TAA is better for 1080p due to lower rendering resolution of DLSS.
This concludes the comprehensive Game Settings guide. Adjust each option according to your hardware and preference, and always test changes in the open world (not menu) because the menu’s performance does not reflect real gameplay.