Game Tips
Game Tips
Beginner Tips
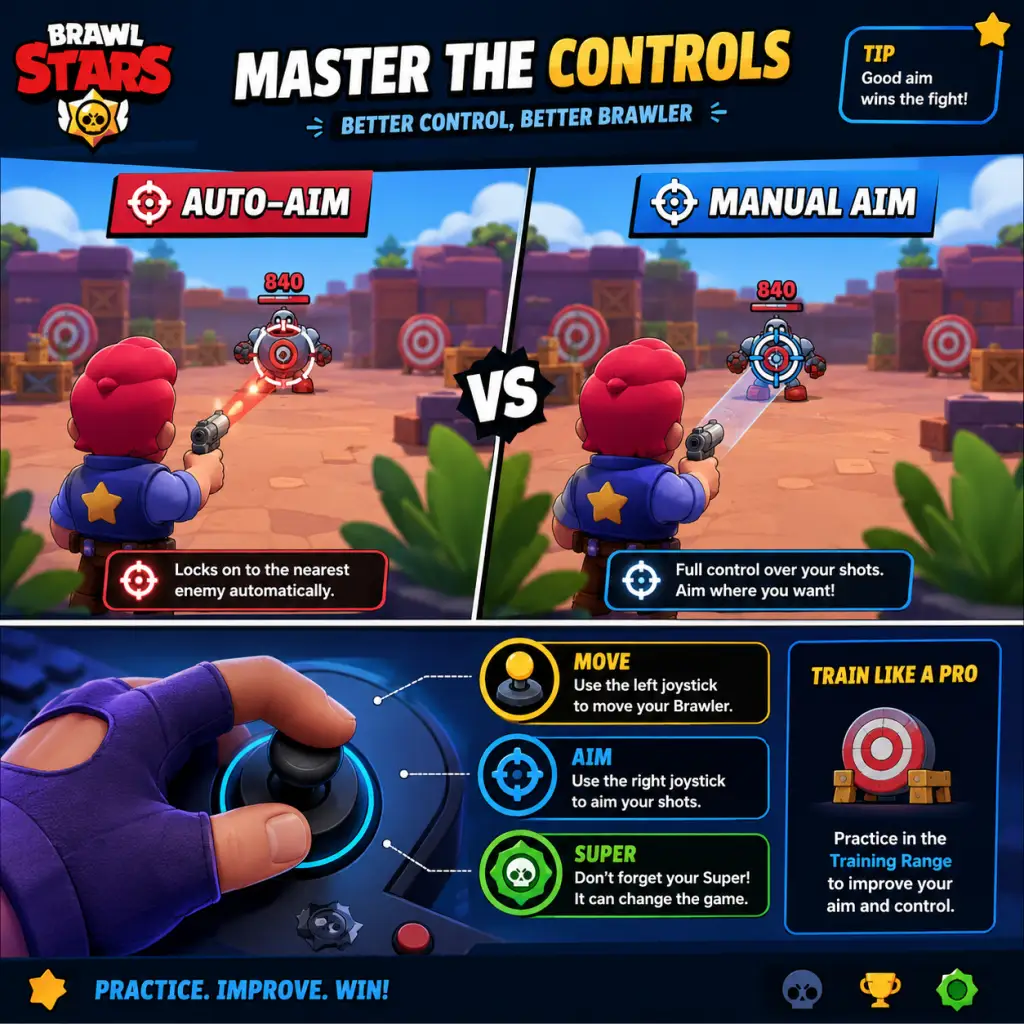
#### 1. Master the Controls
- Manual aim is key: While auto-aim is fine for close range, you'll miss long shots. Drag your attack button to see the trajectory (for throwers, the arc). Practice leading targets.
- Movement stick: Keep it light – small adjustments dodge shots. Don't just run in straight lines.
- Gadget & Super buttons: Know their positions; quickly tap when needed.
- Vision: When you walk into a bush, you can see within a small radius. Enemies in bushes are invisible until very close (about 1 tile). Use bushes to ambush or escape.
- Revealing: Attacking reveals you in a bush for a short time. If you don't move, you stay hidden. Use this to fake retreats.
- Bush camping: In Solo Showdown, waiting in a bush near a center gem mine can get you easy kills, but don't stay too long – you'll miss power cubes.
- Save ammo: Don't spam all three shots at once unless guaranteed kill or to break obstacles. Keep at least one ammo for emergencies.
- Reload timing: Reload rates vary by brawler. Know yours to avoid empty ammo during a fight.
- How to charge: Dealing damage (or healing for supports) charges super. Each brawler needs a set number of hits (check in brawler info). Aim to get super before engaging.
- Using super: Don't hold it forever; use it to secure kills, escape, or control area. But don't waste it on nothing.
- Tanks (e.g., Bull, Rosa): Get close, soak damage, break walls.
- Sharpshooters (e.g., Piper, Brock): Keep distance, control lanes.
- Throwers (e.g., Barley, Tick): Lob over walls, area denial.
- Assassins (e.g., Edgar, Stu): Dive and kill squishy targets.
- Controllers (e.g., Emz, Tara): AoE damage, push enemies back.
- Supports (e.g., Poco, Byron): Heal allies, debuff enemies.
- Predict enemy auto-aim: Most low-level players auto-aim. Sidestep after they fire.
- Wall hugging: Stay near walls to break line of sight. Pop out to shoot, then hide.
- Juking: Change direction unpredictably. For example, run left, then instantly right.
- Technique: Stand at corner of wall, fire, then step back before enemy can retaliate. Essential for sharpshooters and throwers.
- Gadget combos: Some brawlers have gadgets to help (e.g., Brock's rocket laces to jump over walls).
- Team super combos: For example, Gene pulls an enemy into your team's supers (like Frank's stun). Time your supers together.
- Sequence: Thrower's super can flush enemies out, then tank's super to close in.
- Activation timing: Gadgets have limited uses per match (usually 3 if you have second gadget unlocked). Use them wisely. For example, Poco's "Protective Tune" gadget should be saved for when your team is about to die from a stun or knockback.
- Star power switch: Some star powers are better for specific modes. For example, Piper's "Snappy Sniping" (faster reload after super) is great for Bounty, while "Ambush" (extra damage when hiding in bush) works in Showdown.
- Know strengths: Tanks beat low-DPS brawlers but lose to tanks with knockback (e.g., Crow is hard countered by tanks). Sharpshooters beat mid-range brawlers but struggle against assassins.
- Adapt: If enemy team has three tanks, pick a Crow or Spike to deal percentage damage. If they have throwers, pick a fast brawler to rush them.
- Prioritize one brawler: Focus upgrades on your favorite or a versatile brawler (like Poco, Jessie, or Bull) to push trophies faster. Don't spread thin.
- Max level costs: From level 1 to 11, you need about 3785 Power Points and 8470 Coins. That's a lot – plan ahead.
- Gears: Unlock at level 5, but only upgrade the brawler's gear slots when you have good gears. Save coins for gears that benefit your playstyle (e.g., damage gear for aggressive, heal gear for passive).
- Free vs Premium: Free pass gives some rewards; premium gives extra big boxes, a new brawler, and exclusive pins/skins. If you plan to play a lot, buy the pass (169 gems). Never spend gems on boxes – always save for pass or better offers.
- Seasonal resources: Complete quests and events to get tokens. Use tokens to unlock pass tiers.
- Join an active club: Weekly club coins from winning matches. Buy Power Points, Coins, or featured brawlers (if you don't have them). Prioritize rare brawlers you're missing.
- Don't upgrade all brawlers evenly: Pick a core team of 3-5 brawlers and max them first. You can use them for multiple modes.
- Gadgets & Star Powers: Buy only the ones that are meta or suit your playstyle. Check tier lists (e.g., from KairosTime).
- Starr Drops: New reward system – save your win track boxes until you have maxed out certain rarities? Actually, just open as you get them. But remember: you can get gadgets, star powers, even hypercharges from them.
- Best gem use: Brawl Pass (169 gems) > special offers (like 29 gems for 1000 coins) > skins (if you really want). Never buy megaboxes with gems.
- Saving gems: If you're free-to-play, only spend gems on pass. You can earn up to ~80 gems per season from free pass, so it takes 2-3 seasons to get one premium pass.
- Push in low trophy range: Early seasons, stay at lower trophies (e.g., 500-600) to farm star points? Actually, star points come from total trophies at season end. Push high trophies on a few brawlers to get more star points for exclusive skins.
- Avoid tilt: If you lose two matches in a row, take a break. Tilt leads to more losses.
- Role: One brawler collects gems (preferably a tank or fast brawler). Teammates protect. Don't let the gem carrier die.
- Gem count: When you have 7+ gems, it's risky. Retreat and let teammates hold gems. If you die with gems, enemy gets them.
- Map control: Control the two lanes and the center. Use throwers to chip away at defenders.
- Solo: Avoid fighting early unless necessary. Bush camp or collect power cubes. When two enemies fight, third-party them.
- Duo: Stick with your teammate. Share power cubes (give to brawler who benefits more, e.g., give to a heavy hitter). Use the respawn mechanic: if teammate dies, they can come back if you survive 10 seconds.
- Meteor modifier: Avoid clustering; meteors target groups. Gas clouds close borders – don't get caught by the map shrinking.
- Kick the ball: After scoring, reset positions. Use ball to break walls (one hit destroys a wall). Pass to teammates.
- Defense: Stay near your goal to intercept enemy shots. Tanks like Bull can clutch block.
- Ultimate synergy: Gene's super pulls the ball carrier, then your teammate can score easily.
- Star player: The player with the most stars (kills) becomes the target. Protect them or kill the enemy star player.
- Late game: In the last 30 seconds, if you're ahead, play safe and hide. If behind, take risks.
- Map awareness: Use sharpshooters to control long lanes. Avoid getting caught in the open.
- Safe damage: Use brawlers with high DPS (e.g., Brock, Colt, Spike) or brawlers that can bypass walls (throwers, Piper). Tanks can charge in but often die.
- Defense: Place brawlers with area denial (e.g., Penny's mortar, Jessie's turret) near the safe to prevent enemy approach.
- Capture area: If you control the zone, you accumulate points. Even if you die, if team is still in zone, it counts. So try to stay alive in zone.
- Contest: If enemy has zone, you can stop their progress by stepping into it. Multiple brawlers can stack in zone for faster capture? Actually, capture speed is based on number of your brawlers in zone (max 3). Stand in overlapping zones (if map has multiple) to capture both quickly.
- Survival: Only the last team standing wins. Play safe in first round; you can revive after each round. Use brawlers with high survivability (tanks, healers).
- Bush gameplay: Common in knockout; use vision gear to see into bushes.
- Bush checking: Use a quick shot into suspicious bushes before walking in.
- Frank super: Super stuns all enemies in a large area. Combo with a teammate's area damage (e.g., Emz's super).
- Edgar: Only play Edgar in Showdown or modes with lots of bushes. Use his super to dive onto squishy brawlers. Wait until they waste ammo.
- Stu: His dash can chain; with super, you can dash multiple times. Use wall peeking to poke and dash away.
- Arcing: Practice landing shots over walls by predicting enemy movement. Hold attack and drag to see arc.
- Tick's mines: Place mines to block paths, not just on enemies. Use super to create a minefield.
- Piper: Keep distance. Her super can be used to escape or finish kills. Auto-aim is risky; always manual aim.
- Belle: Her super bounces to chain damage. Aim to hit multiple enemies or a hidden squishy.
- Poco: His super heals all teammates. Don't hold it; heal when two or more are low. Gadget can block stuns.
- Byron: His attack heals allies and damages enemies. Use the alternate fire? Actually, he only has one attack that does both depending on target. Stay behind tanks to keep them alive.
- Emz: Her attack widens as it travels. Keep enemies at medium range to hit full damage. Her super pushes back and deals damage – use to separate threats.
- Sandy: His super creates a sandstorm that hides teammates. Use it to secure gem grab zones or approach safely.
- In Bounty/Heist: After killing enemy team, don't all go back. Leave one person near enemy spawn to delay their return. This works especially on maps with long respawn timers.
- Counter: Have a brawler with knockback (e.g., Primo's super) to disrupt the trapper.
- How to get: Collected from starr drops. Hypercharge boosts stats and gives a unique ability for 5 seconds (e.g., double damage, speed). Activate when you're about to teamfight or secure an important kill.
- Best timing: Pop hypercharge just before engaging; the bonus can turn a losing fight. Don't activate early and waste duration.
- Edgar's "Let's Fly" + Super: Use gadget to jump onto an enemy then immediately super to recharge and do it again.
- Brock's "Rocket Laces": Jump over walls to escape or reposition. Combine with super to create a path.
- Using pins: Spamming a laughing pin after a kill can tilt enemies. Use it strategically to provoke mistakes.
- Sprays: Place a spray to fake a position or as a distraction (though rarely effective).
- Power cubes: Give cubes to the brawler that benefits most (e.g., Bull gets insane HP, Crow gets extra poison damage).
- Energy Drinks: In some modifiers, drink gives huge speed and damage. Save it for a 1v1 or to escape gas.
- Every team needs: One aggro (tank or assassin), one support (healer or controller), and one damage dealer (sharpshooter or thrower). Balance helps.
- Communication: Use in-game quick chat ("Attack", "Defend", "I got this") even without voice. Ping enemy positions by tapping on minimap (available in higher ranks?). Actually, you can tap on the mini-map to alert teammates in Gem Grab and Brawl Ball.
- Example combos: Gene + Frank (pull + stun), Tara + Sandy (black hole + sandstorm), Poco + any tank (heals keep tanks alive).
- Counter-picking: In Power League, if enemy picks a heavy tank, you might pick Crow or Colette to melt them.
- Lane control: On maps with three lanes, each teammate takes one. If you win your lane, rotate to help others.
- Bush control: Use area damage (Emz, Tick) to clear bushes. Don't let enemies hide.
- Center control: In modes like Gem Grab or Hot Zone, controlling the center gives you access to gems/zone. Use throwers to deny center.
- Gem Grab – "Double Swoosh": Control the two side bushes. Use long-range brawlers to poke middle.
- Brawl Ball – "Backyard Bowl": Use throwers to lob over the central wall. Break the wall early with a brawler like Bull to open a path.
- Heist – "Skinny Dip": Brock or Piper can shoot the safe from a distance. Defend by hiding behind walls.
- Slider: In settings, you can adjust aim assist strength. Set to low if you want more control; high for easier auto-aim. Most pros set it to medium or low.
- Auto-aim usage: Use auto-aim only when enemy is within 3 tiles or when you need to shoot quickly (e.g., against a fast-assassin). Manual aim for long range.
- Dynamic joystick: Follows your finger – best for fast movement and juking.
- Fixed joystick: Stays in one spot – good for precise control but less agile.
- Increase size: If you accidentally press wrong buttons, enlarge them in settings. Reduce transparency to see better.
- Showdown: Turn off auto-aim sometimes to avoid revealing your position when shooting bushes.
- 3v3: Use auto-aim sparingly – manual aim is more reliable for securing kills.
#### 2. Bush Mechanics
#### 3. Ammo Management
#### 4. Super Charge
#### 5. Know Your Role
Combat Strategies
#### 1. Dodging & Weaving
#### 2. Wall Peeking
#### 3. Super Chain
#### 4. Star Power & Gadget Management
#### 5. Counters & Matchups
Resource Management
#### 1. Power Points & Coins
#### 2. Brawl Pass & Gems
#### 3. Club Shop
Economy & Progression
#### 1. Smart Spending
#### 2. Gems Efficiency
#### 3. Trophy Management
Game Mode Tips
#### 1. Gem Grab
#### 2. Showdown (Solo & Duo)
#### 3. Brawl Ball
#### 4. Bounty
#### 5. Heist
#### 6. Hot Zone
#### 7. Knockout
Brawler-Specific Tips
#### 1. Tanks (Bull, Rosa, Frank, etc.)
#### 2. Assassins (Edgar, Stu, Mortis)
#### 3. Throwers (Barley, Tick, Sprout)
#### 4. Sharpshooters (Piper, Brock, Belle)
#### 5. Supports (Poco, Byron, Gene)
#### 6. Controllers (Emz, Tara, Sandy)
Advanced Optimizations
#### 1. Spawn Trapping
#### 2. Hypercharge Usage
#### 3. Gadget Combos
#### 4. Pin & Spray Mind Games
#### 5. Energy Drink & Power Cube Management (Showdown)
Team Play & Communication
#### 1. Roles in 3v3
#### 2. Synergy
Map-Specific Strategies
#### 1. General Map Control
#### 2. Specific Map Examples
Settings & Controls
#### 1. Aim-Assist Sensitivity
#### 2. Joystick Type
Try both in training cave.
#### 3. Button Size & Transparency
#### 4. Game Mode Specific Settings
Conclusion
These tips cover from beginner to advanced. Practice in friendly games or the training cave to master mechanics. Remember: Brawl Stars is about quick decisions and teamwork. Keep learning, watch replays, and adapt your playstyle to the meta. Good luck and have fun!