Game Tips
Game Tips – Company of Heroes 2
Comprehensive guide covering beginner, intermediate, and advanced strategies for all factions.
---
1. Beginner Tips
#### 1.1 Capture Points Early & Often
- Tip: In the first 30 seconds, send one or two squads to capture the nearest victory point or fuel/munition point. Don’t leave your base idle.
- Why: Territory gives resources. Fuel lets you build tanks; munitions enable abilities and upgrades. A quick cap denies enemy income and accelerates your tech.
- When: Always at game start. Re-cap points after losing them.
- Tip: Always move infantry from green cover (bushes) to green cover. Avoid standing in the open.
- Why: Green cover reduces incoming damage by 50%, yellow cover (sandbags) by 25%. Units in the open die fast.
- When: Every engagement. Pre-position behind rocks or walls before enemy contact.
- Tip: Use engineer squads or vehicle crew to repair tanks and half-tracks. Don’t let your tanks burn.
- Why: A damaged tank is still effective; a repaired one can fight multiple engagements.
- When: After retreating or during lulls in combat.
- Tip: Press R to instantly order a squad to sprint back to base invulnerable for a few seconds.
- Why: Prevents squad wipe, preserves veterancy. Better to retreat early than lose six men.
- When: As soon as a squad takes heavy casualties or is outnumbered.
- Tip: Indirect fire is critical for dislodging enemies from buildings or behind heavy cover.
- Why: Direct assaults on fortified positions cause heavy losses. Barrage forces enemy to move or die.
- When: Mid-game (after 2-3 infantry squads).
- Tip: Prioritize fuel points over munition points in the early game.
- Why: Fuel determines your vehicle timing. A Tiger or T-34 arriving two minutes earlier wins fights.
- When: On maps with fuel points, cap them first. Trade munitions for fuel if needed using doctrines.
- Tip: Save munitions for key abilities like grenades, mortar flares, or defensive artillery.
- Why: Wasting munitions on unnecessary infantry upgrades delays powerful call-ins.
- When: Don’t spam upgrade every squad; pick 1-2 explosive-focused squads.
- Tip: Place structures inside your base’s build radius; don’t over-extend with forward buildings early.
- Why: Forward bases are vulnerable. Keep your economy safe until you control the map center.
- When: Mid-game after securing at least 2-3 sectors.
- Tip: Always send a scout or engineer to capture neutral fuel and munitions on your side of the map.
- Why: Every point adds to your income. Missing one gives opponent free resources.
- When: At game start and after each major fight when you push forward.
- Tip: Press R to order a vehicle to reverse out of danger instead of turning around.
- Why: Turning exposes weak rear armor. Reversing keeps front armor facing enemy.
- When: Any time a vehicle is under anti-tank fire.
- Tip: Select multiple anti-tank squads and have them target the same tank one by one.
- Why: Concentrated fire destroys vehicles faster than spread damage. Reduces enemy damage output.
- When: Against heavy tanks or multiple vehicles.
- Tip: Use separate control groups for different unit types. Avoid moving all infantry as one blob.
- Why: A single mortar shell can wipe a blob. Spread units to use cover and avoid splash.
- When: Always. Split squads into 2-3 groups to flank.
- Tip: Many infantry and vehicles have smoke launchers. Use smoke to block enemy line of sight.
- Why: Allows safe retreat or advance across open ground. Denies enemy MG fire.
- When: When crossing roads or charging a defended position.
- Tip: Send a single scout or sniper forward to reveal enemy positions.
- Why: Knowledge prevents ambushes. Scouting lets you choose engagements on your terms.
- When: Throughout the game. Keep a scout near the front line.
- Tip: Use recon abilities (e.g., Soviet mortar flare, Wehrmacht scout car) to reveal fog of war.
- Why: Reveals hidden AT guns or minefields. Prevents nasty surprises.
- When: Before pushing into a sector you suspect is defended.
- Tip: Kill engineers building forward headquarters or bunkers.
- Why: Destroying their forward base delays their offense and cuts their retreat path.
- When: When you see a builder behind enemy lines.
- Tip: Start with 4 Conscript squads, then tier to T1 for scout car, or skip to T2 for Zis guns.
- Why: Conscripts are cheap, cap fast, and can merge with other squads. T2 gives AT capability.
- When: General purpose. Adapt if facing early armor: rush T2.
- Tip: 1 Pioneer, 2 Grenadiers, then tech to T2 for MG42 or mortar.
- Why: Grenadiers have long-range rifles; MG42 suppresses infantry. Controls early engagements.
- When: Standard for most maps. Against Soviet spam, add an early flamer half-track.
- Tip: Start with Sturmpioneers, then build 2-3 Volksgrenadiers and tech to Flak HQ for AA halftrack.
- Why: Sturmpioneers are strong up close; Volks cap flanks. Flak HQ gives anti-air and anti-infantry.
- When: On open maps. Avoid early blobs.
- Tip: Use Infantry Sections in cover, build a training center for upgrades, then tech to AEC armored car.
- Why: British infantry are powerful in cover. AEC is excellent for early vehicle harassment.
- When: On maps with lots of hedgerows. Weak on open fields.
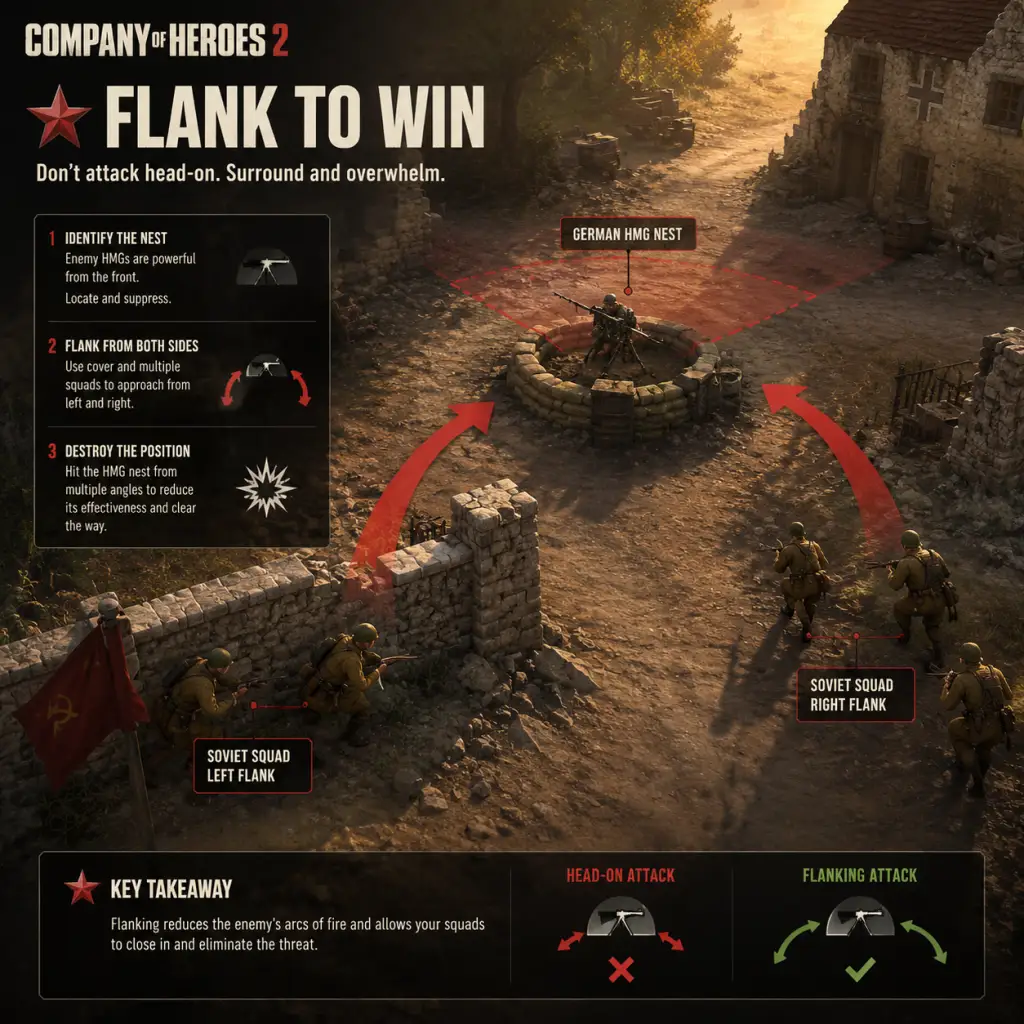
- Tip: Send one squad to engage frontally while another moves around to attack from the side or rear.
- Why: Units take damage from any direction but are less likely to use cover when outflanked. Also, vehicles have weaker side/rear armor.
- When: Against MG nests, tanks, or entrenched infantry.
- Tip: Many infantry squads (e.g., Soviet Conscripts with AT nade upgrade) can throw satchel charges at tanks.
- Why: Cheapest way to damage armor. One well-placed nade can track a tank.
- When: When a tank is stationary or in close range.
- Tip: Pair infantry with vehicles. Use infantry to spot and suppress, vehicles to kill.
- Why: Infantry alone can’t kill tanks; tanks alone get swarmed by RPGs. Combined covers weaknesses.
- When: Mid-game onward. Never send tanks without infantry escort.
- Tip: Veteran units (chevron icons) are much more effective. Retreat them early.
- Why: Veteran bonuses (accuracy, reload speed, health) make them worth 2x a fresh unit.
- When: If a veteran squad is under fire and low on health, retreat immediately.
- Tip: Use control groups: 1-3 for infantry, 4-5 for vehicles, 6 for engineers, 7 for artillery. Use `Q` for abilities.
- Why: Fast selection leads to precise micro. Respond to threats instantly.
- When: Practice in skirmish mode until reflexive.
- Tip: Order units to attack a specific ground area to reveal hidden enemies or flush garrisons.
- Why: Prevents ambush when you suspect presence (e.g., near a building).
- When: When approaching enemy-held points.
- Tip: Place mines (engineers or Wehrmacht) on enemy resource points and common paths.
- Why: Kills units, tracks vehicles, gives vision when detonated.
- When: After securing an area, lay mines before the enemy counterattacks.
- Tip: Attack when you have a numerical advantage or when enemy is distracted (e.g., repairing vehicles).
- Why: Rushing into a prepared defense wastes resources. Wait for your artillery cooldown or reinforce first.
- When: Analyze minimap. Only initiate when you see opportunity.
- Tip: Pick a commander doctrine that counters your opponent’s playstyle. For example, Soviet Guard Motor if facing heavy armor; Wehrmacht Luftwaffe if facing air spam.
- Why: Doctrines provide unique abilities that can turn the tide.
- When: Before the match (scout commander in pre-game).
- Tip: Engineers can build sandbags and bunkers. Place them in key defensive positions.
- Why: Provides cover and suppresses enemy advances. A well-placed bunker can hold a sector.
- When: After capping a strategic point near a bottleneck.
- Tip: Press Backspace to view the strategic map and order long-range attacks.
- Why: Better overview for coordinating multiple fronts. Use to call in off-map artillery.
- When: During lulls or when planning a multi-pronged attack.
- Tip: Use a scout or a cheap squad to bait sniper shots, then mortar the sniper’s position.
- Why: Snipers are high-value but fragile. Once revealed, they die quickly to indirect fire.
- When: If you suspect a sniper. Listen for the shot sound.
- Tip: Send a fast vehicle or infiltration squad to cut enemy supply lines (the road sectors).
- Why: Reduces enemy income drastically. Often more impactful than fighting head-on.
- When: Mid-game when you have a mobile unit (e.g., Soviet cavalry, Wehrmacht half-track).
- Tip: Use paratroopers or commando squads to capture deep neutral points.
- Why: Forces enemy to divert units, creating openings on the main front.
- When: After establishing map control in your half.
- Tip: Order a unit to appear to retreat, then cancel and attack when enemy chases.
- Why: Enemy may overextend, leaving cover. Use this to lure into your MG fields of fire.
- When: When you have a defensive line established.
- Tip: Leave a damaged squad visible to tempt enemy attack, then spring an ambush.
- Why: Enemy greedy for kills often walks into traps.
- When: Only when you have a backup force hidden.
- Tip: Use Conscripts to merge with other squads (Penals, Guards) to reinforce them for cheap.
- Why: Saves munitions and time. Keeps elite squads full without building new units.
- When: Frequently in mid-late game.
- Tip: Keep Grenadiers alive to earn veterancy. Vet 3 Grenadiers are arguably best infantry.
- Why: Gains damage reduction, accuracy, and faster reloads.
- When: Avoid reckless attacks with them.
- Tip: Upgrade to Flak 38 on halftrack. It provides mobile anti-air and anti-infantry.
- Why: Dominates early infantry and denies enemy aircraft. Great support vehicle.
- When: Build as soon as you have a fuel lead.
- Tip: Use Vickers machine guns and 6-pounder AT guns effectively. Creep them forward in cover.
- Why: Defensive play rewards careful positioning. Don’t overextend.
- When: On maps with long sight lines.
- Tip: Look at the minimap every 5-10 seconds to spot enemy movements.
- Why: Prevents flanking and surprise attacks. Gives you time to react.
- When: Always. Make it a habit.
- Tip: Use pings (Alt + click) to alert teammates of enemy positions or objectives.
- Why: Coordination wins team games. A simple ping can save a teammate.
- When: In multiplayer, ping whenever you spot something significant.
- Tip: Read patch notes. Meta shifts every update; obsolete builds may be weak.
- Why: Knowing what’s strong keeps you competitive. Example: certain tanks become cheaper after buffs.
- When: Before each ranked season.
- Tip: Download replays from top players (available in game or on sites like CoH2.org).
- Why: See effective build orders and micro decisions in context.
- When: After learning basics, to refine your play.
- Mistake: Ignoring resource points entirely.
- Mistake: Building too many units without tech.
- Mistake: Leaving vehicles idle.
- Mistake: Not using retreat hotkey.
- Mistake: Overextending into enemy base.
#### 1.2 Use Cover Religiousy
#### 1.3 Repair Your Vehicles
#### 1.4 Use the Retreat Button (R)
#### 1.5 Build at Least One Mortar or Howitzer
---
2. Economy & Resources
#### 2.1 Fuel is King
#### 2.2 Manage Munitions for Abilities
#### 2.3 Build Efficiently
#### 2.4 Capture Neutral Resource Points
---
3. Unit Management & Micro
#### 3.1 Use Vehicle Reverse (R on selected vehicle)
#### 3.2 Cycle Focusing Fire
#### 3.3 Blob Control – Spread Out
#### 3.4 Use Smoke Screens
---
4. Map Control & Vision
#### 4.1 Scout with Cheap Units
#### 4.2 Place Flares/Recon Abilities
#### 4.3 Deny Enemy Forward Bases
---
5. Build Orders & Tech Paths
#### 5.1 Soviet Standard Build
#### 5.2 Wehrmacht Early Game
#### 5.3 OKW (Oberkommando West) Build
#### 5.4 British Forces Build
---
6. Combat Tactics
#### 6.1 Flanking – Hit from Two Sides
#### 6.2 Use Anti-Tank Grenades
#### 6.3 Combined Arms
#### 6.4 Preserve Vet Units
---
7. Advanced Optimizations
#### 7.1 Hotkey Mastery
#### 7.2 Use Attack Ground (Shift + A)
#### 7.3 Minefield Denial
#### 7.4 Timing Your Attack
#### 7.5 Counter Doctrine Choices
---
8. Defensive & Siege Tactics
#### 8.1 Build Bunkers and Sandbags
#### 8.2 Use the Strategic Map (Backspace)
#### 8.3 Counter-Sniper Tactics
---
9. Resource Denial (Economic Warfare)
#### 9.1 Kill Enemy Supply Lines
#### 9.2 Capture Neutral Points Behind Enemy Lines
---
10. Psychology & Mind Games
#### 10.1 Fake Retreats
#### 10.2 Bait with Low HP Units
---
11. Faction-Specific Nuances
#### 11.1 Soviets – Merge Mechanic
#### 11.2 Wehrmacht – Vet for Grenadiers
#### 11.3 OKW – Flak Halftrack
#### 11.4 British – Special Weapons Teams
---
12. Map Awareness & Minimap Usage
#### 12.1 Constant Minimap Glances
#### 12.2 Ping System
---
13. Patches & Meta Changes
#### 13.1 Stay Updated
#### 13.2 Watch Pro Replays
---
14. Common Mistakes to Avoid
- Fix: Always cap everything you safely can.
- Fix: Balance population with tech upgrades.
- Fix: Always have them active – scouting, harassing, or supporting.
- Fix: Bind R to retreat and use it ruthlessly.
---
15. Final Pro Advice
> "Company of Heroes 2 is won by controlling the middle of the map, not by destroying the enemy base." – Relic Entertainment design philosophy.
Patience, discipline, and constant learning separate good players from great ones. Practice in skirmish vs AI before jumping into multiplayer. Good luck, commander!