Game Tips
General / Meta Tips
1. Understand Chaos and How It Affects the World
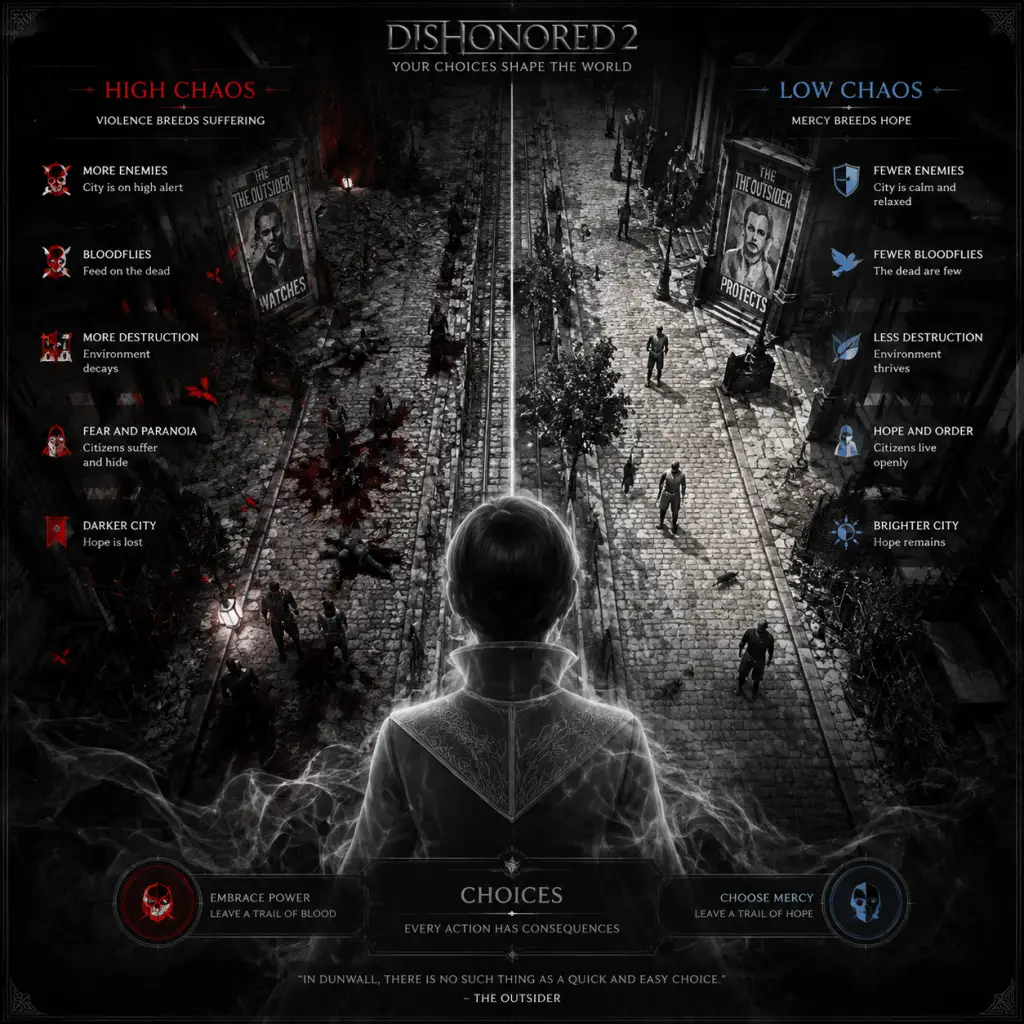
Chaos is a global variable that tracks your lethal vs. non‑lethal actions. High Chaos (many kills, especially civilian deaths) makes levels darker, adds more bloodflies and rats, increases city guard aggression, and leads to a darker ending. Low Chaos (few kills, stealthy non‑lethal takedowns) results in brighter environments, fewer plagues, and a more hopeful conclusion. Plan your run based on the ending you want. For a first playthrough, try low chaos to see more of the story and avoid punitive guard spawns.
2. Save Often and Use Multiple Slots
Dishonored 2 auto‑saves only at checkpoints. Manual quick‑saving (F5 on PC, or the save button on consoles) lets you redo tricky sections without replaying large chunks. Use three or four rotation slots to avoid losing progress if a save becomes corrupted. Before entering a heavily guarded area or attempting a risky maneuver, press quicksave.
3. Read Everything You Find
Books, notes, and audiographs are not just flavor; they often contain passcodes, secret room locations, side‑quest hints, and lore that unlocks optional objectives. Some NPCs give code words that open special dialogue options. The more you read, the more optional content you unlock.
Combat Tips
Beginner Combat Tips
1. Use Thrown Objects to Distract
Bottles, cans, and even severed heads can be thrown to make noise. Guards will investigate the impact point, giving you a clear path to slip past or perform a stealth takedown. This works even in open combat—throw a bottle behind an enemy to break their aim.
2. Parry and Counter‑Attack
When an enemy swings at you, press the block/parry button (right mouse button on PC, or the assigned controller button) just before the hit lands. A successful parry staggers the enemy, leaving them open for a one‑hit kill (or non‑lethal choke). Practice timing on single guards before taking on groups.
3. Use the Environment
Water pools electrocute enemies if you throw a live wire or shoot a whale oil tank. Oil slicks can be ignited with a pistol shot or a grenade. Chandeliers, hanging signs, and loose stone blocks can be shot or pulled down to crush enemies. Always scan the room for interactable elements before engaging.
Intermediate Combat Tips
1. Domino (Corvo’s/Emily’s Power) Combos with Grenades or Sleep Darts
Domino links up to four enemies. If you tag multiple guards and then shoot a sleep dart at one, all linked targets fall asleep simultaneously. Alternately, if you throw a sticky grenade at the linked group, the explosion kills or knockos all of them. Use Domino on patrols to wipe them out silently.
2. Blink (Corvo) vs. Far Reach (Emily) for Combat
Blink is instant and can stop time when fully upgraded, making it ideal for chain‑kill combos. Far Reach can pull enemies toward you (if upgraded) or allow you to yo‑yo around the battlefield. In combat, use Far Reach to yank a sniper off a ledge or to quickly close distance to a ranged enemy.
3. Use Shadow Walk (Emily) for Ambushes
Shadow Walk turns you into a shadow that can phase through grates and small gaps. While in shadow form, you can perform a powerful lunging attack that kills most enemies instantly. Combine with Domino: tag enemies while invisible, then use Shadow Walk’s attack on one to kill all linked targets.
Advanced Combat Tips
1. Slide and Assassinate
Running then sliding (crouch while sprinting) lets you cover ground while staying low. As you slide into an enemy, press the attack button to perform a special slide assassination. This is faster than a standing takedown and can be chained if multiple enemies are close.
2. Use Stop Time (Corvo) for Impossible Kills
Fully upgraded Stop Time freezes all enemies and projectiles. You can place a springrazor trap near a frozen enemy, then release the spell—the trap detonates instantly. Alternatively, shoot multiple enemies in the head while time is frozen to clear a room before they react.
3. Mesmerize (Emily) for Crowd Control
Mesmerize makes all enemies in a radius stop and stare at a glowing orb for several seconds. This gives you free reign to walk behind them and choke them out, or set up a multi‑kill. Upgrade it to increase duration and radius.
Exploration Tips
Beginner Exploration Tips
1. Always Look Up and Down
Many shortcuts, bonecharms, runes, and secret rooms are hidden above eye level (on rooftops, hanging from ceilings) or below (in sewers, basements, and under floors). Regularly pan your camera vertically.
2. Use Dark Vision to Reveal Secrets
Dark Vision (Corvo/Emily power) highlights enemies, loot, and interactable objects through walls. The fully upgraded version reveals the exact location of all collectibles (runes, bonecharms, blueprints, paintings). Whenever you enter a new area, pop Dark Vision for a few seconds.
3. Check All Doors and Windows
Some doors are locked but can be opened from the other side via a lever or a window. If a locked door has a window, try shooting it out or breaking it with a weapon to reach the lever. Peek through keyholes to scout without opening.
Intermediate Exploration Tips
1. Search for Grate Vents and Pipe Tunnels
Small vents and pipe tunnels are often overlooked. They lead to alternate paths, loot rooms, and guard barracks. Crouch and slowly move through them. Some have pressure plates or alarms—disable them before proceeding.
2. Use Hacking and Rewire Tools
Many levels have security systems (walls of light, arc pylons, watchtowers). Using a rewire tool on these can turn them against enemies or disable them for passage. Hack clockwork soldiers to make them fight the guards. Always carry a rewire tool and a couple of hacks.
3. Listen to Guard Conversations
Guards often discuss patrol routes, secret codes, or locations of valuables. Eavesdrop for clues. For example, in the Clockwork Mansion, guards talk about a hidden safe combination. You won’t find that code anywhere else.
Advanced Exploration Tips
1. Use Possession (Corvo) on Rats and Fish
Small animals can access areas too tight for humans. Possess a rat to crawl through small holes, then exit on the other side to open a door from within. In the Royal Conservatory, you can possess a fish to swim through pipes into a sealed room.
2. Combine Doppelganger (Emily) with Switch Teleport
Place a Doppelganger on a high ledge, then use Far Reach to swap places with it. This lets you reach seemingly inaccessible heights or cross large gaps without using Blink. The Doppelganger also draws enemy fire.
3. Reach Impossible Heights with Missing Persons Side Quest
In the Dust District, you can help a character named Stilton to unlock a different timeline version of the mansion. There, many collectibles become reachable that are otherwise blocked. Complete all side quests to open exploration opportunities.
Resources & Crafting
Beginner Resource Tips
1. Loot Everything, but Manage Inventory
Coins, ammo, health potions, and crafting materials (bone charnel fragments, whale oil) are scattered everywhere. You have limited inventory space for elixirs and potions (max 12 of each). Don’t hoard—use them early to free space. Craft a bonecharm early to understand the system.
2. Save Whale Oil for Rewire Tools
Whale oil is scarce early on. Use it primarily for rewire tools and grenades, not for crafting useless items. In the first few levels, avoid wasting whale oil on springrazors you won’t use.
3. Blueprints Improve Crafting
Blueprints (found around the world) upgrade your inventory capacity for potions, elixirs, and grenade types. They also unlock new crafting recipes for bonecharms. Always search for blueprints; they permanently improve your effectiveness.
Intermediate Resource Tips
1. Craft Bonecharms from Fragments
Four bonecharm fragments make one random bonecharm. You can break down unwanted bonecharms at a workbench for fragments. Focus on crafting bonecharms that suit your playstyle: stealth players want “Swift Shadow” (move faster while crouching), combat players want “Bloody Mist” (kill enemies make them explode into bloodflies).
2. Use the “Spirit Water” or “Voltaic Conversion” Bonecharms
Spirit Water: picking up a small health or mana potion also restores the other resource partially. Voltaic Conversion: taking electrical damage (from arc pylons) restores mana. These provide infinite sustain in certain areas.
3. Automate Crafting with Workbenches
Each mission has at least one workbench. You can craft bonecharms, upgrade equipment (bow, pistol, crossbow) using coins and whale oil. Upgrading your crossbow to shoot armored enemies is a high priority for stealth runners.
Advanced Resource Tips
1. Farm Whale Oil from Arc Pylons
Arc pylons and walls of light contain whale oil tanks. If you disable them (using rewire tool or destroying the power source), you can loot the whale oil for crafting. This gives you a steady supply without exploring dangerous rooms.
2. Duplicate Bonecharms via Void Shrines
After completing certain side objectives (like the “Dr. Galvani” quest), a Void Shrine may offer to duplicate a bonecharm you own. This allows stacking identical strong effects (e.g., two “Swift Shadow” charms). Use this to create overpowered combinations.
3. Use “Blood Flight” from Bonecharm to Gain Height
If you craft a bonecharm that lets you jump higher (e.g., “Agility” upgrade), combine it with Blink or Far Reach to reach almost any spot. This eliminates the need for alternate paths and saves time.
Builds & Upgrades (Runes & Powers)
Beginner Build Tips
1. Choose a Character and Stick to a Power Set
Corvo has Blink, Possession, Stop Time, and Windblast. Emily has Far Reach, Domino, Shadow Walk, Doppelganger, and Mesmerize. Sam playthrough? Focus on one character’s powers first. For stealth, Emily’s Domino + Shadow Walk is forgiving. For direct combat, Corvo’s Stop Time + Blink is devastating.
2. Prioritise Upgrade of Movement Powers
Blink’s upgraded range (Blink Range I/II) and Far Reach’s reach and pulling ability drastically improve navigation. Spend your first runes on these. Being able to escape or reposition easily saves you more trouble than any combat power.
3. Get Dark Vision Early
Dark Vision is indispensable for stealth. The first upgrade reveals loot, the second reveals living beings. Buy it with your first runes. It prevents detection and helps you find all secrets.
Intermediate Build Tips
1. Domino + Shadow Walk is a Stealth Killer Combo
Tag a group of enemies with Domino (up to 4). Activate Shadow Walk, walk up to one, and perform the lunging attack. All tagged enemies die instantly, and since Shadow Walk is active, you remain invisible during the kill. No bodies, no alarms.
2. Stop Time + Grenade + Blink Escape
Corvo: cast Stop Time (fully upgraded), place a sticky grenade on each frozen enemy’s chest, then Blink to a high vantage point. When time resumes, the grenades explode simultaneously. This clears entire rooms without alerting other floors.
3. Doppelganger + Mesmerize for Crowd Control
Emily: drop a Doppelganger in a hallway, then cast Mesmerize. Enemies will stare at your decoy while you backstab them from behind. Upgrade Doppelganger to explode on death (for fun) or to possess enemies.
Advanced Build Tips
1. Optimise Bonecharm Loadouts
Stack multiple copies of the same beneficial bonecharm. For example, “Swift Shadow” (move faster while crouched) stacks; three of these make you walk at full speed while hunched. “Agility” (jump height) stacks; two of these let you jump over walls. “Bloody Mist” (explosive kills) can chain-kill enemies in a crowd. Plan your build before a mission.
2. Use “Void Favor” to Save Runes
Some Void Shrines offer a “Void Favor” that grants a random bonecharm or rune for free if you complete a challenge (e.g., no kills in this area). Accept these to accelerate your power growth without spending resources.
3. Hybrid Build: Combat+Stealth
If you want to handle both, invest in Far Reach/Blink for mobility, Domino (Emily) or Stop Time (Corvo) for crowd control, and always keep Dark Vision. Use any remaining runes on passive upgrades like Vitality (max health) and Bonecharm Divination (increase bonecharm drop rate).
Economy & Coin Tips
Beginner Economy Tips
1. Sell Unwanted Items Every Mission
Black Market shops appear in each level. Sell surplus whale oil, ammo you won’t use, and extra health potions. Coins are used to buy upgrades and services (like keys or safe codes). Always carry at least 200 coins for emergencies.
2. Collect All Coins, Even Small Amounts
Coins are hidden everywhere: inside drawers, under beds, on dead bodies. Looting every container might net you 200 extra coins per level—enough for a bonecharm from the Black Market.
3. Donate to Beggars for Alternate Paths
In some missions (e.g., Dust District), giving a beggar 50 coins opens a shortcut door or reveals a secret stash. Keep spare change for these interactions.
Intermediate Economy Tips
1. Invest in “Bonecharm Divination” Early
This passive power (requires runes) increases the chance of finding bonecharm fragments on enemies and in containers. More fragments = more bonecharms = more coin from selling duplicates. It pays for itself quickly.
2. Use the Black Market Purchases Wisely
Black Markets often sell special items: keys that open new areas, maps revealing collectible locations, or exclusive bonecharms. If you can afford the map, buy it—it shows all runes and bonecharms on the level map, saving hours of searching.
3. Trade Runes for Coins with the Outsider’s Shrines?
Actually, you cannot trade runes directly. But more runes mean more powers, which let you complete missions faster and loot more coins. Focus on missions with high coin potential (e.g., The Clockwork Mansion has many safes).
Advanced Economy Tips
1. Abuse the Invisibility+Pickpocket Combo
Use Dark Vision to locate guards with coin pouches. Use Shadow Walk or Possession + Blink to get next to them without detection. Pickpocketing yields 20-100 coins per guard. There are over 30 guards in some levels; you can harvest 2000+ coins this way.
2. Craft and Sell Bonecharms
After completing a mission, break down any bonecharms you don’t need and craft new ones. You can sell crafted bonecharms to Black Market dealers for a profit, as some rare charms fetch high prices. Focus on crafting charms with “Spirit Water” or “Swift Shadow” because they are universally useful.
3. Complete Side Objectives for Bonus Coins
Side objectives often reward large sums (e.g., recovering the Duke’s safe key gives 500 coins). Always do side quests before leaving a level. The payout helps buy late‑game upgrades.
Difficulty & Chaos Management
Beginner Difficulty Tips
1. Play on Normal First
Normal difficulty offers fair enemy HP and damage. Harder difficulties give enemies more health and sharper awareness, punishing mistakes. Learn the mechanics on Normal, then try a higher difficulty for achievements.
2. Use Quick Save Before Risky Actions
If you are about to attempt a complex jump or a multi‑kill, quicksave. If you fail, reload instantly. This saves frustration and allows experimentation.
3. Manage Chaos Systematically
If you want a low chaos ending, never kill civilians, avoid killing guards unless absolutely necessary, and don’t be seen. Non‑lethal takedowns are always possible. Use sleep darts, chokeholds, and the non‑lethal methods for special targets.
Intermediate Difficulty Tips
1. “No Kills” Run Requires Patience
To achieve the “Clean Hands” achievement, you must not kill any human or bloodfly (bloodflies count as kills if they die from your influence). Use non‑lethal takedowns, Domino+Choke, and avoid fall damage kills. If an enemy falls off a ledge while unconscious, that counts as a kill. Be careful with body placement.
2. “Ghost” Run (Never Detected) Needs Perfect Dark Vision Usage
To get the “Ghost” achievement, you must never be spotted by enemies. Use Dark Vision constantly to check enemy cones of vision. Wait for patrols to move. Use Far Reach/Blink only when no enemy is looking at your landing spot.
3. Higher Chaos Means More Enemies
As chaos increases, guard patrols become more frequent and more aggressive. Areas that were empty become filled with enemies. This can make exploration harder but also more rewarding for combat builds. If you’re stuck, try reducing chaos by non‑lethal methods.
Advanced Difficulty Tips
1. Chain Non‑Lethal Takedowns with Domino + Choke
Tag four enemies with Domino. Walk up to one and press choke. All four are choked simultaneously. This is the only way to non‑lethally neutralize a group quickly. Requires upgrade to Domino for 4 targets.
2. Use Stop Time to Avoid Detection
Even if you are about to be seen, casting Stop Time (Corvo) freezes the moment. You can then walk behind the guard and choke him before time resumes, and he never registers you. This is a “cheat” for Ghost runs.
3. Speedrun Techniques: “Blink Cancel” and “Far Reach Slide”
Learn to cancel Blink’s landing animation by pressing crouch immediately. With Far Reach, use the pull to slide across gaps while maintaining momentum. These techniques let you traverse levels in under 30 seconds, bypassing all guards. Practice in the first level.
Platform‑Specific Tips
1. PC: Remap Keys for Easy Access
Default controls can be awkward. Remap powers to Q or mouse thumb buttons, and quicksave to F5 or a convenient key. Consider using a gaming mouse with extra buttons for quick power cycling.
2. PlayStation/Xbox: Use Controller Vibration for Stealth
Controller vibration intensifies when you are near an enemy or an explosive hazard. Use this to feel guards through walls—if the left half of the controller vibrates, an enemy is to your left. This is helpful for blind fire.
3. PlayStation 5 Backward Compatibility: Enable Performance Mode
If playing on PS5, make sure to select Performance Mode in the game’s options (if available via patch). This runs the game at 60 FPS, making combat and power usage smoother.
Miscellaneous Advanced Tips
1. Use the “Double Jump” from Bonecharm “Agility”
Craft a bonecharm that adds +20% jump height. Two of these let you jump almost as high as a Blink. Save on mana for other powers.
2. Combine “Spirit Water” with Health Elixirs
If you have Spirit Water equipped, drinking a small health elixir also refills 25% of your mana. In areas with abundant potions, you never need to visit a touchstone.
3. Destroying Walls of Light with an Arc Pylon Battery
You can pick up a whale oil battery from a disconnected pylon and throw it at another Wall of Light; it will explode and disable the barrier temporarily. Useful for nonspecialist builds.
4. Listen to the Heart’s Whispers
The Heart (given to you by the Outsider) can be held to listen to secrets about locations and NPCs. Use it near a corpse to learn the person’s name and relevance. This helps with lore and sometimes reveals hidden side undercovers.
5. Use the Environment to Hide Bodies
Never leave unconscious bodies in plain sight; patrolling guards will find them and raise the alarm. Dump bodies in dumpsters, behind large furniture, or in high ledges. In the Dust District, you can drop bodies into the river to dispose of them permanently.
6. Endgame: Use the “Void Gorgers” to Refill Mana
Void Gorgers (green glowing plants) are rare but fully restore mana. Memorise their locations in each level to sustain power usage. They respawn after a while (not during same mission).
7. Final Boss Tips
The final boss (Delilah) has three phases. First phase: she is invincible; you must destroy the painting of her. Use Far Reach/Blink to reach the painting platform while dodging her attacks. Second phase: after destroying painting, she becomes vulnerable for a few seconds; attack with Domino + grenades or Stop Time + sword. Third phase: she summons multiple shadow copies; use Dark Vision to identify the real one. Keep moving and use Mesmerize to freeze copies.
Summary
Mastering Dishonored 2 requires blending stealth, powers, and environmental awareness. Start with low chaos on Normal difficulty, focus on one character, and gradually try advanced power combos. Save often, explore thoroughly, and listen to the world—it rewards patience. Whether you choose Corvo’s time‑bending abilities or Emily’s shadowy dominion, each playthrough can be vastly different. Good luck in Karnaca!