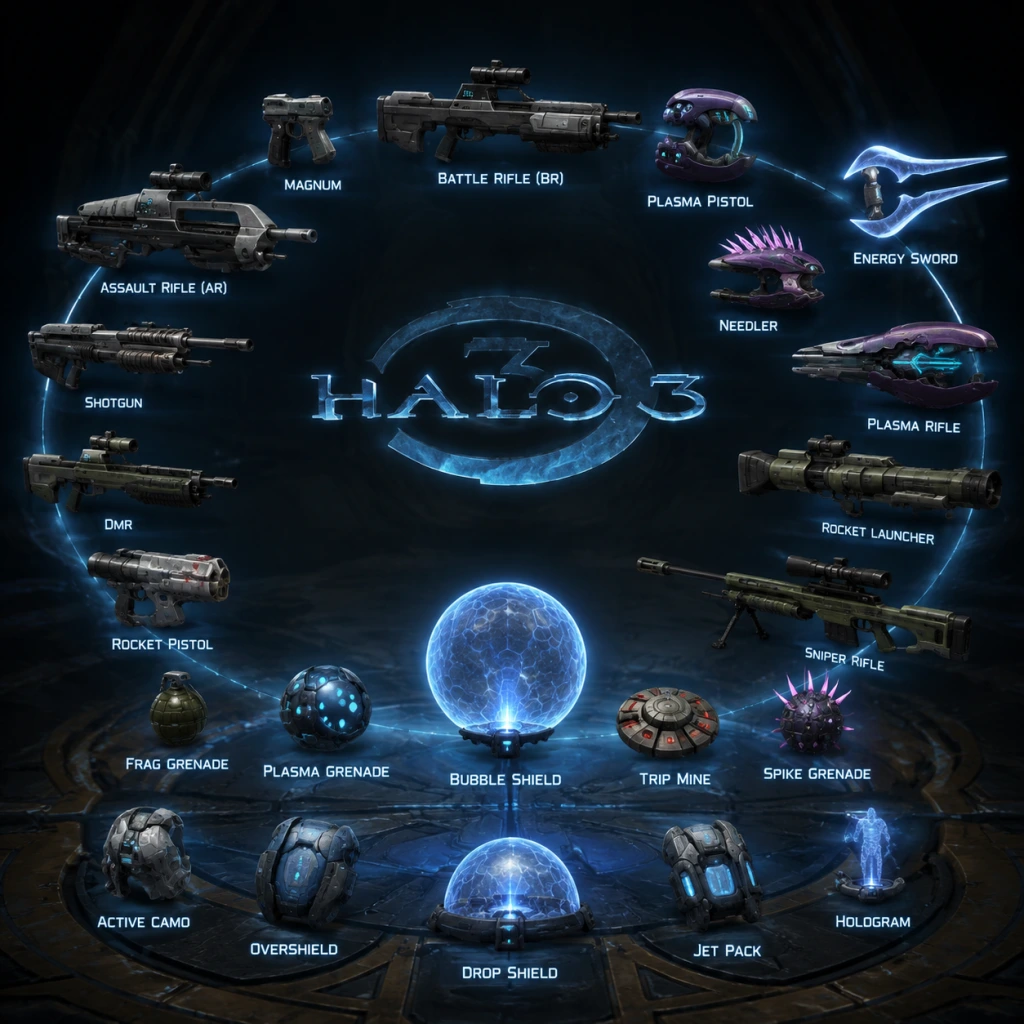
All Game Items
Overview
This guide covers every grabable item in Halo 3’s campaign and multiplayer. Items are grouped by type: weapons, equipment, grenades, vehicles, health items, mission key items, and collectibles. Each entry explains function, acquisition, optimal usage, and any notable synergies. Note that Halo 3 does not have persistent currency or crafting materials; all items are found or dropped in the field.
Weapons
Human Weapons
#### Assault Rifle (MA5C)
- Function: Automatic rifle with a 32-round magazine. Effective at short to medium range.
- Obtain: Starting weapon for many campaign missions; common drop from dead Marines; found on weapon racks in multiplayer.
- Useful when: Suppressing enemy groups, clearing Grunts and Flood infection forms at close range.
- Synergies: Dual-wielding with a Plasma Pistol (to drain shields then finish with the AR). No upgrades.
- Function: 3-round burst rifle with a 36-round magazine. Medium-long range precision weapon; a headshot kills an unshielded enemy instantly.
- Obtain: Common in campaign (Marines carry it, weapon cases); standard starting weapon in ranked multiplayer.
- Useful when: Engaging Jackals, Brutes, and Elites at mid range; any situation requiring accuracy.
- Synergies: Combine with a Plasma Pistol’s overcharged shot for instant shield drop → headshot. No upgrades.
- Function: High-rate-of-fire submachine gun with a 60-round magazine. Very effective at close range but poor accuracy.
- Obtain: Often found paired with a Plasma Pistol on weapon racks; dropped by Marines.
- Useful when: Dual-wielded with another SMG or a plasma weapon for rapid DPS against shields and flesh.
- Synergies: Dual-wielding with Plasma Pistol for shield drain + finish. No upgrades.
- Function: Semi-automatic pistol with a 12-round magazine. High damage per shot; slow fire rate; headshot kills unshielded enemies.
- Obtain: Rare in campaign; appears in certain weapon caches and on some dead Marines. Starter pistol in some multiplayer variants.
- Useful when: As a backup weapon for precise headshots when out of BR ammo; powerful against Flood combat forms.
- Synergies: Can be dual-wielded? No. No upgrades.
- Function: Pump-action shotgun with a 8-shell tube. Devastating at point-blank range; kills most enemies in one shot (including Brutes if close enough).
- Obtain: Common in close-quarters campaign areas (e.g., Cortana, The Covenant); spawns on certain multiplayer maps.
- Useful when: Clear rooms, killing Flood infection forms, one-shotting shielded Brutes and Elites from behind.
- Synergies: Use in tight corridors; no dual-wielding. In campaign, the Shotgun is also effective against Flood Combat Forms’ heads.
- Function: Bolt-action sniper with a 4-round magazine. One-shot headshot on unshielded enemies; very high damage to vehicles.
- Obtain: Found on weapon racks in open areas (e.g., The Ark); dropped by Jackal snipers.
- Useful when: Picking off high-value targets from range, destroying Ghosts or Warthogs with focused fire.
- Synergies: Shoot a vehicle’s fuel tank for explosive kill. No upgrades.
- Function: Two-tube rocket launcher with a 2-round capacity (reloads two rockets). Extremely high splash damage; can lock onto vehicles? No lock-on in Halo 3; manual aim only.
- Obtain: Rare; found in weapon caches and at strategic locations (e.g., The Covenant, The Ark).
- Useful when: Destroying Wraiths, Scorpions, or groups of enemies. One rocket kill on any unshielded infantry.
- Synergies: Lead moving targets; rocket + grenade combo can secure vehicle kills. No upgrades.
- Function: Directed-energy anti-vehicle weapon. Fires a red beam after a 2-second charge; one-shot kill on any vehicle (except maybe Scarab).
- Obtain: Very rare; appears in late campaign missions (The Covenant, Halo) and on certain multiplayer maps.
- Useful when: Destroying Wraiths, Scorpions, Phantoms (if you hit the cockpit). Also effective against Hunters.
- Synergies: Pair with a Spotter for guided hits. No upgrades.
- Function: Continuous-fire weapon that sprays flammable liquid. Ignites enemies and area for a few seconds.
- Obtain: Campaign only; found in specific locations (e.g., “Cortana” mission near the Flood-infested rooms).
- Useful when: Clearing Flood infection forms and combat forms; area denial against Flood wave.
- Synergies: Fuel canisters explode when shot. Not in multiplayer.
- Function: Semi-automatic pistol with two firing modes: regular bolt (slow) and overcharged shot (charged hold) that drains enemy shields completely and stuns vehicles.
- Obtain: Common; dropped by Grunts, Jackals, Elites; found on weapon racks.
- Useful when: Critical for disabling vehicles (especially Banshees and Ghosts) and for stripping shields before headshot.
- Synergies: Overcharge + Battle Rifle headshot is a classic combo. Dual-wield with an SMG or another plasma weapon for rapid shield drain and kill.
- Function: Automatic plasma weapon with a short burst that overheats. Good against shields but less effective against health.
- Obtain: Dropped by Elites, Brutes; common in campaign.
- Useful when: Dual-wielded with another plasma weapon or with a precision weapon for shield drain.
- Synergies: Overheats quickly; swap to another weapon for kill. No upgrades.
- Function: Fires pink homing crystals that track enemies and then supercombine (explode) after enough hits. 7-round burst magazine (variable).
- Obtain: Common; dropped by Grunts, Jackals.
- Useful when: Against groups of lightly armored enemies; the supercombine kills in about 2 bursts. Very effective against Flood combat forms.
- Synergies: The homing makes it useful against strafing enemies. Dual-wield two Needlers for faster supercombine.
- Function: Covenant precision rifle, semi-automatic, 15-round magazine. Similar to Battle Rifle but with a scope and slightly different handling.
- Obtain: Dropped by Covenant marksmen (Elites, Jackals); weapon caches.
- Useful when: Long-range engagements; headshot kills unshielded enemies.
- Synergies: Combine with Plasma Pistol overcharge. Often preferred by players who like the scope.
- Function: Covenant sniper rifle, fires a thin beam with a single shot per charge. One-shot headshot; has a small battery that recharges slowly.
- Obtain: Dropped by Jackal snipers; found on weapon racks in long-range areas.
- Useful when: Same as human Sniper; the beam is harder to dodge but gives away position. Good for vehicle sniping.
- Synergies: Overheats after several shots; wait for cooldown.
- Function: Weapon that fires bouncing explosive discs with a timed detonation. Also has a bayonet for melee.
- Obtain: Dropped by Brutes; common in mid-game missions (e.g., The Storm).
- Useful when: Indirect fire around corners; melee is powerful. Good against groups of infantry.
- Synergies: Can launch grenades or power cores if aimed correctly (physics laughs). No upgrades.
- Function: Covenant shotgun-style weapon that fires a spread of plasma shards. Slower fire rate; high damage at close range.
- Obtain: Dropped by Brutes; rare.
- Useful when: Close-quarters combat against shielded enemies (Brutes, Elites). Can stun opponents.
- Synergies: Dual-wield two Maulers for devastating burst damage, though ammo runs out fast.
- Function: Power weapon that creates a shockwave on impact, launching enemies and dealing heavy damage. Slow windup.
- Obtain: Dropped by Brute Chieftains; found in specific campaign locations (e.g., “The Covenant”).
- Useful when: Area denial; one-shot kills on non-shielded enemies; can destroy vehicles with a direct hit? Not really, but can flip them.
- Synergies: The shockwave can send grenades back at enemies. No upgrades.
- Function: One-hit kill melee weapon. Lunge attack from a short distance; can also block plasma? No block mechanic.
- Obtain: Dropped by Elite Sword-bearers; found in campaign missions (e.g., “The Covenant”) and multiplayer.
- Useful when: Stealth kills; quickly dispatching shielded enemies (Elites, Brutes). Lunge through shields.
- Synergies: Combine with Camouflage (via equipment or active camo pickup) for assassination chains. No upgrades.
- Function: Fires green explosive projectiles that bounce and detonate after a delay. High damage; good against vehicles and groups.
- Obtain: Dropped by Brutes with heavy weapons; found in campaign areas with large battles (e.g., “The Ark”).
- Useful when: Clearing out bunkers; destroying Phantoms or Wraiths if you hit the weak points.
- Synergies: Can be used to trigger explosive barrels. No lock-on.
- Function: Continuous beam weapon from Sentinels. Deals steady damage to shields and health; overheats quickly.
- Obtain: Dropped by dead Sentinels in Forerunner-themed missions (e.g., “The Covenant”, “Halo”).
- Useful when: Against Flood or unshielded Covenant; good for suppressing fire. Not very powerful but can be used as a melee weapon? No.
- Synergies: None notable. Ammo is plentiful but overheats.
- Flood Infection Form: Not an item, but they can be killed by melee or shooting. There are no unique Flood weapons, but Flood Combat Forms carry human or Covenant weapons they possessed when infected.
- Function: Deploys a spherical energy shield that blocks incoming fire (but not grenades or melee from inside). Lasts about 10 seconds.
- Obtain: Found in campaign weapon caches; multiplayer map spawns.
- Useful when: Emergency cover during a firefight; protecting an objective like a flag or hill.
- Synergies: Combine with Shotgun or Sword to hold a point; enemies can enter the bubble and attack you. Use with Power Drain to deplete enemies inside.
- Function: Scrambles enemy radar (motion tracker) within a radius. Also makes you slightly invisible? No, it just jams radar.
- Obtain: Campaign weapon cases; multiplayer spawn.
- Useful when: Flanking in team modes; denying information. Not commonly used.
- Synergies: Use with Active Camouflage (not available as equipment in Halo 3) but can be used with cloak pickups? There is a separate active camo pickup in some missions. No direct synergy.
- Function: Places a laser-triggered explosive mine that detonates when an enemy crosses the beam. Large area damage.
- Obtain: Campaign weapon caches; multiplayer spawn points.
- Useful when: Chokepoints, guarding flanks, objective defense.
- Synergies: Can be set off by your own grenades? Yes, but not recommended. Combine with radar jammer to hide the beam? Not effective.
- Function: Deploys a device that drains shields and slows enemies in a large area. Also damages vehicles and disables them briefly.
- Obtain: Campaign (e.g., “The Ark”); multiplayer spawn.
- Useful when: Stopping a vehicle rush; weakening a group of enemies before pushing.
- Synergies: Follow up with a headshot weapon for easy kills. Combine with Bubble Shield to protect while the drain works. Also effective against Hunters (drains their armor).
- Function: Creates an upward gravity beam that launches players, vehicles, and objects upward.
- Obtain: Campaign (some Forerunner areas); multiplayer map spawn.
- Useful when: Reaching high ledges, launching grenades or fusion coils to create chaos, moving large objects (like power cores) upward.
- Synergies: Place a Grav Lift over a Power Drain to launch enemies into the air for an easy sniper shot. In campaign, use to toss fusion coils into Scarab weak points.
- Function: Deploys a bright flash that blinds enemies and players looking at it. Also reveals cloaked enemies.
- Obtain: Campaign weapon caches; multiplayer spawn (rare).
- Useful when: Disorienting enemies; making an escape; revealing active camo users.
- Synergies: Not strong.
- Function: Standard explosive grenade with a 2.5-second fuse. Good damage, can bounce off walls.
- Obtain: Found on dead Marines, Covenant; weapon racks.
- Useful when: Clearing rooms, area denial, killing groups, destroying vehicles (weaker than plasma).
- Synergies: Can be thrown into enemy-held Bubble Shields to kill them. Can be cooked (hold button) to control detonation timing.
- Function: Blue glowing grenade that sticks to any surface or enemy. After sticking, it detonates after a short delay with high damage. Can also be used as a sticky bomb for vehicles.
- Obtain: Dropped by Grunts, Elites; weapon caches.
- Useful when: Perfect for sticking a Brute Chieftain or a vehicle (will destroy a Ghost or Banshee if stuck). One-hit kill on any unshielded enemy.
- Synergies: Plasma Grenade + Energy Sword lunge? No, but you can stick an enemy and then melee them. Can stick to a Warthog and kill passengers.
- Function: Covenant grenade that fires spikes in all directions on detonation. Can stick to surfaces and enemies. Damage less concentrated.
- Obtain: Dropped by Brutes; rare.
- Useful when: Area denial; the spikes can kill enemies hiding around corners. Sticking to a wall can kill enemies on the other side.
- Synergies: Combine with Brute Shot for indirect fire? Not directly.
- Function: Only appears in the campaign mission “Cortana”. Creates a fire patch that lingers for a few seconds. Can be thrown by Flood combat forms or picked up from dead Flood.
- Obtain: Campaign only; from Flood weapons.
- Useful when: Burning Flood infection forms and slowing down combat forms.
- Synergies: No special synergies.
- Function: Light Reconnaissance Vehicle with a driver, passenger seat, and a gunner seat (machine gun or Gauss cannon in some variants). Fast, off-road capable.
- Obtain: Found at many campaign starting points; can be boarded by enemies.
- Useful when: Transport, hit-and-run attacks, supporting infantry.
- Synergies: The Gauss cannon variant (M68 ALIM) is devastating at long range; one-shot kills on infantry and light vehicles. Driver and gunner teamwork.
- Function: Heavy tank with a main cannon and a machine gun turret. Main cannon one-shots most vehicles and kills infantry with splash.
- Obtain: Campaign checkpoints (e.g., “The Storm”); multiplayer map spawn (rare).
- Useful when: Heavy fire support against Covenant armor and Scarabs.
- Synergies: Machine gunner can clear infantry while cannon hits hard targets. Vulnerable from behind; use friendly infantry as cover.
- Function: Fast off-road ATV with no weapons. Seats two: driver and passenger (who can hold a weapon).
- Obtain: Campaign (e.g., “The Ark”); multiplayer spawns (often in race variants).
- Useful when: Rapid transport; passenger can use a rocket launcher or sniper rifle while moving.
- Synergies: The passenger can use a Spartan Laser or Fuel Rod Gun for poweful mobile fire.
- Function: VTOL aircraft with a primary machine gun and rocket pods. Can hover and drop off passengers? Yes, it can carry two passengers side-by-side (no gunner).
- Obtain: Campaign only (e.g., “The Covenant”); multiplayer? In Halo 3 multiplayer the Hornet appears only in certain maps like “Sandtrap”.
- Useful when: Aerial superiority; strafing ground targets; rapid insertion. The rockets are effective against vehicles and infantry.
- Synergies: Pilots can drop allies onto high ground. The doors can be opened to throw grenades.
- Function: Fast hoverbike with forward-facing plasma cannons. Boost ability for speed.
- Obtain: Common; dropped by Covenant; found in campaign.
- Useful when: Scouting, hit-and-run, running over enemies (splatter kills).
- Synergies: Steal from Covenant and use against them. Plasma cannons overheat quickly.
- Function: Covenant aircraft with twin plasma cannons and fuel rod bombs. Can perform a blue boost for speed.
- Obtain: Common; spawned by Covenant in campaign; can be stolen.
- Useful when: Air superiority; bombarding ground positions. The fuel rod bomb drops a powerful explosive.
- Synergies: Use boost to evade Spartan Laser shots. The Banshee can be used to quickly traverse large maps.
- Function: Covenant mortar tank. Fires a plasma mortar that arcs and creates a large explosion; also has a secondary plasma cannon for self-defense.
- Obtain: Spawned in campaign; rare in multiplayer.
- Useful when: Indirect fire support; destroying fixed positions. The mortar can one-shot infantry and damage structures.
- Synergies: The driver can switch to the main cannon while the passenger operates the plasma turret. Weak at close range.
- Function: Brute motorcycle with a large front blade that can splatter enemies. Fires a plasma turret and can do a boost that flips it? No, it can ram and kill.
- Obtain: Dropped by Brute riders; campaign (e.g., “The Covenant”).
- Useful when: Offensive splatter kills; traversing rough terrain. The chopper can also perform a wheelie to dodge fire.
- Synergies: Nothing special.
- Function: Covenant troop transport with a plasma turret on top. Carries multiple passengers (up to 8?). Slower but more armored.
- Obtain: Campaign only (e.g., “The Covenant”); can be boarded.
- Useful when: Transporting a squad; the turret provides suppressing fire.
- Synergies: Passengers can lean out to shoot.
- Function: Restores a portion of health (up to a maximum). In Halo 3, health does not regenerate automatically; you must find these.
- Obtain: Scattered throughout campaign levels in cabinets, on walls, or dropped by enemies? Not dropped, but found in medical stations.
- Useful when: Your health bar is low (after shield is depleted and you take damage). Prioritize picking them up before large fights.
- Synergies: None; they are essential for survival on Legendary.
- Function: Actually there is no Overshield as a pickup in Halo 3. There are shield boosters? In campaign, there are “Shield Charges” (aka Overshield capsules) that grant a temporary overshield. These appear as glowing blue spheres in some levels (e.g., The Covenant). They double your shield capacity for a limited time.
- Obtain: Rarely; floating in campaign areas near Covenant or Forerunner structures.
- Useful when: Facing bosses like the Brute Chieftain or when you need extra survivability.
- Synergies: Pair with Bubble Shield to hold a position while the overshield lasts.
- Function: Orange glowing cylinder that can be picked up and thrown. Explodes on impact, dealing heavy damage.
- Obtain: Found in many campaign missions; often used to destroy barriers or Scarab legs.
- Useful when: Clearing obstacles; damaging large enemies. In “The Covenant”, you must throw power cores into the Scarab’s core.
- Synergies: Can be launched with a Grav Lift for distance or used as a lightweight bomb. Can be thrown into groups of enemies.
- Function: Not an item you pick up, but she’s a character. However, in the mission “Cortana”, you must carry her (she appears as a wounded AI). That’s scripted.
- No physical item.
- Function: In the mission “The Ark”, you must retrieve a data cartridge to open a door? Actually there is a “shady” informational item. Not a pickup item.
- Function: There are no key items that you pick up and store. The campaign uses prompts and scripting.
- Function: Skulls are optional collectibles that modify gameplay. There are 13 skulls in Halo 3 (the original had 13). They appear as floating skulls in campaign levels. Once collected, they can be activated in the lobby to change game behavior.
- Obtain: Hidden in specific locations (e.g., “IWHBYD” skull on The Covenant, “Sputnik” on The Storm). Locations widely documented.
- Useful when: Unlocking achievements; enabling challenges for Legendary runs. Notable skulls include Mythic (doubles enemy health), Catch (enemies throw more grenades), LASO (Legendary all skulls on).
- Synergies: Combine skulls for extreme difficulty; used in speedrun strategies.
- Function: Interactive objects that provide backstory lore and are part of the “Terminal” achievement list. There are 7 terminals in Halo 3.
- Obtain: Found in specific campaign levels (e.g., “The Ark”, “The Covenant”). They are glowing holographic panels.
- Useful when: Lore enrichment; required for 100% completion. No gameplay effects.
- Helmets: Recon, Scout, EOD, etc.
- Shoulders: Various shapes.
- Chest: Emblems, attachments.
- Effects: Like flames.
- Obtain: Reach certain ranks (original) or buy with season points in MCC. No gameplay impact.
#### Battle Rifle (BR55HB SR)
#### SMG (M7S)
#### M6G Pistol (Magnum)
#### Shotgun (M90A CAWS)
#### Sniper Rifle (S2 AM Sniper)
#### Rocket Launcher (M41 SPNKr)
#### Spartan Laser (M6 Grindell/Galilean Nonlinear Rifle)
#### Flamethrower
Covenant Weapons
#### Plasma Pistol
#### Plasma Rifle
#### Needler
#### Carbine (Type-51)
#### Beam Rifle (Type-50 Sniper Rifle System)
#### Brute Shot
#### Mauler (Type-25)
#### Gravity Hammer
#### Energy Sword (Type-1 Energy Weapon)
#### Fuel Rod Gun
Forerunner Weapons
#### Sentinel Beam
Flood Weapons (Note: Flood use existing weapons, but there is one unique item)
Equipment (Deployable Items)
Each equipment item can be picked up and placed (or activated) by pressing the action button.
#### Bubble Shield
#### Radar Jammer
#### Trip Mine
#### Power Drain
#### Grav Lift
#### Flare
Grenades
#### Fragmentation Grenade
#### Plasma Grenade
#### Spike Grenade
#### Incendiary Grenade (Flood variant)
Vehicles
Human Vehicles
#### Warthog (M12 LRV)
#### Scorpion Tank (M808B)
#### Mongoose (Puma)
#### Hornet (AV-14)
Covenant Vehicles
#### Ghost (Type-32)
#### Banshee (Type-26)
#### Wraith (Type-25)
#### Chopper (Type-52)
#### Prowler (Type-54)
Health & Shield Items
#### Health Pack (Medical Kit)
#### Overshield (Active Camouflage? No)
Mission Key Items
These are items that must be carried or interacted with to complete objectives. They cannot be dropped.
#### Power Core (Fusion Coil)
#### Cortana (AI Chip)
#### Data Cartridge
#### Flood Spores / Keys? No.
#### Skulls (Collectibles)
#### Terminals
Multiplayer Cosmetics (Armor Permutations)
While not functional items, Halo 3 multiplayer features armor permutations that can be unlocked via the Rank system (original) or via Season points in MCC. They include:
Conclusion
Understanding the item ecosystem in Halo 3 is key to mastering both campaign and multiplayer. Memorize spawn locations of power weapons and equipment, learn how to combo weapons and equipment (like Plasma Pistol + Battle Rifle, Power Drain + Grenades), and use vehicles to control the battlefield. Collectibles like skulls add replayability and challenge. Use this guide to make informed decisions in every firefight.