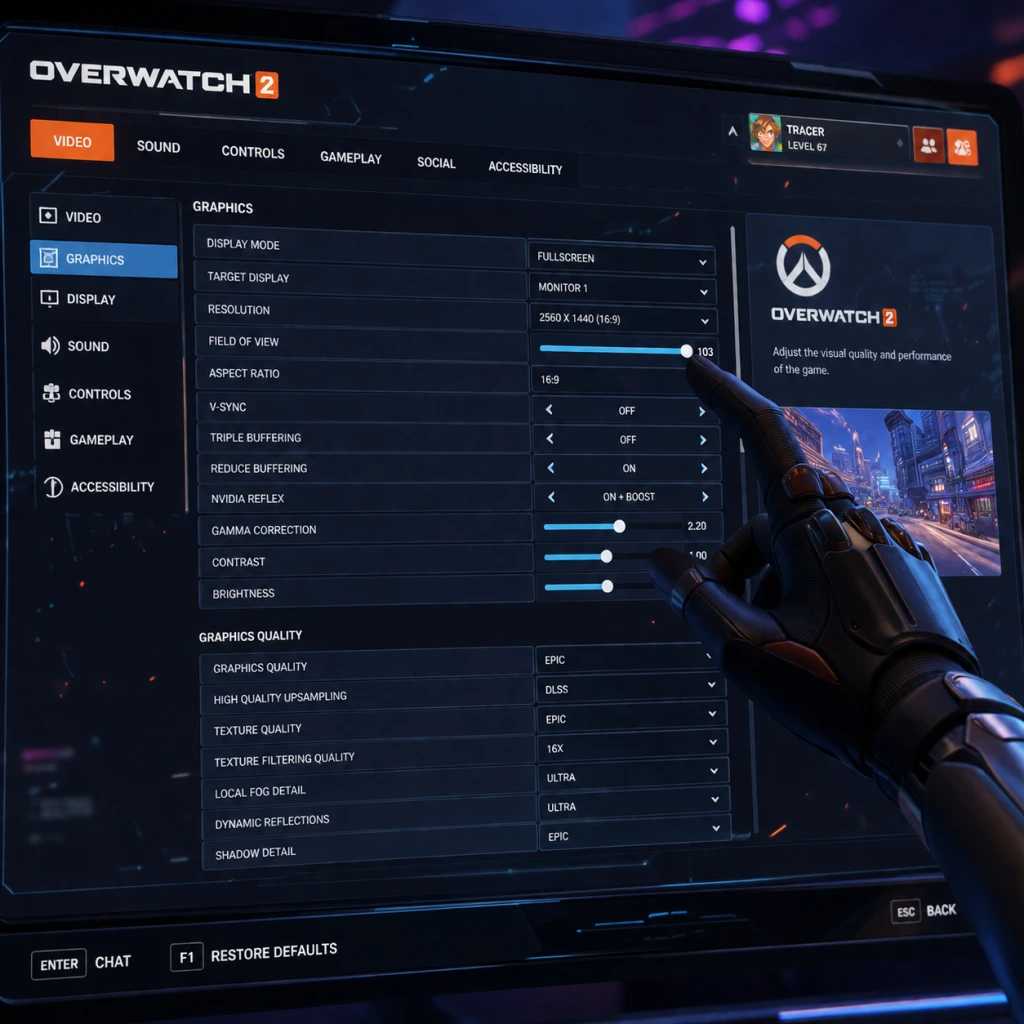
Game Settings
Overview
Overwatch 2 offers a comprehensive settings menu that lets you fine-tune every aspect of the game. This guide covers Graphics, Audio, Controls, Accessibility, Language, Network, and Gameplay settings. We’ll recommend optimal configurations for different hardware levels and highlight settings that are often misconfigured or require special attention.
---
Graphics Settings
Graphics settings are split into Video and Advanced tabs. The following table shows recommended presets for various hardware tiers. Adjust individual options as needed.
Recommended Presets by Hardware
| Hardware Tier | Example GPU | Recommended Preset | Notes |
|---|---|---|---|
| Low | GTX 1050 / RX 560 | Low | Aim for consistent 60+ FPS. Turn off shadows and reflections. |
| Mid | GTX 1060 / RX 580 | Medium / High | Can enable medium shadows and low effects. Render Scale at 100%. |
| High | RTX 2070 / RX 5700 XT | High | Keep render scale 100%. Enable some reflections and dynamic shadows. |
| Ultra | RTX 3080 / RX 6800 XT | Ultra / Epic | Maxed out at 1440p or 4K. Fine-tune scaling and anti-aliasing. |
Key Graphics Settings and Recommendations
- Display Mode: Always choose Fullscreen for best performance. Borderless Windowed may introduce input lag.
- Resolution: Match your monitor’s native resolution. Lowering resolution (e.g., 1080p on a 1440p monitor) can hurt clarity.
- Field of View (FOV): 103 is the max and gives the widest peripheral view. Set to 103 – it’s not a performance hog and improves situational awareness.
- Aspect Ratio: Use 16:9 or your monitor’s native ratio.
- VSync: Turn OFF to minimize input lag. Enable only if you experience screen tearing and cannot tolerate it.
- Triple Buffering: Turn OFF when VSync is off. Only relevant with VSync enabled.
- Render Scale: Keep at 100% for native resolution clarity. Lowering (e.g., 75%) can boost FPS but blurs image. Setting above 100% (e.g., 150%) forces supersampling, which is very demanding.
- Frame Rate Cap: Set to your monitor’s refresh rate or a bit higher (e.g., 144 FPS for 144Hz). Use Custom and input your target. Avoid “Display-Based” as it can introduce input lag.
- Reduce Buffering: Turn this ON to minimize input delay. It reduces the frame buffer queue. Do not leave it off.
- Texture Quality: Low saves VRAM; High improves visual sharpness. On low-end PCs, set to Low.
- Texture Filtering (Anisotropic): High doesn’t cost much performance. Set to 16x.
- Effects Quality: Medium or High for ability clarity. Low can make enemy abilities harder to see.
- Shadows: Low to Medium saves performance. Off removes shadows entirely but can make it harder to judge verticality.
- Lighting Quality: Low for performance; High for atmosphere.
- Anti-Aliasing: FXAA is lightweight; SMAA offers better quality but costs some FPS. MSAA is very heavy. Recommended: SMAA High for most setups, FXAA for low-end.
- Reflections: Turn OFF or Low. Real-time reflections are costly.
- Ambient Occlusion: OFF for performance; HBAO+ for visual depth.
- Local Reflections: OFF.
- Fog Quality: Medium.
- Dynamic Reflections: OFF.
- Model Detail: Low can help with FPS, but may render heroes less distinct. Set to Medium.
- Particle Density: Low reduces clutter. High makes ultimate effects more visually informative.
- Reduce Buffering (mentioned above) – many players leave it off, causing unnecessary input lag.
- VSync and G-Sync/FreeSync: If you have adaptive sync, turn VSync ON in the game but cap FPS slightly below refresh rate (e.g., 141 for 144Hz) to prevent V-Sync from engaging during dips. Confusing, but this is standard practice.
- Render Scale: Mistakenly set to 50% by some users for “smoother” gameplay, but it ruins clarity and hit detection.
- Frame Rate Cap: Setting “Unlimited” can cause micro-stutters if your GPU can’t maintain a stable high FPS. Always cap to a manageable number.
- Sound Mix: Choose from Studio Reference (most accurate), Home Theater, Night Mode (compresses dynamic range), and Headphones (spatial audio via Dolby Atmos on compatible devices). For competitive play, Headphones with Dolby Atmos enabled (if available) gives excellent directional cues.
- Main Volume: Keep near 100% and control volume via OS or headset.
- Voice Chat: Adjust Voice Chat Volume and Microphone Volume in-game. Test with friends.
- Sound Effects Volume: 100% – footstep and ability audio are critical.
- Music Volume: Lower to 50-70% to hear game sounds better, or mute entirely.
- Voice Lines Volume: Keep high – enemy ultimate voice lines are loud and distinct.
- Subtitles: Enable if you want to ensure you catch hero dialogue.
- Spatial Audio: If supported, turn ON for better directional awareness.
- Voice Chat Channels: Ensure you’re in the correct channel (Team vs Group) during matches. Many players accidentally mute themselves or join wrong channel.
- Sound Mix for Headphones: If you’re using stereo headphones, “Headphones” mix is best. But if you have Dolby Atmos enabled, the game will automatically use spatial audio – leaving it on “Home Theater” may be fine.
- Sensitivity: Start around 3-4 at 1600 DPI or 6-8 at 800 DPI. Adjust by feeling. Pro players often use 800 DPI with in-game sens 4-8.
- Aim Smoothing: Turn OFF to remove acceleration-like smoothing. Many players leave it on by default; turning it off makes aim feel more responsive.
- Aim Ease In: Set to 0 for immediate aim response. Some prefer slight ease in (10-20) for tracking, but competitive standard is 0.
- Relative Aim Sensitivity While Zoomed (Scoped heroes like Widowmaker/Ana): Most pros use 30-50, with 38 being a common conversion. Adjust based on your muscle memory.
- Crosshair: Customize type (Circle, Dot, Crosshairs), color (preferably bright, high-contrast like green or cyan), thickness, and opacity. Set outline opacity to 100% for visibility.
- Hero-Specific Settings: Overwatch 2 allows per-hero controls. For example, you can set Toggle vs Hold for abilities like Mercy’s Guardian Angel, or adjust scope sensitivity for each sniper. Take advantage of this to optimize each hero.
- Aim Technique: Dual-Zone is popular – slow inner zone for precision, fast outer zone for flicks. Others prefer Linear with aim ease in adjusted.
- Aim Ease In: Start at 0 and increase to 10-20 if you find stick movement too twitchy.
- Aim Smoothing: Leave at 100 (default) for console, but reducing can make aim snappier if you can handle jitter.
- Aim Assist Strength: Keep at 100 for console. Decrease if you find it “pulls” too much.
- Aim Assist Window Size: Default (100) is large. Reducing to 50-70 makes aim assist kick in only when closer to target.
- Aim Assist Legacy Mode: OFF unless you prefer the Overwatch 1 behavior.
- Button Layout: Consider Dual-Zone with Jump on L2/L1 (bumper jumper) for easier movement while aiming. Use Jump on Left Stick Click as an alternative.
- Rumble: Turn OFF for competitive play to avoid distraction.
- Aim Smoothing (PC/Console): Often left default ON, causing noticeable input lag. Turning it OFF makes aim feel more direct but may initially feel too raw.
- Toggle Ability vs Hold: For heroes like Mercy (Guardian Angel), Toggle allows one press to fly, while Hold requires holding the button. Misconfiguring can cause accidental movements.
- Toggle Zoom: For scoped heroes, choose whether to hold right-click or toggle. Many Widowmaker players prefer hold for quick scoping.
- Controller Vibration: Vibration can interfere with fine aim; turn off for competitive advantage.
- Colorblind Modes: Deuteranopia, Protanopia, Tritanopia – change team colors (friendly, enemy, and UI). Can also customize enemy and friend outline colors manually. This is crucial for players with color vision deficiency.
- Subtitle Display: Turn ON to see hero dialogue and ultimate callouts. Can adjust size.
- Camera Shake: Reduce or disable to avoid disorientation.
- Screen Shake: Same as above.
- Menu Background Animations: Turn OFF to reduce visual clutter and potential motion sickness.
- Text-to-Speech and Speech-to-Text: Available for voice chat – useful for players who cannot speak or hear.
- High Contrast Mode: When enabled, changes UI colors to high contrast for better readability.
- Rotate Minimap: Lock or free rotate (only relevant if minimap is enabled in future updates; currently Overwatch 2 does not have a traditional minimap).
- Respectful Player Name Display: Option to show hero names instead of player names.
- Colorblind Settings: If you’re not colorblind, leave these off. Changing them can make enemy outlines harder to distinguish.
- Screen Shake: Often forgotten. If you feel dizzy after playing, check this setting and reduce it.
- Text Language: Choose your preferred language for UI and subtitles.
- Audio Language: Choose voiceover language (heroes’ voice lines, announcer, etc.). This is separate from text. Some players prefer native language for voice lines to identify ultimates faster.
- Bandwidth Limit: Set to 0 (unlimited) if you have a stable connection. If you experience lag spikes while others use the network, set a cap (e.g., 100 Mbps) to avoid overloading your connection.
- High Precision Mouse Input: Turn ON for more accurate mouse polling. This can reduce input lag on high-polling-rate mice (e.g., 1000 Hz).
- Enable Network Stats: Turn ON to display latency (ping), packet loss, and other metrics. This helps diagnose connection issues during gameplay.
- Show Round-End Statistics: Enable if you want delay numbers after a match.
- Hero Specific Controls: As mentioned, you can set different control schemes per hero. Access via Controls > Change Hero > select hero. Adjust:
- Confirmation for Ultimate: Some heroes have to hold button (e.g., D.Va self-destruct). You can set “Confirm Ultimate” to ON to require a second confirm; OFF for instant use. Most players leave OFF.
- In-Game HUD:
- Movement:
- Communication:
- Auto-Play Hero Intro: Turn OFF to avoid being stuck in an intro when you want to skip.
- Skip Player Icon Animation: Turn ON to reduce time in menus.
- Toggle/Hold for Abilities: For example, if you play Genji and have “Swift Strike” on toggle, you might accidentally use it while trying to aim. Set to Hold if you want more control.
- Confirmation for Ultimate: If you play D.Va and have Confirm Ultimate ON, you need to press ult twice. Many forget and try to blow up but fail. Turn OFF if you want instant use.
- Ally Health Bars: Support players often forget to enable this – it’s critical to see teammates’ health at a glance.
- Display Mode: Fullscreen
- Resolution: 1280x720 or 1600x900
- Render Scale: 100%
- Frame Rate Cap: 60
- Reduce Buffering: ON
- VSync: OFF
- Texture Quality: Low
- Texture Filtering: 2x
- Effects Quality: Low
- Shadows: Off
- Lighting Quality: Low
- Anti-Aliasing: FXAA Only
- Reflections: Off
- Ambient Occlusion: Off
- Model Detail: Low
- Particle Density: Low
- Display Mode: Fullscreen
- Resolution: 1920x1080
- Render Scale: 100%
- Frame Rate Cap: 144 (or your monitor’s refresh)
- Reduce Buffering: ON
- VSync: OFF
- Texture Quality: High
- Texture Filtering: 8x
- Effects Quality: High
- Shadows: Medium
- Lighting Quality: High
- Anti-Aliasing: SMAA High
- Reflections: Off
- Ambient Occlusion: Low
- Model Detail: High
- Particle Density: Medium
- Display Mode: Fullscreen
- Resolution: Native
- Render Scale: 100% (use 150% for supersampling only if you have excess GPU)
- Frame Rate Cap: 237 (for 240Hz) or 144 (for 144Hz) – leave slight headroom for G-Sync
- Reduce Buffering: ON
- VSync: ON (if using G-Sync) or OFF
- Texture Quality: High or Ultra
- Texture Filtering: 16x
- Effects Quality: High or Ultra
- Shadows: High
- Lighting Quality: Ultra
- Anti-Aliasing: SMAA High
- Reflections: Low (or off for max FPS)
- Ambient Occlusion: HBAO+
- Model Detail: Ultra
- Particle Density: High
- Field of View: Increase from default to 90-100 on PS5/XSX for better awareness (Switch version is locked lower).
- Sensitivity: Start low (around 30 horizontal/vertical) and increase gradually.
- Controller Layout: Use Dual-Zone with aim ease in at 0. Consider “Jump on L1” layout.
- Aim Assist: Keep at 100 strength, window size 70.
- Video Output: On PS5/XSX, if you have 120Hz display, enable “Performance Mode” (120Hz output) in console settings and in-game. Overwatch 2 supports 120 FPS on these platforms. On Switch, use “Performance Mode” in options (reduces resolution for 60 FPS target).
Easy-to-Misconfigure Graphics Settings
---
Audio Settings
Important Audio Settings
Easy-to-Misconfigure Audio Settings
---
Controls Settings
Keyboard and Mouse (PC)
Controller (PlayStation/Xbox/Nintendo Switch)
Easy-to-Misconfigure Controls
---
Accessibility Settings
Overwatch 2 includes robust accessibility options. Key settings:
Easy-to-Misconfigure Accessibility
---
Language Settings
Note: Changing these typically requires restarting the client. If you play on PC via Battle.net, you can also swap language in the launcher settings for a smaller download.
---
Network Settings
Special Attention: Network Stats Display
Many players don’t realize they can show live ping and packet loss. Enable this from Settings > Network > Show Network Stats (Ctrl+Shift+N in-game). Watch for spikes in “Interpolation Delay” or “Packet Loss”. If you see constant packet loss, check your Wi-Fi or use a wired connection.
---
Gameplay Settings
These settings affect how the game feels and how abilities behave.
- Toggle vs Hold for abilities (e.g., Mercy Guardian Angel, Tracer Blink).
- Zoom toggle vs hold (Widowmaker, Ana, Ashe).
- Ability keys (some players rebind ult to mouse button).
- Enable Kill Feed: Always ON.
- Show Health Bars: Always ON.
- Show Ally Health Bars: ON for support players; OFF if you find it distracting.
- Show Ultimate Status: ON to see teammates’ ult charge.
- Backwards Walk Speed: Not adjustable, but you can rebind backwards movement (default S).
- Crouch: Toggle or Hold. Many players prefer Hold for easier crouch-spamming.
- Ping Key: Default Middle Mouse. Can be rebound. Use frequently to ping enemies, locations, and abilities.
- Communication Wheel: Customize four quick chat options.
Easy-to-Misconfigure Gameplay Settings
---
Special Attention Points During Setup
1. Reduce Buffering: Ensure it’s ON. It’s one of the most impactful input lag reducers.
2. Frame Rate Cap: Cap FPS to your monitor’s refresh rate or a stable value. Do not leave at “Unlimited” if your PC fluctuates heavily.
3. Aim Smoothing (PC): Turn OFF for direct cursor movement.
4. Sound Mix: Select Headphones (or Studio Reference if using high-end speakers) for competitive audio.
5. Network Stats: Display latency and packet loss using Ctrl+Shift+N. Diagnose issues early.
6. Per-Hero Controls: Spend 15 minutes setting up keybindings for your most-played heroes. This can drastically improve performance.
7. Crosshair: Pick a high-contrast color (e.g., green or cyan) and ensure outline is enabled. Avoid red – it blends with enemy outlines.
8. Controller Users: Consider bumper jumper layout (jump on L1/LB) for better mobility without sacrificing aim.
9. Accessibility Check: Not colorblind? Leave colorblind modes off. But do enable subtitles if you want to hear ultimate callouts clearly in noisy environments.
10. Backup Settings: On PC, settings are stored in `Documents/Overwatch/Settings_v0.ini`. You can copy this file to backup your configuration.
---
Optimal Settings for Different Hardware Levels
Low-End PC (Target 60 FPS stable)
Mid-Range PC (Target 144 FPS at 1080p)
High-End PC (Target 240+ FPS at 1080p or 144 FPS at 1440p)
Console (PlayStation 5 / Xbox Series X / Nintendo Switch)
Consoles have limited settings menus, but you can adjust:
---
Use this guide as a reference when entering the settings menu for the first time, or to fine-tune your experience. Remember to test changes in the Practice Range or quick play before jumping into competitive matches.