Game Settings
Game Settings Guide for Overwatch 2
This guide covers every setting in Overwatch 2 across all platforms, with detailed recommendations for performance and visual quality. Whether you’re playing on a low-end laptop or a top-tier PC, you’ll find the optimal configuration. We also highlight the most commonly misconfigured settings and critical points to watch during setup.
---
1. Graphics Settings
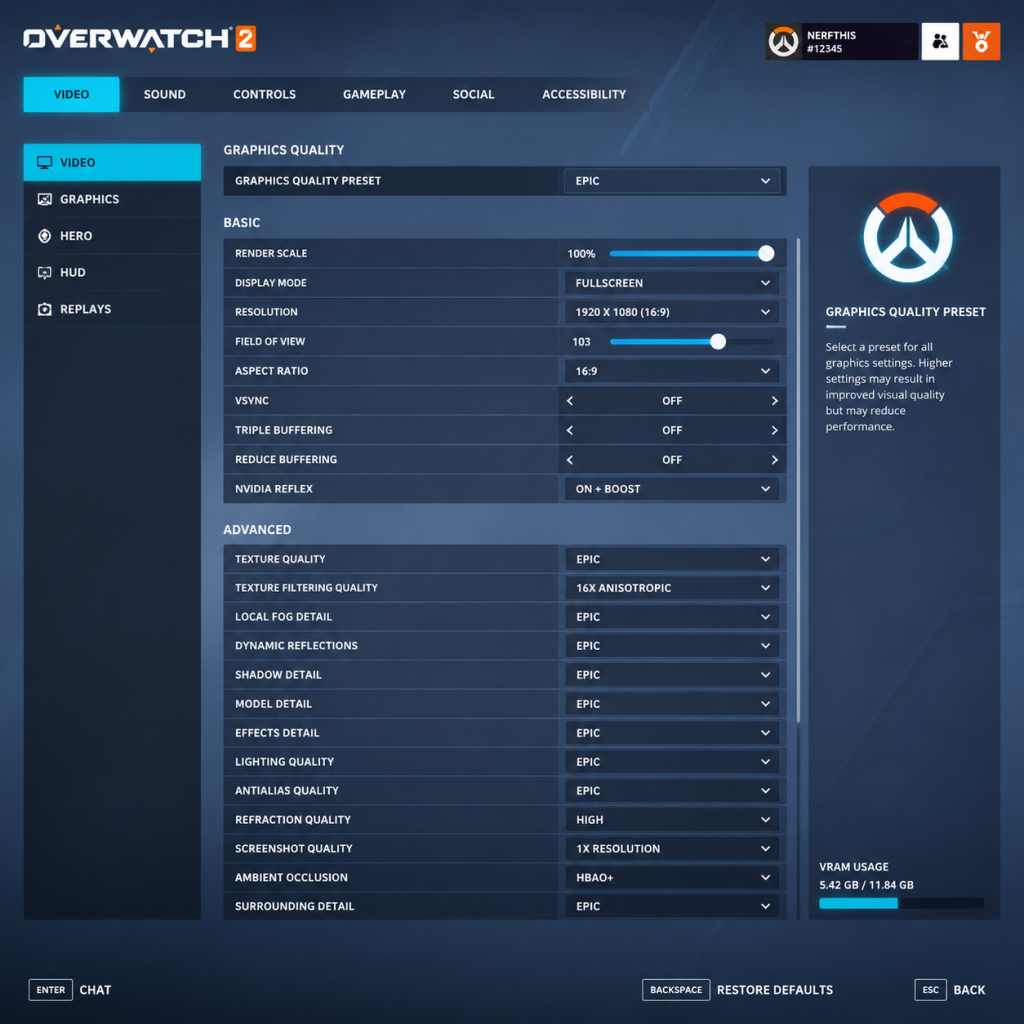
#### 1.1 Display Mode
- Fullscreen – Best performance, prevents input lag from window compositing.
- Windowed/Borderless Windowed – Useful for quick alt-tabbing, but may reduce FPS and introduce slight input lag.
- Recommended: Fullscreen for competitive play; Borderless if you frequently multitask.
- Aspect Ratio: 16:9 (standard) or 21:9 (ultrawide). Native resolution is best for clarity.
- Resolution: Match your monitor’s native resolution. Lower resolution (e.g., 1600x900) boosts FPS significantly.
- Render Scale: Usually left at 100%. For extra performance, reduce to 75% or 50%; for quality, increase to 150%-200% (only if your GPU can handle it).
- V-Sync: OFF (recommended). ON adds input lag; only enable to prevent screen tearing if you don’t have G-Sync/FreeSync.
- Triple Buffering: OFF (only useful with V-Sync).
- Frame Rate Cap: Set to your monitor’s refresh rate (e.g., 144 FPS for 144Hz) or unlimited (for lowest input lag). For competitive play, cap at a stable rate slightly below your average FPS to avoid fluctuations.
#### 1.2 Resolution & Aspect Ratio
#### 1.3 V-Sync & Frame Rate Cap
#### 1.4 Graphics Quality Presets (Performance vs Quality)
| Setting | Low (Performance) | Medium | High | Ultra (Quality) |
|---|---|---|---|---|
| Render Scale | 50% | 75% | 100% | 150% |
| Texture Quality | Low | Medium | High | Ultra |
| Texture Filtering | Bilinear | Trilinear | 4x Aniso | 16x Aniso |
| Shadow Detail | Off | Low | Medium | Ultra |
| Model Detail | Low | Medium | High | Ultra |
| Effects Detail | Low | Low | High | Ultra |
| Lighting Quality | Low | Low | Medium | Ultra |
| Antialiasing | Off | FXAA | SMAA Low | SMAA High |
| Reflections | Off | Off | Static | Dynamic (Real-time) |
| Ambient Occlusion | Off | Off | Low | High |
| Local Fog Detail | Off | Off | Medium | Ultra |
| Dynamic Reflections | Off | Off | Low | High |
| Shadow Quality | Off | Low | Medium | Ultra |
| Particle Density | Low | Low | Medium | Ultra |
- Shadow Detail – High impact on performance. Set to Medium or Low for competitive edge.
- Effects Detail – Controls visual density of explosions and abilities; keep Low for clarity.
- Antialiasing – SMAA High provides crisp edges but costs performance; FXAA is a good middle ground.
- Ambient Occlusion – Adds depth but reduces FPS; disable for competitive play.
- Dynamic Reflections – Very demanding; OFF or Low recommended.
- Reduce Buffering – ON (critical!). Reduces input lag by pre-rendering frames. Always enable.
- NVIDIA Reflex (if available) – ON + Boost for lowest system latency. Requires compatible GPU (GTX 900 series and newer).
- HDR Rendering – Only enable if you have a proper HDR monitor and Windows HDR is on. Adds visual fidelity but can cause performance dip.
- Color Blind Mode – Filter options (Protanopia, Deuteranopia, Tritanopia) to adjust enemy/ally colors. Not a graphics performance setting but important for accessibility.
#### 1.5 Individual Advanced Graphics Settings
#### 1.6 Hardware Tier Recommendations
| Hardware Level | CPU | GPU | RAM | Recommended Preset | Expected FPS (1080p) |
|---|---|---|---|---|---|
| Low-End | i3 / Ryzen 3 | GTX 1050 / RX 560 | 8 GB | Medium (with Reduce Buffering ON, Shadows Low, Effects Low) | 60-90 FPS |
| Mid-Range | i5 / Ryzen 5 | GTX 1660 / RTX 2060 / RX 5600 | 16 GB | High (SMAA Low, Reflections Static) | 120-144 FPS |
| High-End | i7 / Ryzen 7 | RTX 3070 / RX 6700 XT | 16+ GB | Ultra (SMAA High, Dynamic Reflections Low) | 144-240 FPS |
| Ultra | i9 / Ryzen 9 | RTX 4090 / RX 7900 XTX | 32 GB | Max everything (Ultra, 4x MSAA optional) | 200+ FPS at 1440p/4K |
---
2. Audio Settings
#### 2.1 Master Volume & Sound Mix
- Master Volume: 100% – adjust via system volume/takeover.
- Sound Effects: 80-100% – crucial for hearing footsteps and abilities.
- Voice Chat: 70-80% – balance with game sounds to hear teammates.
- Music: 0-20% – music can mask important audio cues; lower it.
- Dialogue: 50-70% – voice lines can give hints but not essential.
- Dynamic Range: Night Mode (recommended). Compresses loud sounds and boosts quiet ones, making footsteps and reloads more audible. Home and Studio modes preserve natural range but can cause quiet sounds to be missed.
- Output Device: Select your headset/speakers correctly (e.g., “Headphones” or “Spatial Audio”).
- Spatial Audio (Dolby Atmos / Windows Sonic): Enable if your headphones support it – improves directional awareness. Use Dolby Atmos for Headphones (paid, best) or Windows Sonic (free, good).
- Voice Chat Volume: 100%.
- Microphone Sensitivity: Auto (default works well). Adjust manually if others complain about background noise.
- Push-to-Talk (PTT): Strongly recommended (binding to a mouse thumb button or keyboard key). Open mic can annoy teammates and pick up ambient noise.
#### 2.2 Dynamic Range & Output Mode
#### 2.3 Voice Chat & Mic
Common Misconfiguration: Leaving “Dynamic Range” on Home/Studio and wondering why you can’t hear footsteps – switch to Night Mode immediately.
---
3. Controls Settings
#### 3.1 Mouse & Keyboard (PC)
| Setting | Recommended Value | Notes |
|---|---|---|
| Sensitivity | 4.0 – 8.0 (800 DPI) | Adjust to your preference; most pros use 800 DPI, 5-7 sens. Lower = more precise, higher = faster turns. |
| Aim Smoothing | OFF | Causes input delay; disable for raw input. |
| Aim Easing | OFF | Same as smoothing; turns off acceleration. |
| Relative Aim Sensitivity While Scoped | 30-50 (Widow, Ana, Ashe) | Set per hero to match flick muscle memory. |
| Wheel Down / Up | Jump (or ability) | Many players use scroll wheel jump to spam. |
| Quick Melee | Mouse Button 5 (side) or V | For easy melee during fights. |
| Push to Talk | Mouse Button 4 or T | Avoid interfering with movement. |
| Ultimate Ability | Q (default) – but consider Mouse Button 3 if Q is hard to reach. | Keep Q or remap to side button. |
| Crouch | Left Ctrl or hold vs toggle | Most pros use hold (CTRL) for crouch spam. |
| Ability 1 & 2 | E and Shift (default) | Good for most heroes; remap if you have extra buttons. |
| Interact | F | Default; used for payload, teleporter, etc. |
#### 3.2 Controller (Console & PC)
- Horizontal/Vertical Sensitivity: Start at 50/50; adjust up or down.
- Aim Assist Strength: 100 (default) – helps tracking but can be reduced if you feel it pulls too much.
- Aim Assist Window Size: 30-50 – larger window makes it easier to lock on, but smaller gives more control.
- Aim Ease In: 0-20 – adds a deadzone to initial stick movement; useful for precision.
- Vibration: OFF – improves aim consistency.
- Button Layout: Use “L3 Jump” (click left stick to jump) to aim and jump simultaneously, or “Bumper Jumper” (LB jump).
- Legacy Gadget Mode: OFF – allows separate controls for each hero.
- Widowmaker / Ana / Ashe: Adjust scoped sensitivity relative.
- Mercy: Toggle Guardian Angel to “Prefer Facing Target” or turn off “Beam Toggle”.
- Genji / Doomfist: Change “Double Jump” or “Slam” to hold vs toggle.
- Sigma: Adjust his primary fire sensitivity if needed.
- Color Blind Mode: Choose the filter that works for you (Protanopia, Deuteranopia, Tritanopia). Also set Enemy/Allied UI Color – these change outline colors on characters. For strong color blindness, consider colorblind-friendly crosshair colors (yellow/cyan).
- Crosshair Settings: Adjust crosshair type (dot, circle, cross), thickness, opacity, and color. Many players use a bright green or cyan crosshair with a small gap for precision.
- HUD Scale: Adjust to see more or less of the interface. Some players increase scale for readability on smaller monitors.
- Subtitles: On by default. Enable dialogue and ability subtitles for clarity.
- Sound Queue for UI: Not critical, but can help if you miss visual cues.
- Toggle vs Hold: Many abilities can be set to toggle (e.g., “Toggle Crouch”, “Toggle Beam”). If you have limited dexterity, use toggles.
- Auto Climb: ON to automatically climb walls (e.g., Genji, Hanzo) without holding forward.
- Auto-Move Forward: Found in controls – useful for players who cannot hold W.
- Aim Assist (Console): Full strength for beginners; reduce gradually as skill improves.
- Friend/Enemy Color Scheme: Under Options → Accessibility → Colorblind – can swap enemy and friendly colors (e.g., enemies green, allies blue) to reduce confusion.
- Text Language: Choose your preferred language for UI text and menus. Can differ from audio language.
- Voice Chat Language: Not a setting, but ensure your region matches to avoid communication issues.
- Spoken Language: Choose voiceover language for heroes (e.g., Japanese, Korean, German). Changes all character voices. Very fun for immersion but may hinder understanding of ability callouts (e.g., “I need healing” in English vs overseas). No performance impact.
- High Precision Mouse Input: ON – reduces input lag. Leave ON unless you experience mouse stutter.
- Network Quality: Default settings are fine. Overwatch 2 uses UDP and has decent netcode. Do not adjust network buffers unless troubleshooting.
- Show Network Status: ON – press Ctrl+Shift+N while in game to display FPS, ping, packet loss, and server tick. This is essential to diagnose lag. The overlay shows:
- Limit Client Send/Receive Rate: Leave at default (30). Only reduce if you have extremely slow internet.
- Use a wired connection when possible – Wi-Fi adds latency and jitter.
- Close background downloads/streaming while playing.
- Set network profile to “High Performance” in Windows Power Options.
- Disable Nagle’s Algorithm (optional technical tweak): Add registry edit for TcpAckFrequency = 1 and TCPNoDelay = 1. Not recommended unless you understand the risks.
- Hero Preference: No setting, but you can set Group Up and Need Healing quick chat binds.
- Mode Specific: Options like “Disable Kill Cam” – recommended ON for competitive play (saves a few seconds). “Disable Respawn Kill Cam” – ON to return to action faster.
- Voice Chat Auto-join: ON if you want to be in team voice. Can be set to “On” or “Party Only”. Competitive players should have it ON.
- Text Chat: Enable both team and match chat; mute toxic players individually.
- Avoid/Block List: Use after games to avoid problematic teammates.
- Health Bar Style: “Percentage” or “Numeric” – personal preference.
- Cooldown Visibility: Ensure your ability icons show remaining cooldowns (default).
- Ultimate Status: Show over each teammate’s portrait if possible.
- Player Outlines: Always ON for enemies (red outlines) and allies (green outlines by default).
- Practice Range: Spend 10 minutes adjusting sensitivity and crosshair before first match.
- Aim Arena Custom Game: Create a custom game against Ana bots (headshots only) to refine aim with new settings.
- Third-Party Tools: Overwatch 2 does not allow macros or scripts; use only in-game settings.
- [ ] Graphics: Fullscreen, native resolution, V-Sync OFF, Reduce Buffering ON, NVIDIA Reflex ON+Boost if available.
- [ ] Audio: Night Mode, SFX 100%, Music 0-20%, Voice Chat 70%, Push-to-Talk bound.
- [ ] Controls: 800 DPI, 5-6 sens, aim technique Dual-Zone, smoothing OFF, per-hero scoped sens adjust.
- [ ] Accessibility: Enable subtitles, adjust colorblind filter if needed, set toggle/hold as per motor needs.
- [ ] Language: Choose your preferred voice and text languages.
- [ ] Network: Wired connection, show network stats (Ctrl+Shift+N), default limits.
- [ ] Gameplay: Disable kill cam, auto-join voice, customise crosshair, avoid blocked players.
- [ ] Final test: Spend 5-10 min in Practice Range then play Quick Play before competitive.
Special Attention Point: Many console players keep “Aim Assist” settings at default and wonder why their crosshair gets pulled off target during chaotic fights. Reduce Aim Assist Window Size to 30 or lower to minimise magnetic pull on non-targets.
#### 3.3 Per-Hero Settings
Overwatch 2 allows individual settings per hero. To access: Controls → select hero from the dropdown. Common tweaks:
---
4. Accessibility Settings
#### 4.1 Visual Accessibility
#### 4.2 Auditory Accessibility
#### 4.3 Motor Accessibility
#### 4.4 Cognitive Accessibility
---
5. Language Settings
Note: Some languages require separate voice pack downloads. They can be uninstalled to save disk space.
---
6. Network Settings
#### 6.1 In-Game Network Options
#### 6.2 Bandwidth & Ping Display
- Ping: Lower is better (ideal <50 ms).
- Interpolation Delay: ~50-100 ms normally.
- Packet Loss: Should be 0%. If >0%, you will experience rubberbanding.
#### 6.3 System-Level Network Optimisations
Common Misconfiguration: Enabling “Limit Client Send Rate” thinking it saves bandwidth – it actually increases latency and can cause desync. Keep at default.
---
7. Gameplay Settings
#### 7.1 Heroes & Mode
#### 7.2 Social & Voice
#### 7.3 Game UI & HUD
#### 7.4 Elite Player Pre-Adjustments
---
8. Special Attention Points & Common Mistakes
1. Reduce Buffering OFF – Most critical mistake. Keep it ON always.
2. V-Sync ON – Adds 10-30ms of input lag. Only use if you have screen tearing and can’t tolerate it.
3. Dynamic Range set to Home/Studio – Hard to hear footsteps. Switch to Night Mode.
4. High Mouse Sensitivity – Many beginners use high DPI+high in-game sens and complain of jitter. Try 800 DPI, 5-6 sens.
5. Aim Smoothing ON – Adds lag on console/controller. Turn OFF for raw input.
6. Aim Assist Window Size at 100 – Causes crosshair to be pulled by nearby enemies even when not aiming at them. Reduce to 30-50.
7. Network Limiters Enabled – Leave at default; don’t lower send/receive.
8. Ignoring Per-Hero Settings – Each hero benefits from unique control tweaks (e.g., scoped sensitivity, ability toggle).
9. Playing with Default Crosshairs – Customise crosshair colour and shape for better visibility. A bright green dot works wonders.
10. Not Using the Practice Range – Test all settings in a controlled environment before jumping into comp.
---
9. Summary Checklist for New Players
Following this guide will give you a solid, low-lag, high-fidelity setup tailored to Overwatch 2’s fast-paced gameplay. Adjust further as you develop your own preferences.