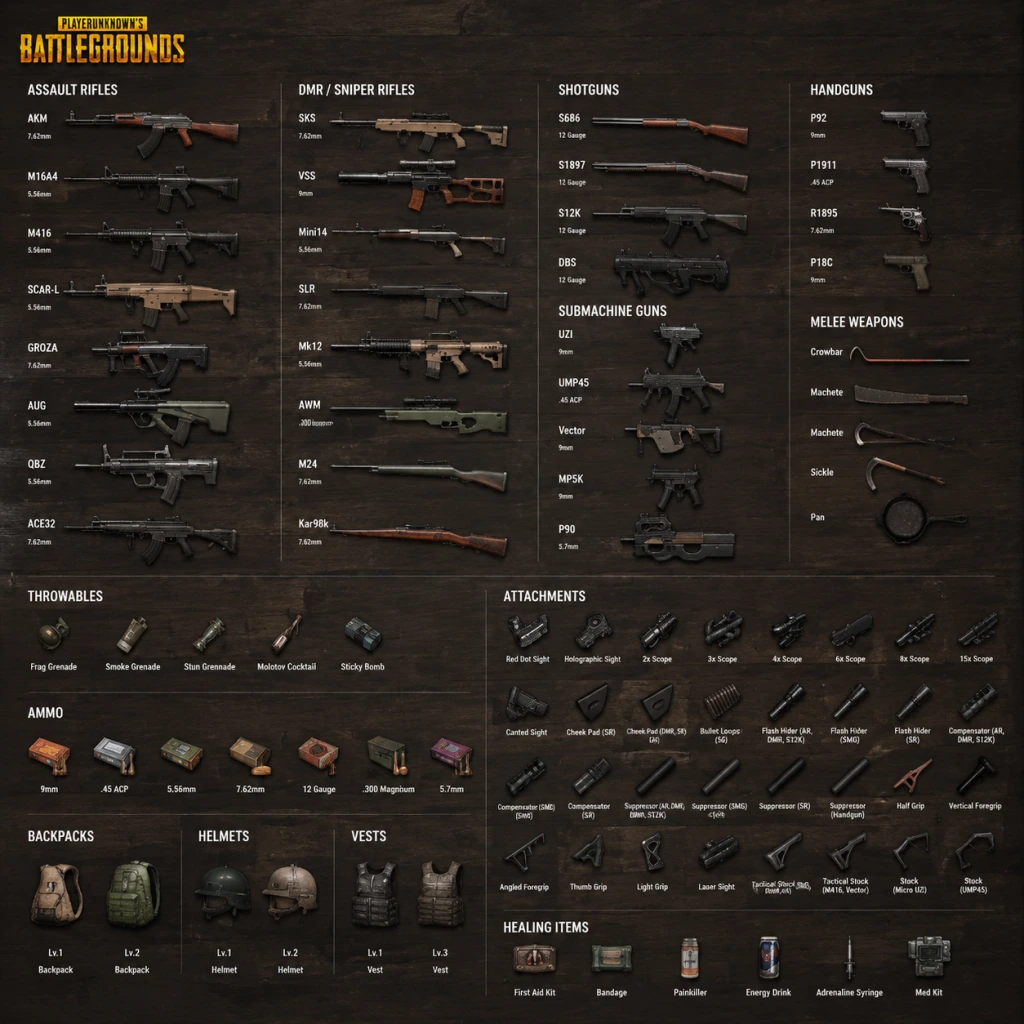
All Game Items
PlayerUnknown's Battlegrounds (PUBG) – All Game Items Guide
This guide covers every major item in PUBG: weapons, attachments, armor, consumables, equipment, currencies, materials, and collectibles. Items are grouped logically with explanations on how to obtain them, when they are useful, and any important synergies or upgrades. All information applies to the standard Battle Royale mode unless noted.
---
1. Weapons
Weapons are the core tools for eliminating enemies. They are found as floor loot, in crates, or from killed players. Each weapon type has distinct roles. Below are all significant weapons, categorized by class.
1.1 Assault Rifles (ARs)
Versatile, medium-range weapons with selectable fire modes (single, burst, full-auto). They accept most attachments and are the backbone of loadouts.
- Beryl M762: High damage, heavy recoil. Requires muzzle/vertical grip to control. Best mid-range with 3x/4x scope. Ammo: 7.62mm.
- G36C: Excellent stability with a 30-round magazine. Found only on Vikendi. Ammo: 5.56mm.
- M416: Popular for balanced stats. Low recoil with full attachments. Best all-rounder. Ammo: 5.56mm.
- M16A4: Burst-only or single shot. High muzzle velocity but no full-auto. Use with 4x/6x for long range. Ammo: 5.56mm.
- Mk47 Mutant: Burst-only, high damage. Uncommon. Accepts grips. Ammo: 7.62mm.
- QBZ: Found on Sanhok instead of M416/SCAR-L. Low recoil, fast reload. Ammo: 5.56mm.
- SCAR-L : Stable and accurate. Moderate rate of fire. Ammo: 5.56mm.
- AKM : High damage per shot but strong recoil. Ideal for close to mid-range. Ammo: 7.62mm.
- AUG A3 : Crate-only AR. Very stable, high fire rate. Excellent. Ammo: 5.56mm.
- Groza : Crate-only bullpup. Exceptional DPS, but limited to 30 rounds and only compatible with AR scopes up to 6x. Ammo: 7.62mm.
- FAMAS : Crate-only (added in later seasons). Very high fire rate, controllable. Ammo: 5.56mm.
- Micro UZI: Extremely high fire rate. Best for point-blank. Attachments: stock, magazine, muzzle, sight. Ammo: 9mm.
- MP5K: Balanced SMG with good accuracy. Can equip 3x scope. Ammo: 9mm.
- PP-19 Bizon: 53-round helical magazine. No attachment magazine slot. Good for sustained fire. Ammo: 9mm.
- Vector : Highest DPS among SMGs. Very high fire rate. Recoil is upward; use vertical grip. Ammo: 9mm (since Patch 10.2; previously .45 ACP).
- UMP45 : Sturdy SMG with moderate fire rate. Good for controlled bursts. Ammo: .45 ACP.
- Tommy Gun: Drum magazine (50-100 rounds). Poor accuracy but devestating in hipfire spray. No stock slot. Ammo: .45 ACP.
- MP9: Crate-only SMG. Integrally suppressed. Very high fire rate. Ammo: 9mm.
- P90: Crate-only bullpup SMG. 50-round magazine, high fire rate, built-in red dot. Ammo: 5.7x28mm (unique).
- S686: Double-barrel, two shots. Massive damage. Slow reload. Ammo: 12 gauge.
- S1897: Pump-action. Five shots. Reload one shell at a time. Ammo: 12 gauge.
- S12K: Semi-auto, five-shot magazine (extendable to 8). Fast follow-up. Ammo: 12 gauge.
- DBS: Crate-only bullpup double-barrel. Fire two shots fast, then reload. Extremely powerful. Ammo: 12 gauge.
- Mini-14: Low recoil, fast bullet speed. Reliable. Ammo: 5.56mm.
- Mk12: More damage than Mini-14, slower fire rate. Requires few attachments. Ammo: 5.56mm.
- QBU: Sanhok-exclusive. Has a bipod. Ammo: 5.56mm.
- SLR : High damage, strong recoil. Reward for skilled shooters. Ammo: 7.62mm.
- M110: Newer DMR (in later updates). High damage, decent stability. Ammo: 7.62mm.
- VSS: Integrally suppressed. Subsonic bullet drop is heavy. Hard to use but silent. Ammo: 9mm.
- SKS: Classic DMR. Recoil manageable with compensator and cheek pad. Ammo: 7.62mm.
- AWM: Crate-only. The most powerful sniper. One-shot headshot through level-3 helmet. Ammo: .300 Magnum (crate-exclusive).
- M24: Recently moved to crate? Actually M24 is world-spawn now (as of recent patches). Higher damage than KAR98k. Ammo: 7.62mm.
- KAR98K: Classic bolt-action. Can one-shot headshot up to level-2 helmet. Ammo: 7.62mm.
- Mosin-Nagant: Vikendi-exclusive. Same stats as KAR98K. Ammo: 7.62mm.
- Winchester Model 1894: Lever-action rifle. Slow fire rate, but high damage. Only found in certain modes? Actually it's a hunting rifle in spawn islands. Ammo: .45 ACP.
- DP-28: 47-round pan magazine. Fixed iron sights. Can mount 6x scope. High damage, slow reload. Ammo: 7.62mm.
- M249: Crate-only. 100-round belt. Can use red dot/holo sights. Very powerful suppressive fire. Ammo: 5.56mm.
- MG3: Crate-only (alternates with M249 in some seasons). Dual fire rates (660/990 RPM). Ammo: 7.62mm.
- P92: 15-round magazine. Decent fire rate. Ammo: 9mm.
- P1911: 7 or 9 rounds. Stopping power. Ammo: .45 ACP.
- P18C: Full-auto capable, burst-mode option. Very fast. Ammo: 9mm.
- R1895: Revolver. Slow reload, high damage. Ammo: 7.62mm.
- Deagle: Powerful revolver. One-shot headshot against level-1 helmet. Very slow. Ammo: .45 ACP.
- Flare Gun: Special weapon. Fires a flare to call an airdrop (care package) or if fired into a plane, a special vehicle (Brink vehicle). Ammo: Flare rounds (unique). Found rarely.
- Pan: The pan can block bullets (hitbox). Best melee. It deflects shots from behind? Actually it covers the butt area. Common.
- Machete: Moderate damage and range.
- Crowbar: Similar to machete.
- Sickle: Fast swings.
- Combat Knife: Found rarely (event modes). Fast.
- Frag Grenade: High explosive damage. Timer after pull. Effective in rooms and behind cover.
- Molotov Cocktail: Creates a fire zone. Damage over time. Denies space. Can destroy wood surfaces.
- Smoke Grenade: Creates a smoke screen. Blocks vision. Use for revives, cover, or misleading enemies.
- Stun Grenade (Flashbang): Blinds and deafens enemies in its arc. Can be countered by turning away.
- Spike Trap: Deployed on road. Punctures vehicle tires. Useful for ambushes.
- C4: Timed explosive that can be stuck to surfaces. Huge area. Detonated remotely or via timer. Rare.
- Blue Zone Grenade: Deals damage similar to blue zone. Area denial. Temporarily hurts enemies. Can be used to finish downed players? Actually it damages health only, not shield.
- Suppressor: Reduces sound and hides muzzle flash. Most rare. Useful for stealth in all ranges.
- Compensator: Reduces vertical and horizontal recoil. Helps with spray control.
- Flash Hider: Reduces muzzle flash and slightly reduces recoil. Middle ground.
- Choke: For shotguns (S686, S1897, S12K). Tightens pellet spread, increasing effective range.
- Duckbill: For shotguns (especially S12K). Spreads pellets horizontally. Useful for clearing buildings.
- Vertical Grip: Reduces vertical recoil the most. Perfect for most ARs.
- Angled Grip: Reduces horizontal recoil. Better for tap-firing.
- Half Grip: Balanced reduction for both. Good all-round.
- Light Grip: Reduces vertical recoil after initial shots. Increases weapon sway. Not recommended for spray.
- Thumb Grip: Improves ADS speed and reduces vertical recoil. Good for snap-aiming.
- Extended Magazine: Increases capacity (e.g., M416 from 30 to 40 for ARs; SMGs by 20-25).
- Quickdraw Magazine: Faster reload, no capacity increase.
- Extended Quickdraw Magazine: Best of both: more rounds and faster reload.
- Drum Magazine: For some SMGs (Tommy Gun, Uzi?) Actually Tommy Gun has drum extender, Vector can use extended but not drum; Uzi has 25-round standard, extended goes to 33.
- Red Dot Sight: 1x magnification, clear for close-mid.
- Holographic Sight: 1x with larger reticle, slight block.
- 2x Scope: Good for mid-range.
- 3x Scope: Popular for ARs and DMRs. A bit cluttered but great for 100-200m.
- 4x Scope: Classic sniper scope. Use on snipers, DMRs, ARs (tap).
- 6x Scope: Variable 3-6x zoom. Can be used on ARs and DMRs. Adjustable.
- 8x Scope: Fixed high zoom for long-range sniping.
- 15x Scope : Crate-only extremely rare. Massive zoom, heavy scope sway.
- Tactical Stock: For M416, SCAR, Vector, UMP45, etc. Improves weapon stability and reduces recoil.
- Cheek Pad: For sniper rifles (KAR98, SKS, etc.). Reduces sway and improves recoil recovery.
- Bullet Loops: For shotguns (S686, S1897). Increases reload speed for each shell.
- AWM Stock: Crate attachment for AWM? Actually AWM doesn't use stock? It uses cheek pad. Some unique attachments exist: e.g., M249 doesn't accept stock.
- Extended Magazine (Shotgun): For S12K, increases from 5 to 8 shells.
- Level 1 Vest: Reduces damage by 30%. Capacity: +50 (actually, vests themselves don't increase capacity; only backpacks do). Wait, vests in PUBG have a small inventory space? Actually vests provide a small storage bonus (50, 100, 150 for L1/L2/L3?). Let me verify: Level 1 vest: 100 capacity? No, backpacks are separate. Vests themselves don't add inventory. Correction: Vests only provide damage reduction. They have no inventory slots. The inventory space is solely from backpacks. So ignore that.
- Level 2 Vest: Reduces damage by 40%.
- Level 3 Vest: Reduces damage by 55%. Increases your survival significantly.
- Level 1 Helmet: Reduces headshot damage by 30%. Usually broken after one sniper shot.
- Level 2 Helmet: 40% reduction. Can survive one KAR98 headshot.
- Level 3 Helmet: 55% reduction. Can survive one AWM headshot (barely). Extremely valuable.
- Level 1 Backpack: 150 capacity.
- Level 2 Backpack: 200 capacity.
- Level 3 Backpack: 250 capacity.
- Bandage: Restores 10 HP per use up to 75% health. Max stack: 20. Quick use time. Good for minor healing.
- First Aid Kit: Restores 75% of maximum health. Cannot use if health is above that. Takes 6 seconds. Common.
- Med Kit: Restores 100% health. Takes 10 seconds. Rare. Great for full recovery.
- Painkiller & Energy Drink are boost items, not direct heal. They provide gradual health recovery and speed boost.
- Level 1 (20-50% Energy)+: Slow health regen.
- Level 2 (50-90% Energy)+: Health regen + slight speed increase.
- Level 3 (90-100% Energy): Maximum health regen + noticeable speed boost.
- Energy Drink: Adds 40 energy over time. Takes 4 seconds. Count: 2 per slot? Actually can stack up to 5? Stack size: 5.
- Painkiller: Adds 60 energy over time. Takes 6 seconds. More efficient.
- Adrenaline Syringe: Adds 100 energy instantly. Very rare (crate only). Takes 6 seconds. Best for a quick full boost.
- Repair Kit: Not traditional consumable but used to repair armor. Found rarely. Restores 30 durability to helmet or vest. Can be used multiple times on same piece.
- Gas Can: Used to refuel vehicles. Can be thrown and shot to create a fire trap? Yes, it explodes. Found infrequently.
- Bandage already covered.
- Emergency Pickup: A special item that allows you to be extracted from the battlefield and score points? Actually in ranked mode, there is a heat map? No. In normal mode, there is no such item. Might be in custom games. Omit.
- Battle Points (BP): Obtained from matches. Used to buy crates (Raider, Contraband, etc.) and in the BP store. No real-money purchase.
- G-Coin: Premium currency bought with real money. Used for Battle Pass, emotes, skins in the store, and certain crates.
- Contraband Coupons: Used in the Workshop to open Contraband Crates (for progressive weapon skins). Obtained from BP purchases or events.
- Crafting Materials: Schematics, Polymers, and Weapon XP. Used to upgrade progressive weapon skins.
- Schematics: Rare items that allow you to craft a weapon skin tree.
- Polymers: Common material from dismantling skins. Used to upgrade progressive skins.
- Weapon Leveling Materials: XP cards to increase weapon master level? Actually progressive skins require materials from Contraband Crates.
- Crate Keys: Some crates require keys (purchased with BP or G-Coin). But currently, crate system is being phased out; many direct purchase options.
- Ghillie Suit: Crate-only. Full camouflage. Hides your character model. Extremely valuable for snipers. Occupies your inventory? Actually it's a costume slot; does not take inventory space. Found in airdrops.
- Flare Gun: Already listed under pistols. Unique function.
- Spike Trap: Throwable. Deploy on roads to puncture tires.
- Jammer Pack: In special modes or on Miramar (?) Actually not in classic BR. Ignore.
- Emergency Pickup: Not standard.
- AR + DMR/Sniper: Classic loadout. One for close-mid (AR), one for long-range (DMR/sniper).
- SMG + Shotgun: Extreme close-range dominance.
- Armor + Helm: Always upgrade to higher tiers. Use Repair Kits on durable pieces.
- Boost + Med Kit: Pair for full recovery plus speed for rotation.
- Suppressor + DMR/Sniper: Keeps your position hidden after shots.
- Compensator + AR for spray: Reduces recoil for medium range.
- Grip choices: Vertical for spray AR, angled for tap, light for single-shot.
- Crate weapons: Always worth contesting if you have the gear. AUG, Groza, AWM, M249 are end-game capable.
- Flare Gun: Use in safe zone to call airdrop with better loot. Or in danger to call armored vehicle (if fired under plane).
- Floor loot: Items scattered in buildings, compounds, and open areas. Rarity increases with loot density in higher-tier zones (e.g., Mansion, School, Military Base).
- Airdrops: Done by plane late-game. Contain crate-only weapons, level-3 gear, and rare attachments.
- Killed players: Loot their inventory.
- Care Packages (from flare gun): Contain similar to airdrops.
- Shops (in certain modes like the map Karakin with a special loot mechanic): Not in classic.
- Vehicle trunks: Some vehicles have a trunk with loot (e.g., some cars on Miramar?). Mostly removed.
- Early game: Any weapon with ammo is good. Prioritize a long-range option and a close-range.
- Mid game: Seek upgrades, attachments, level-2 armor.
- Late game: Level-3 helmet, sniper/DMR, suppressors. Use throwables to flush enemies.
- Solo vs Squad: SMGs and shotguns are riskier but rewarding for aggressive plays. ARs are safer.
- Specific maps: On Vikendi, G36C and Mosin-Nagant are exclusive. On Sanhok, QBZ and QBU. On Miramar, M416 is less common; SCAR-L and AKM are plentiful.
1.2 Submachine Guns (SMGs)
Designed for close-quarters combat. Faster fire rates and better hipfire than ARs. Use 9mm, .45 ACP, or 9mm (Vector/MP5K uses 9mm after rework). Low recoil makes them forgiving.
1.3 Shotguns
Devastating at close range (<10m) but suffer from spread and slow reload. Headshots are lethal even with an unarmored torso. Pellets count matters.
1.4 Designated Marksman Rifles (DMRs)
Semi-auto rifles for mid-to-long range. Higher damage than ARs, lower than snipers. Can equip up to 6x or 8x scopes.
1.5 Sniper Rifles
Bolt-action single-shot weapons for extreme range. One-shot headshot kills against level-2 helmets. High skill requirement.
1.6 Light Machine Guns (LMGs)
High magazine capacity, sustained suppression. Heavy recoil. Best used prone with bipod.
1.7 Pistols
Sidearms for emergencies or early game. High risk of being outgunned.
1.8 Melee Weapons
Typically last resort, but can be effective for stealth kills.
1.9 Throwables
Essential for flushing enemies, denying areas, or dealing damage.
---
2. Attachments
Attachments modify weapon performance. They are found as floor loot and cannot be crafted. Each weapon has specific attachment slots. Below are the main types.
2.1 Muzzle Attachments
2.2 Grips
2.3 Magazine Attachments
2.4 Sights/Scopes
2.5 Stock Attachments
2.6 Magazine Attachments for specific weapons (e.g., Shotgun extended tube for S12K)
---
3. Armor & Backpack
Armor reduces incoming damage. Helmets protect head, vests protect torso. Backpacks increase carrying capacity.
3.1 Vests (Level 1, 2, 3)
All vests degrade with damage and can be repaired using repair kits (see later). Higher level vests have more durability.
3.2 Helmets (Level 1, 2, 3)
Helmets also have durability. They protect only the head, not face hitbox.
3.3 Backpacks (Level 1, 2, 3)
Backpacks don't affect stats. They allow carrying more items. Essential for holding ammunition, healing, and throwables.
---
4. Consumables
These items restore health or provide temporary buffs.
4.1 Medical Items
4.2 Boost Items
Boost items provide energy, which has multiple levels:
All boost items' effects can be overwritten by taking another before it wears off, but energy caps at 100.
4.3 Other Consumables
---
5. Currencies
PUBG has multiple currencies for cosmetics and progression.
---
6. Materials & Crafting (Workshop)
These are not used in the battle royale match but in the account's inventory for cosmetic upgrades.
---
7. Key Equipment & Collectibles
These items do not fit the above categories but are notable.
7.1 Equipment
7.2 Collectibles
There are no in-game collectibles that affect gameplay. Cosmetic items (skins, outfits, parachutes, weapon skins) are purely visual. They can be earned through BP crates, Battle Pass, or purchased. Some limited-time skins are highly sought after.
---
8. Important Synergies & Upgrades
---
9. How to Obtain Items
---
10. When is Each Item Useful?
This comprehensive guide covers all major items. Use this reference to optimize your loadout and decision-making in every match.