Character Skills
Overview
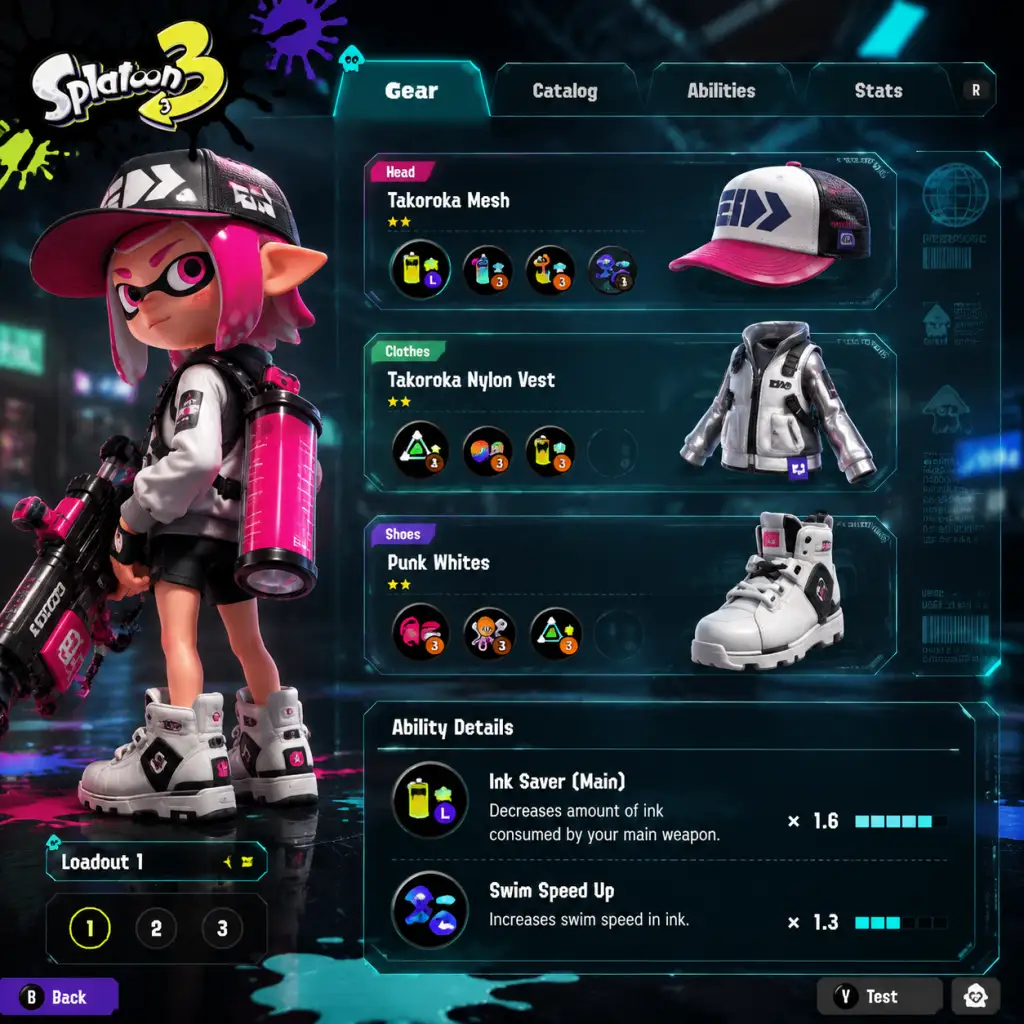
Splatoon 3 does not feature traditional character classes or skill trees. Instead, every player controls an Inkling or Octoling whose abilities are defined entirely by their chosen weapon loadout (main weapon, sub weapon, special weapon) and gear abilities (passive buffs). This guide covers every "skill" in the game: all sub weapons, special weapons, and key gear abilities. Each entry includes effects, usage tips, cooldowns/ink costs, upgrades (gear ability stacking), combos, synergies, recommended builds, and situational advice.
---
Sub Weapons (Secondary Skills)
Sub weapons are secondary tools fired with the R button. They consume ink from your tank (typically 40–70% of one tank). Each weapon has one fixed sub weapon. Below is every sub weapon in Splatoon 3.
Splat Bomb
- Effect: A standard fragmentation grenade that explodes after a short fuse (about 1.5 seconds). Can be thrown and will detonate on contact with an enemy or surface. Deals 180 damage (direct hit) or 30 damage in the outer blast radius.
- Ink Cost: 70% of a full tank.
- Cooldown/Refill: No cooldown, but you must wait for ink to recover.
- Upgrades: Gear abilities like Ink Saver (Sub) reduce ink cost; Sub Power Up increases throw range and blast radius.
- Combos: Excellent for flushing enemies out of ink or finishing low-health opponents. Combos well with any main weapon that can poke (e.g., Shooters, Sloshers).
- Synergies: Pairs with specials that require precision (e.g., Tenta Missiles + Splat Bomb to force enemies into the missile storm).
- Recommended Builds: Any aggressive or midline build. Use Sub Power Up to land safer throws.
- When to Use: - To deny a choke point before pushing. - To finish an enemy you can’t reach. - To break a Splash Wall or enemy armor. - As a panic defensive option.
- Effect: A small, fast projectile that explodes on impact or after a short delay. Deals 35 damage direct hit, 25 splash. Very low ink cost (40%). Can be thrown rapidly.
- Ink Cost: 40%.
- Upgrades: Sub Power Up increases damage (up to 41 direct) and explosion radius.
- Combos: Great for fishing (hitting enemies around corners) and building special gauge quickly. Combos well with high-damage main weapons like Chargers or Splatanas.
- Synergies: Works with any weapon that lacks quick poking ability.
- Recommended Builds: Use with a main weapon that has low ink efficiency (e.g., Splattershot Pro) to supplement damage. Stack Ink Saver (Sub) for more spam.
- When to Use: - To pressure enemies hiding behind cover. - To build special gauge from a distance. - To confirm kills after a partial main weapon hit.
- Effect: A bomb that sticks to surfaces (walls, floors, ceilings) and detonates after about 2 seconds. Can be attached to the tower in Tower Control. Deals 180 damage direct, 30 splash.
- Ink Cost: 70%.
- Upgrades: Sub Power Up extends the time before detonation (up to 2.5 seconds), allowing late explosions. Also increases blast radius.
- Combos: Place on a wall near an enemy’s path; time your push. Popular with weapons that have low mobility.
- Synergies: Use with Point Sensor to track enemies near your bomb.
- Recommended Builds: Defensive/support builds; good for area denial.
- When to Use: - On the Tower in Tower Control to delay the enemy team. - On a Rainmaker shield to protect it. - On a wall above a chokepoint to catch jumping foes.
- Effect: A bomb that skids across the ground in a straight line, leaving a trail of your team’s ink. Explodes on contact with an enemy or after reaching max range (about 3 seconds). Direct hit 180 damage, splash 30.
- Ink Cost: 70%.
- Upgrades: Sub Power Up increases travel speed and distance.
- Combos: Use as a rapid movement tool: throw it and swim in the ink trail. Pairs with Rollers or Brushes to close distance.
- Synergies: Great with weapons that need mobility aid (e.g., E-liter 4K).
- Recommended Builds: Aggressive slayer builds. Stack Swim Speed Up and Sub Power Up.
- When to Use: - To quickly ink forward for a surprise attack. - To retreat while leaving a defensive line. - To contest zone in Splat Zones.
- Effect: A small robot bomb that beeps and chases the nearest visible enemy. If it reaches them, it explodes for 180 damage (direct). Can be destroyed; has low HP. Moves at moderate speed.
- Ink Cost: 60%.
- Upgrades: Sub Power Up increases chase speed and detection range.
- Combos: Use to flush out campers or force enemies into your main weapon’s range.
- Synergies: Pairs with long-range weapons like Chargers to safely pressure close-range foes.
- Recommended Builds: Support or control builds.
- When to Use: - To scout hidden enemies (throw into suspected ink). - To annoy enemy snipers. - To delay an enemy push.
- Effect: Deploys a cloud of purple ink mist that lasts about 5 seconds. Enemies inside are slowed (movement speed reduced by ~50%) and take 30 damage per second over time. The mist does not ink the ground.
- Ink Cost: 60%.
- Upgrades: Sub Power Up increases duration (up to 7 seconds) and slows more.
- Combos: Follow up with a damage-over-time special (like Ink Storm) for massive area denial.
- Synergies: Works wonders with weapons that excel at close range (e.g., Splat Roller) to ensure enemies can’t escape.
- Recommended Builds: Control/trapper builds.
- When to Use: - In Narrow corridors. - On the Splat Zone to slow enemies capturing. - In Rainmaker paths to hinder the carrier.
- Effect: Throws a sensor that marks all enemies within a large radius for about 6 seconds. Marked enemies are visible through walls to your entire team. Deals no damage.
- Ink Cost: 45%.
- Upgrades: Sub Power Up increases detection radius and duration (up to 8 seconds).
- Combos: Direct your team’s fire and specials (e.g., Tenta Missiles or Ink Jet) onto marked foes.
- Synergies: Great for coordinated teams.
- Recommended Builds: Support or recon builds.
- When to Use: - Before pushing an objective. - To reveal invisible enemies (Ninja Squid). - To track the Rainmaker carrier.
- Effect: A carbonated bomb that can be charged by holding the sub button. When thrown, it bounces and leaves a trail of fizzy ink that damages enemies (10 per contact). Fully charged explodes for 150 damage direct; uncharged 60 damage. The ink trail also boosts special gauge when teammates swim through it.
- Ink Cost: 60% (uncharged), 70% (fully charged).
- Upgrades: Sub Power Up increases bounce time and explosion damage.
- Combos: Charge and roll into a group of enemies for area damage. Works well with weapons that have high mobility (e.g., Dualies, Splatana Wiper).
- Synergies: The ink trail can help allies build specials.
- Recommended Builds: Aggressive midline builds.
- When to Use: - When you anticipate enemies bunching up. - To build special gauge for yourself and nearby teammates.
- Effect: Fires a laser projectile that bounces off walls (up to 4 bounces). Deals 30 damage on hit. If you hit an enemy, they are marked (similar to Point Sensor) for 3 seconds. Also inks a thin line on surfaces.
- Ink Cost: 45%.
- Upgrades: Sub Power Up increases damage (up to 35) and marking duration.
- Combos: Use to hit enemies hiding behind cover; follow up with a main weapon.
- Synergies: Pairs well with walls and corridors.
- Recommended Builds: Defensive or midline builds.
- When to Use: - To probe enemy positions from a safe angle. - To confirm a kill on a retreating enemy.
- Effect: Creates a protective wall of ink that blocks enemy shots and ink. Lasts about 5 seconds or until destroyed (200 HP). Your own shots pass through freely. Deals 15 contact damage if an enemy touches it.
- Ink Cost: 70%.
- Upgrades: Sub Power Up increases HP (up to 300) and duration (up to 7 seconds).
- Combos: Place to protect while you charge a special or revive a teammate. Good for holding chokepoints.
- Synergies: Excellent with slow-firing weapons like the Dynamo Roller or Charge weapons.
- Recommended Builds: Defensive or anchor builds.
- When to Use: - On the tower. - In front of the Rainmaker shield. - To block a Charger’s line of sight.
- Effect: Deploys a device that slowly inks the surrounding area in a circular pattern. Lasts until destroyed (approx 12 seconds, 200 HP). Does not damage enemies. Good for building special gauge and covering ground.
- Ink Cost: 60%.
- Upgrades: Sub Power Up increases ink coverage range and duration.
- Combos: Place on high walls or unorthodox surfaces to cover large areas.
- Synergies: Works with any weapon that needs passive ink coverage (e.g., Chargers).
- Recommended Builds: Support or zone control builds.
- When to Use: - At the start of a match to ink your base. - To contest Splat Zones from a distance. - To paint the tower while you hide.
- Effect: Places a mine that is invisible to enemies until triggered. When an enemy steps near, it explodes dealing 30 damage and inks a large area. The mine remains until detonated or replaced.
- Ink Cost: 50%.
- Upgrades: Sub Power Up increases explosion radius and damage (up to 45).
- Combos: Place near your Splat Zone or Tower Control path to catch flankers.
- Synergies: Pairs with weapons that trap enemies (e.g., Octobrush).
- Recommended Builds: Defensive or trapper builds.
- When to Use: - On common flank routes. - Near rainmaker path. - Behind your team’s front line to prevent ambushes.
- Effect: Places a beacon that your teammates can super jump to (even if they don’t have it unlocked). Lasts until destroyed (200 HP). Does not damage. Up to two beacons can be placed at once.
- Ink Cost: 80%.
- Upgrades: Sub Power Up increases beacon durability and allows you to place up to three.
- Combos: Strategic super jump spots for coordinated pushes.
- Synergies: Great for maps with verticality.
- Recommended Builds: Support or flanker builds.
- When to Use: - Before a big push. - On high ledges near the objective. - In your base to facilitate quick returns.
- Effect: Fires a homing projectile that seeks the nearest enemy in its path. If it hits, deals 100 damage and leaves a spreading ink patch. If it misses, it explodes after a short time dealing splash damage.
- Ink Cost: 60%.
- Upgrades: Sub Power Up increases homing range and splash radius.
- Combos: Use to pressure backline players or finish kills.
- Synergies: Works well with weapons that have low range.
- Recommended Builds: Aggressive or midline builds.
- When to Use: - To chase a retreating enemy around a corner. - To harass enemy Chargers.
- Effect: Locks onto up to 4 enemies (if fewer, missiles repeat on locked ones). After brief wind‑up, fires 10 waves of missiles (per locked enemy) that rain down from above. Each missile deals 150 damage direct (kill) or 50 splash. Covers large area.
- Gauge Required: 190.
- Duration: Lock‑on time ~2s, missile rain ~4s.
- Strategy: Use from cover. Lock on then reposition. Combos with Point Sensor or Angle Shooter for guaranteed lock.
- Synergies: Works with long‑range weapons to control space.
- When to Use: - To break a stalemate or force enemies off an objective. - To clear a Splat Zone before a push. - To delay the enemy team (e.g., in Tower Control).
- Effect: Calls down a slow‑moving cloud of damaging ink rain over a large area (you choose starting location). Deals 30 damage per second to enemies inside, and inks the ground for your team. Lasts 6 seconds.
- Gauge Required: 190.
- Duration: 6 seconds after cloud forms.
- Strategy: Place to block escape routes or force enemies away from objective. Good for contesting zones.
- Synergies: Combine with Toxic Mist for extreme slow + damage.
- When to Use: - On the tower. - Over the Rainmaker path. - To deny a super jump landing.
- Effect: Unleashes a high‑pressure jet of ink that you can aim while moving slowly. Deals 120 damage per direct hit ( kills in ~3 hits). Lasts about 5 seconds. You can cancel early to escape.
- Gauge Required: 180.
- Duration: 5 seconds of firing.
- Strategy: Use from high ground or surprise flanks. Very good for picking off backline enemies.
- Synergies: Use with a weapon that has Sub Power Up to increase jet range.
- When to Use: - To quickly kill an exposed enemy. - To clear a perch for your team. - As a panic button if you’re being chased.
- Effect: You begin charging a massive ink explosion while glowing. During charge, you are invincible but can’t move. Press again to throw a huge bomb that deals 400 damage in a large radius (kills anything). If you hold to full charge, it’s larger.
- Gauge Required: 210.
- Duration: Charge up to 3 seconds, splash lasts ~0.5s.
- Strategy: Use when enemies are grouped or contesting objective. Charge behind cover, then throw into the fray.
- Synergies: Works well with Stealth Jump to surprise drop in.
- When to Use: - To break a Rainmaker shield. - To turn the tide in a clustered fight. - As a last‑resort counter‑push.
- Effect: Jump up and crash down, creating a damaging shockwave around you. Midair you can move slightly. Deals 140 damage in inner ring, 60 outer. Can be used while falling from a super jump.
- Gauge Required: 180.
- Duration: ~1.5 seconds animation.
- Strategy: Very risky; vulnerable to being shot out of the sky. Use from ambush or while falling from a squid jump.
- Synergies: Combine with Ninja Squid to catch enemies off guard.
- When to Use: - When surrounded and no escape. - To punish enemies who are stationary (e.g., charging a Charger). - In combination with a super jump onto an enemy.
- Effect: Deploys a large, stationary bubble shield that blocks all enemy ink and projectiles. Your shots pass through. Allies inside are protected. Lasts 7 seconds or until destroyed (500 HP).
- Gauge Required: 200.
- Duration: 7 seconds.
- Strategy: Plant near objective to protect teammates. Can be used to block a Charger’s sight line.
- Synergies: Place on the tower in Tower Control for safe ride.
- When to Use: - To shield your team while they push the Rainmaker. - To protect the Splat Zone from enemy specials. - To revive a teammate safely.
- Effect: Fires a series of three wide‑range sound waves that travel forward, ignoring walls. Each wave deals 120 damage (kills in one hit if both waves hit). Waves spread out.
- Gauge Required: 190.
- Duration: ~3 seconds for the three waves.
- Strategy: Use in narrow corridors or to cover an escape route. Can hit multiple enemies.
- Synergies: Point Sensor or Angle Shooter can help you confirm a kill.
- When to Use: - To flush enemies from behind cover. - To defend a choke point. - As a finisher after tagging with sub weapon.
- Effect: Transform into a slow, armored crab with two ink cannons. Primary fire: charged shots that pierce enemies and ink walls. Secondary fire: rapid ink blobs. You can stick to walls and ceilings. Lasts 8 seconds.
- Gauge Required: 200.
- Duration: 8 seconds.
- Strategy: Use for area denial and zoning. Stick to a wall to rain ink from above.
- Synergies: Use Sub Power Up to increase Crab Tank’s ink output.
- When to Use: - To lock down a Splat Zone. - To defend the rainmaker path. - To break a stalemate with continuous fire.
- Effect: You ride a shark‑shaped inflatable that dashes forward. Upon releasing, you leap and explode on landing (400 damage). You are invincible during the dash and jump, but the landing has a brief vulnerability.
- Gauge Required: 190.
- Duration: Dash ~1.5s, jump ~1s.
- Strategy: Ambush from ink. Dash toward grouped enemies, then leap and explode.
- Synergies: Use with Ink Mine or Toxic Mist to cluster enemies.
- When to Use: - To initiate a charge into enemy territory. - To destroy the Rainmaker shield. - To scatter a clumped enemy team.
- Effect: Mark up to three locations on the map (ground). After a delay, three giant ink pillars strike those spots, dealing damage (150 direct) and inking the area. Each pillar lasts and inks for a few seconds.
- Gauge Required: 190.
- Duration: Marking ~2s, strikes ~3s.
- Strategy: Place on objectives or known enemy positions.
- Synergies: Use with Ink Storm for layered area denial.
- When to Use: - To force enemies off the tower. - To contest Splat Zones from a distance. - To block super jump landing points.
- Effect: Deploys a cooler that dispenses drinks for you and nearby teammates. Each drink provides a random beneficial effect (e.g., faster swim, special charge up, ink recovery). Lasts about 8 seconds for each drink. The cooler itself can be destroyed (200 HP).
- Gauge Required: 190.
- Duration: Cooler lasts 15 seconds, drinks last ~8 seconds.
- Strategy: Place near your team’s push point. Great for supporting an aggressive push.
- Synergies: Works with all team compositions; especially good in tower or rainmaker pushes.
- When to Use: - Before a coordinated push. - To help teammates recover quickly after a fight. - As a morale boost (and the random effects can be clutch).
- Effect: Deploys a device that emits three expanding ink wave rings. Each wave damages enemies (30 per hit, up to 90 if hit by all three) and marks them with a red highlight visible through walls.
- Gauge Required: 190.
- Duration: Three waves over ~4 seconds.
- Strategy: Use to scout and soften enemies before engaging.
- Synergies: Combos with any special that requires precision (e.g., Tenta Missiles with marking).
- When to Use: - At the start of a fight to weaken the enemy. - To reveal hidden opponents. - To zone enemies away from an area.
- Effect: You shoot a grappling hook that lunges you forward to a surface (wall, ceiling, floor). You can then dash around while firing your main weapon (with reduced damage). Lasts 5 seconds. Hooking an enemy does damage (60).
- Gauge Required: 190.
- Duration: 5 seconds after grapple.
- Strategy: Excellent for flanking. Grapple to high ground and rain ink. Can escape quickly.
- Synergies: Use with weapons that have high burst potential (e.g., Splatana Stamper).
- When to Use: - To get behind enemy lines. - To pursue a fleeing enemy. - To escape a losing fight.
- Squid Move Speed Up (Shoes): Increases swim speed in ink and squid form.
- Dodge Roll (Shoes): Only for Dualie users? No, but the gear ability “Squid Surge” is not a thing. Actually, main abilities are not unique by slot; they can appear on any slot. The actual main abilities are:
- Any of the above can appear as sub abilities (except Ability Doubler and certain main‑only). They provide a smaller boost per slot.
- Aggressive Slayer: Swim Speed Up, Run Speed Up, Ink Saver (Main), Special Charge Up, Ninja Squid, Stealth Jump. Sub weapon: Splat Bomb or Burst Bomb. Special: Kraken? Not in S3. Use Reefslider or Zipcaster.
- Support/Area Denial: Ink Recovery Up, Sub Power Up, Special Charge Up, Special Power Up. Sub: Toxic Mist or Point Sensor. Special: Ink Storm or Tacticooler.
- Defensive Anchor: Ink Saver (Sub), Sub Power Up, Object Shredder, Quick Super Jump. Sub: Splash Wall or Sprinkler. Special: Big Bubbler or Wave Breaker.
- Rusher/Objective‑Control: Swim Speed Up, Stealth Jump, Special Charge Up, Sub Saver. Sub: Curling Bomb (for speed) or Autobomb (for distraction). Special: Crab Tank or Killer Wail.
- Point Sensor + Tenta Missiles: Guaranteed lock and increased missile accuracy.
- Toxic Mist + Ink Storm: Slows and damages enemies simultaneously, forcing them to retreat.
- Stealth Jump + Splashdown: Ambush from above.
- Ink Mine + Wave Breaker: Waves reveal enemies, mines finish them.
- Fizzy Bomb + Special Charge Up: Charge special quickly while providing ink trail for teammates.
- Sub Power Up + Curling Bomb: Maximize movement speed.
Burst Bomb
Suction Bomb
Curling Bomb
Autobomb
Toxic Mist
Point Sensor
Fizzy Bomb
Angle Shooter
Splash Wall
Sprinkler
Ink Mine
Squid Beakon
Torpedo
---
Special Weapons (Ultimate Skills)
Each main weapon has a fixed special weapon that charges by inking turf (pressing both sticks or L + R). Special gauge requires 180–210 points (varies by weapon). Duration/effect listed below.
Tenta Missiles
Ink Storm
Ink Jet
Booyah Bomb
Splashdown
Big Bubbler
Killer Wail 5.1
Crab Tank
Reefslider
Triple Inkstrike
Tacticooler
Wave Breaker
Zipcaster
---
Gear Abilities (Passive Skills)
Gear abilities are obtained from headgear, clothing, and shoes. Each piece has one main ability plus up to three sub abilities (obtained via scrolls or ability chunks). Abilities stack, but diminishing returns apply after 3–4 of the same ability.
Main Abilities (Unique to gear type)
- Ink Saver (Main): Reduces ink consumption for main weapon.
- Ink Saver (Sub): Reduces ink consumption for sub weapon.
- Ink Recovery Up: Faster refill when in ink.
- Swim Speed Up: Faster movement while swimming.
- Run Speed Up: Faster movement while running (not swimming).
- Special Charge Up: More points toward special for each unit of ink coverage.
- Special Power Up: Enhances special effects (varies by special).
- Special Saver: Loses less special gauge when splatted.
- Sub Power Up: Enhances sub weapon effects.
- Sub Resistance Up: Reduces damage from enemy subs.
- Quick Respawn: Faster respawn after being splatted.
- Quick Super Jump: Faster super jump.
- Stealth Jump: Makes super jump landings invisible (no landing ink splash).
- Ninja Squid: Swim without leaving a rippling trail (slower swim speed).
- Haunt: Mark the enemy who splatted you for a short time after you respawn.
- Comeback: Temporarily boosts stats (speed, charge) after respawning.
- Drop Roller: Perform a quick roll after super jumping to avoid damage.
- Object Shredder: Increases damage to objects (splash walls, rainmaker shield, etc.).
- Opening Gambit: Boosts speed and ink recovery for first 30 seconds of match.
- Last‑Ditch Effort: Boosts abilities when your team is behind (e.g., special charge, ink recovery).
- Thermal Ink: Marks hit enemies through walls for a short time.
- Respawn Punisher: Increases respawn time for the enemy who splats you (and yourself).
- Ability Doubler: Doubles the effects of sub abilities on that gear.
Sub Abilities (Stackable)
Build Recommendations
Synergies and Combos
---
When to Use Each Skill: Contextual Guide
| Situation | Recommended Sub | Recommended Special | Gear Focus |
|---|---|---|---|
| Opening push | Sprinkler (ink base) or Curling Bomb (rush) | Tacticooler or Ink Storm | Opening Gambit, Swim Speed |
| Holding a Splat Zone | Splash Wall, Toxic Mist, Ink Mine | Big Bubbler, Wave Breaker | Sub Power Up, Quick Respawn |
| Tower Control (attacking) | Suction Bomb (stick to tower), Point Sensor | Big Bubbler, Tenta Missiles | Special Charge Up, Sub Saver |
| Tower Control (defending) | Toxic Mist, Autobomb | Ink Storm, Booyah Bomb | Quick Super Jump, Special Power Up |
| Rainmaker (escorting) | Splash Wall, Curling Bomb | Big Bubbler, Reefslider | Object Shredder, Swim Speed |
| Rainmaker (defending) | Angle Shooter, Ink Mine | Killer Wail, Crab Tank | Thermal Ink, Respawn Punisher |
| Clam Blitz (offense) | Point Sensor, Burst Bomb | Tenta Missiles, Zipcaster | Special Charge Up, Stealth Jump |
| Clam Blitz (defense) | Splat Bomb, Squid Beakon | Wave Breaker, Tacticooler | Quick Super Jump, Sub Power Up |
| 1v1 duel | Burst Bomb, Splat Bomb | Ink Jet, Reefslider | Ink Recovery Up, Run Speed |
| Escaping a fight | Curling Bomb, Autobomb | Zipcaster, Splashdown | Swim Speed Up, Quick Respawn |
Final Notes
- Experiment with different sub/special combos on training room (the Shoal) to learn timings.
- Gear abilities can be rerolled with ability chunks obtained from Salmon Run or splatfest rewards.
- No single “best” loadout; adapt to map, mode, and team composition.
- Use this guide to understand each skill’s strengths, but always stay flexible.
This concludes the complete Character Skills guide for Splatoon 3.