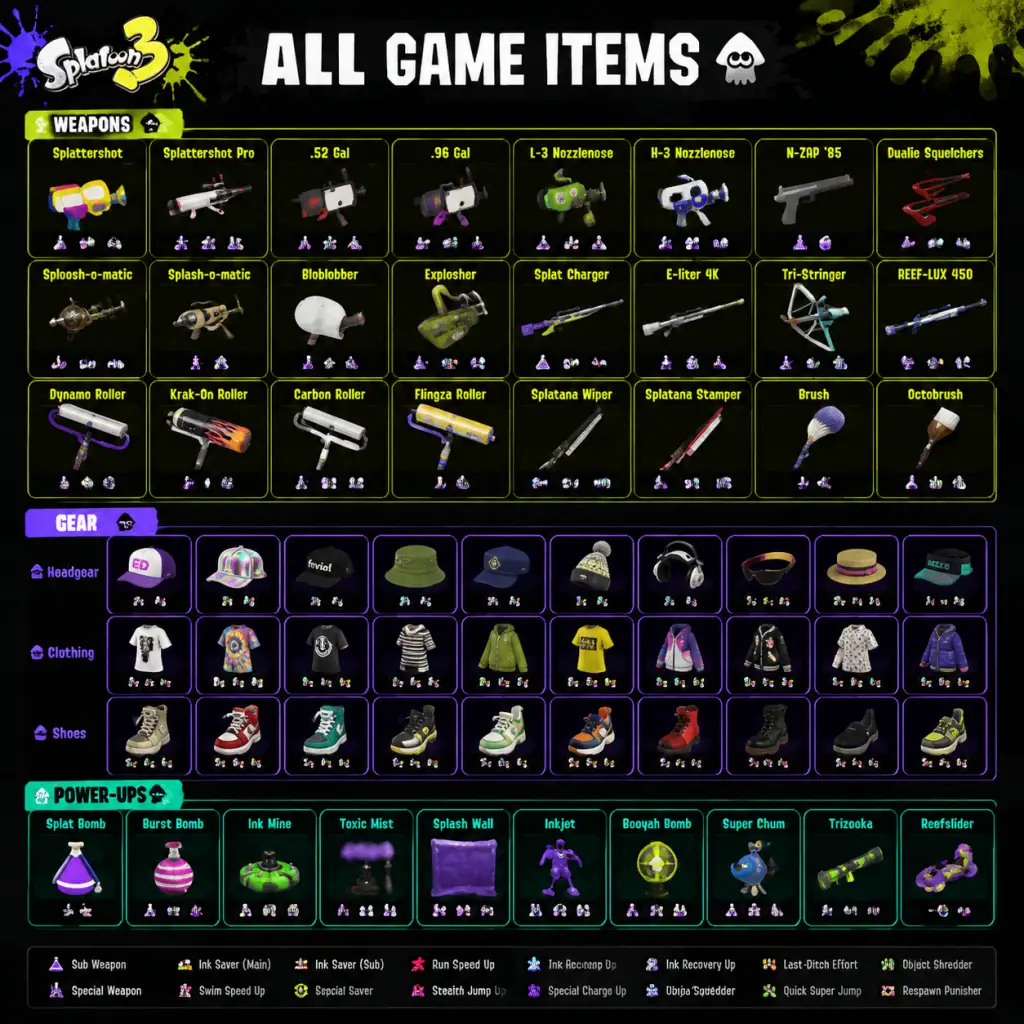
All Game Items
Overview
Splatoon 3 features a vast array of items that fall into several categories: currencies, weapons (main, sub, and special), gear (headgear, clothing, shoes with abilities), consumables (food and drink tickets), collectibles (Sunken Scrolls, Sardines, etc.), materials (ability chunks, Super Sea Snails), and key equipment (Hero Gear, amiibo rewards). This guide details every major item, how to obtain it, its practical use, and any important synergies or upgrade paths.
---
1. Currencies
| Currency | Purpose | How to Obtain | Notes |
|---|---|---|---|
| Cash | Buy weapons, gear, food/drink tickets, and reroll gear abilities. | Earned from Turf War matches, Salmon Run rewards, story mode (Return of the Mammalians) levels, and selling unused gear. | Unlimited cap. Essential for early progression. |
| Sheldon Tickets | Unlock new main weapons from Sheldon. | Level up (every level grants a ticket), complete story mode levels, or receive from Salmon Run rotations. | One ticket unlocks one weapon. Some weapons require multiple tickets. |
| Super Sea Snails | Add ability slots to gear (up to 3) or reroll gear abilities. | Earned from Splatfest rewards (winning or participating) and leveling up past level 30 (every 5 levels). | Limited supply; use wisely to optimize gear builds. |
| Ability Chunks | Craft specific gear abilities at Murch’s shop. | Earned by scrubbing gear abilities (costs cash) or as Salmon Run rewards. | Each chunk corresponds to a single ability; 10 chunks (or 20 for rare abilities) are needed to add an ability. |
| Fish Scales (Salmon Run exclusive) | Buy Salmon Run gear, locker decorations, and food tickets. | Earned from Salmon Run by completing shifts and meeting quotas. | Used only in the Grizzco Industries shop. |
| Catalog Exp | Progress the seasonal Catalog (unlocks cosmetic rewards). | Earned by playing any mode – Turf War, Anarchy Battle, Salmon Run, etc. | Not a currency you spend, but tracks your seasonal level. |
2. Weapons
2.1 Main Weapons
Main weapons are your primary inking tools. Each belongs to a class with distinct mechanics. Below are the classes and notable examples.
Shooters – Balanced range, fire rate, and ink efficiency.
- Splattershot: Starter weapon; good range, moderate damage (2-hit kill). Unlocked from the start. Synergizes with Suction Bomb and Trizooka. Best for all-around play.
- N-ZAP ’85: Fast fire rate, low damage per hit but good for inking. Unlocked via Sheldon ticket. Pairs with Curling Bomb and Tenta Missiles. Ideal for support.
- Splattershot Pro: High damage (3-hit kill), longer range, but slow fire rate and high ink consumption. Unlocked later. Use with Point Sensor and Trizooka for area denial.
- Splat Roller: Standard roller. Unlocked early. Horizontal flick is strong; vertical flick has reach. Sub: Suction Bomb. Special: Big Bubbler. Good for aggressive splatting and turf coverage.
- Carbon Roller: Lightweight, fast flicks but low damage. Unlocked via tickets. Sub: Burst Bomb. Special: Zipcaster. Useful for hit-and-run tactics.
- Splat Charger: Long charge time, one-shot kill at full charge. Unlocked early. Sub: Sprinkler. Special: Wave Breaker. Best for long-range support and picking off enemies.
- E-liter 4K: Extremely long range but very slow charge. Unlocked later. Sub: Ink Mine. Special: Tenta Missiles. Requires good aim and map awareness.
- Slosher: Standard bucket. Unlocked mid-game. Sub: Suction Bomb. Special: Triple Inkstrike. Effective on maps with ledges.
- Explosher: High ink consumption but fires a slow projectile that explodes on surfaces. Unlocked late. Sub: Point Sensor. Special: Booyah Bomb. Excellent for zoning.
- Heavy Splatling: Long rev time but sustained fire. Unlocked early. Sub: Sprinkler. Special: Booyah Bomb. Good at holding chokepoints.
- Hydra Splatling: Extremely slow rev but longest range and highest damage. Unlocked later. Sub: Auto-Bomb. Special: Killer Wail 5.1. Best for campy defense.
- Splat Dualies: Standard dualies. Unlocked early. Sub: Splat Bomb. Special: Crab Tank. Highly mobile; dodge roll is key.
- Dapple Dualies: Fast roll, low ink consumption, short range. Unlocked mid-game. Sub: Ink Mine. Special: Reefslider. Good for flanking.
- Splat Brella: Balanced shield and shot. Unlocked early. Sub: Sprinkler. Special: Ink Vac. Shield can block ink and protect teammates.
- Undercover Brella: Weak shield but can shoot while moving. Unlocked mid-game. Sub: Reginaldo? Actually Sub: Ink Mine. Special: Triple Inkstrike. Good for aggressive play behind a weak umbrella.
- Tri-Stringer: The first stringer. Unlocked via Sheldon ticket. Sub: Toxic Mist. Special: Tacticooler. Perfect for area denial and medium-range support.
- R-3 Stringer: (Available in DLC or later updates) Grizzco? Actually not in base game; but as of version updates, new stringers may appear. For simplicity, refer to Tri-Stringer as representative.
- Splatana Wiper: Fast horizontal slash, short range. Unlocked mid-game. Sub: Splat Bomb. Special: Ultra Stamp. Good for close combat and ambushes.
- Splatana Stamper: Slower but longer range; charged vertical slash is powerful. Unlocked later. Sub: Curling Bomb. Special: Triple Inkstrike. Synergizes with bomb usage.
Rollers – Large ink coverage; swing to fling ink or roll over enemies.
Chargers – Sniper rifles; hold to charge, release to fire a precise shot.
Sloshers – Buckets; slosh ink in a wide arc. Good for vertical engagement and covering walls.
Splatlings – Heavy machine guns; rev up and fire continuously. Slow move speed while firing.
Dualies – Twin pistols; dodge-roll to increase fire rate.
Brellas – Umbrella-shaped shields that shoot and can be deployed as a barrier.
Stringers – Bows that fire three arrows in a spread; charge to increase distance.
Splatanas – Sword-like weapons that slash ink in horizontal arcs; can be charged for vertical swings.
Obtaining Main Weapons: Unlock via Sheldon tickets at the weapon shop in the lobby. Some weapons are default, others require leveling up (levels 1-30) and purchasing with tickets. Sheldon’s picks and Salmon Run also grant temporary weapons (Grizzco weapons).
Synergies and Upgrades: Each main weapon comes with fixed sub and special weapons (except some variants). There is no direct upgrade path for a single weapon; instead, you unlock different weapon kits. For example, the Splattershot has the standard kit (Suction Bomb + Trizooka) and the Splattershot Jr. kit (Splat Bomb + Ink Storm). Choose based on playstyle.
2.2 Sub Weapons
Sub weapons are secondary tools thrown or placed. Most main weapons come with one type.
| Sub Weapon | Description | How to Obtain | When Useful |
|---|---|---|---|
| Splat Bomb | Standard bomb that explodes after a short fuse. | Available on many kits. | Area denial, forcing enemies out of cover, splatting enemies in ink. |
| Suction Bomb | Sticks to surfaces; detonates after a few seconds. | Same as above. | Great for attaching to walls/ceilings; useful in Splat Zones. |
| Burst Bomb | Small bomb that explodes instantly on contact; low damage but high velocity. | Common on shooters. | Quick chip damage, finishing off opponents, breaking on objects. |
| Curling Bomb | Rolls forward, leaving an ink trail; explodes on contact with enemy or wall. | Found on many weapons. | Good for creating ink paths, surprising enemies around corners. |
| Auto-Bomb | Homing bomb that seeks out nearby enemies. | Uncommon. | Useful for flushing out campers, checking blind spots. |
| Ink Mine | Placeable mine that triggers when enemy steps on it; reveals location. | On some rollers and chargers. | Perfect for guarding flanks or your base. Pairs with Special Charge Up abilities. |
| Toxic Mist | Creates a cloud of ink that slows enemies and drains their ink. | Found on stringers and some shooters. | Control zones, block pathways, counter aggressive pushes. |
| Fizzy Bomb | Bubbles that can be charged to increase range and damage; splits on impact. | Added via updates. | Versatile, can be used for zoning or direct hits. |
| Splash Wall | Deploys a temporary ink wall that blocks enemy ink and projectiles. | On some weapons. | Protect teammates, block enemy fire, control sightlines. |
| Point Sensor | Tracks enemies in its radius; highlights them on the map. | On some shooters and sloshers. | Reveal sneaky enemies, useful for coordinating team attacks. |
2.3 Special Weapons
Special weapons are powerful abilities that charge up by inking turf. Each main weapon kit has one special.
| Special Weapon | Description | How to Obtain | When Useful |
|---|---|---|---|
| Trizooka | A three-shot burst of powerful ink bullets from a launcher. | On many shooters. | Offensive push; can splat multiple enemies or break armor. |
| Tenta Missiles | Locks onto up to 4 enemies and rains missiles on them. | On some shooters and chargers. | Use to scatter enemies, force them out of positions, or finish low-health targets. |
| Booyah Bomb | Throws a large bomb that creates a shockwave; requires charging by pressing R. | On splatlings and sloshers. | Excellent for contested objectives; shockwave pushes enemies away. |
| Ink Storm | Summons a storm that inks a large area and damages enemies slowly. | On some shooters. | Zone control; covers a large area, good for Splat Zones and Tower Control. |
| Killer Wail 5.1 | A long-range sound wave that goes through walls. | On some chargers and splatlings. | Great for picking off campers behind cover; reveals enemy positions. |
| Crab Tank | Turns you into a crab tank with high firepower and armor; can also ink while moving. | On some dualies and shooters. | Powerful turf coverage and combat; good for pushing through enemy ink. |
| Reefslider | Rushes forward on a sliding shield; explodes at the end. | On some dualies and rollers. | Good for initiating team fights or escaping; can splat if direct hit. |
| Zipcaster | Grapples to walls and ceilings; can launch ink blobs from above. | On some rollers and shooters. | High mobility; use to flank or reach high ground. |
| Triple Inkstrike | Fires three slow-moving ink tornadoes. | On some sloshers and splatanas. | Area denial; can push enemies off the objective. |
| Wave Breaker | Sends out two waves that damage and push enemies. | On some chargers. | Control the battlefield; disrupt enemy pushes. |
| Ultra Stamp | A giant stamp that crushes enemies; can be charged for a long-range ink wave. | On some rollers and splatanas. | Aggressive push; can break through defenses. |
| Big Bubbler | Creates a large protective bubble that blocks enemy ink. | On some rollers. | Protect team objective; use in Splat Zones or Tower Control. |
| Ink Vac | Sucks in enemy ink and releases it as a projectile. | On some brellas. | Counter specialist; can devour enemy specials and return fire. |
| Tacticooler | Deploys a cooler that gives speed and quick respawn to teammates. | On some stringers and shooters. | Team support; helps in coordinated pushes. |
---
3. Gear and Abilities
3.1 Gear Types
Gear consists of three slots: Headgear, Clothing, and Shoes. Each piece of gear comes with one or more ability slots. Abilities enhance your inkling’s performance.
- Headgear: Includes hats, glasses, masks, etc. Common abilities: Ink Saver (Main), Ink Saver (Sub), Special Charge Up, etc.
- Clothing: Shirts, jackets, dresses. Common abilities: Swim Speed Up, Run Speed Up, Ink Resistance Up, etc.
- Shoes: Boots, sandals, etc. Common abilities: Ninja Squid, Stealth Jump, Quick Super Jump, etc.
Obtaining Gear: Purchase from shops (Splash Mob, Shell-Out Machine, Cranky’s) with cash. Also unlock through the Catalog (seasonal rewards), story mode, Salmon Run (Grizzco gear), and scanning amiibo (special exclusive gear).
3.2 Ability System
Each gear piece has up to three ability slots. The primary ability (the first slot) is fixed and cannot be changed. The secondary abilities (slots 2 and 3) are random. Use Ability Chunks (see Materials) to add a specific secondary ability to a gear piece at Murch’s shop. Super Sea Snails allow you to add a new slot to gear (max 3) or reroll secondary abilities.
Key Abilities:
| Ability | Effect | Best Synergy |
|---|---|---|
| Ink Saver (Main) | Reduces ink consumption of main weapon. | Essential for high-ink weapons like Splatlings. |
| Ink Saver (Sub) | Reduces ink consumption of sub weapons. | Useful if you spam bombs. |
| Ink Recovery Up | Speeds up ink regeneration while in swim form. | Good for aggressive players. |
| Special Charge Up | Increases special gauge gain from inking. | Pairs with special-focused weapons. |
| Special Power Up | Enhances special effects (e.g., longer Tenta Missiles lock-on, bigger Booyah Bomb). | Use with your chosen special. |
| Special Saver | Retains more special gauge after splat. | Helps keep specials alive after death. |
| Swim Speed Up | Increases swim speed. | Universal; great for mobility. |
| Run Speed Up | Increases movement speed while shooting. | Useful for shooters and chargers. |
| Ink Resistance Up | Reduces damage and movement penalty from enemy ink. | Important for all modes. |
| Intensify Action | Boosts jump accuracy and certain weapon actions. | Good for Rollers, Splatanas, and Dualies. |
| Stealth Jump | Hides super jump landing marker from enemies within a range. | Essential for flanking. |
| Ninja Squid | Hides your swimming ink trail but reduces swim speed. | Pairs with Swim Speed Up to lessen downside. |
| Quick Respawn | Reduces respawn time after being splatted (only if you splatted at least one enemy). | Use with Tenacity or in ranked. |
| Quick Super Jump | Speeds up super jump. | Useful for rapid team movement. |
| Sub Power Up | Boosts sub weapon range, damage, or duration (varies by sub). | Must pair with a specific sub. |
| Sub Resistance Up | Reduces enemy sub weapon effects. | Niche. |
| Comeback | Temporary boosts upon respawning (speed, ink, etc.). | Good for aggressive builds. |
| Opening Gambit | Boosts move speed at match start. | Good for fast initial turf coverage. |
| Last-Ditch Effort | Boosts ink efficiency when your team is losing. | Competitive games. |
| Haunt | Marks splatting enemy for your teammates. | Support build. |
| Thermal Ink | Reveals enemy location after you hit them. | Works well with long-range weapons. |
| Tenacity | Automatically charges special when teammate is splatted. | Good for defensive support. |
| Respawn Punisher | Extends enemy respawn time after you splat them (but extends yours too). | High-skill, high-risk. |
3.3 Key Gear Sets
- Hero Gear: Unlocked by completing the Story Mode (Return of the Mammalians). Each piece comes with unique abilities (e.g., Headgear has Ink Saver (Main), Clothing has Swim Speed Up, Shoes have Ink Resistance Up). Can be reordered using Murch.
- Amiibo Gear: Scan compatible Splatoon amiibo (Inkling Boy, Girl, Octoling, etc.) to unlock exclusive gear with unique appearance and fixed abilities. Example: Classic Squid Amiibo gives a vintage hat with Comeback.
- Grizzco Gear: Earned from Salmon Run rotations. Typically has random abilities. Some pieces are seasonal.
- Catalog Gear: Each season’s Catalog has exclusive gear (e.g., Chilly Terrain Coat, Neon Brim Cap). Obtainable by leveling the Catalog.
- Ancho-V Powder (Base): 1.5x EXP for winning. Costs 1,000 cash.
- N-Tri-Pie (Extra): 2.0x EXP. Costs 3,500 cash.
- Super Scoop (Super): 3.0x EXP. Costs 8,000 cash.
- Champion’s Soup (Base): 1.5x cash. Costs 1,000 cash.
- Golden Egg (Extra): 2.0x cash. Costs 3,500 cash.
- Mystery Box (Super): 3.0x cash. Costs 8,000 cash.
- Scrub gear abilities at Murch (costs 20,000 cash per scrub, returns all chunks from that gear).
- Earn from Salmon Run rewards (random chunks).
- Receive as level-up rewards after level 30 (every 5 levels gives 10 chunks of a random ability).
- Win matches with active drink ticket (gives chunks of that ability).
- Participate in Splatfest; team wins give 24 snails, losses give 21.
- After level 30, every 5 additional levels grants 1 snail (up to level 99, then prestige resets).
- Sometimes given as special event rewards.
- Hero Headphones: Ink Saver (Main)
- Hero Jacket: Swim Speed Up
- Hero Runner Sneakers: Ink Resistance Up
- Squid Amiibo: Gives a classic retro hat (Comeback ability).
- Inkling Girl Amiibo: Gives a school uniform look with Ink Saver (Sub).
- Octoling Girl Amiibo: Gives a punk jacket with Special Charge Up.
- Grizzco Blaster: Explosive shots that cover large area.
- Grizzco Charger: Infinite range and one-shot kill, but slow charge.
- Grizzco Slosher: Wide arc, high damage.
- Use Sheldon tickets to unlock weapons that fit your playstyle.
- Save Super Sea Snails for gear you use frequently.
- Farm Ability Chunks by scrubbing gear or using drink tickets in combination with wins.
- Spend cash wisely – buy food tickets for leveling and save for expensive gear.
- Collect Sunken Scrolls for lore and Hero Gear.
- Participate in Splatfests for Snails.
---
4. Consumables
4.1 Food Tickets
Food tickets provide experience boosts or cash bonuses for a set number of matches (usually 20 battles). Purchase from Crusty Sean’s food truck in the lobby using cash. There are three tiers: Base, Extra, and Super. Each ticket lasts for 20 wins (not matches, but wins).
Similarly, Cash tickets boost cash earned:
When useful: Use EXP tickets when leveling up to unlock weapons faster. Use cash tickets when saving for expensive gear or rerolls.
4.2 Drink Tickets
Drink tickets are consumed before a battle (like food tickets) but they grant a temporary ability boost for the duration (20 wins). Each drink ticket corresponds to one ability (e.g., Swim Speed Up Drink). While active, the game favors that ability showing up as a secondary on gear you earn/loot. Also increases the chance of getting that ability from gear rolls. Purchase at Crusty Sean’s for cash (1,000-8,000 depending on tier). Common drinks are: Ancho-V Powder (gives Ink Saver Main), etc.
When useful: When farming for a specific ability chunk or building a gear with a particular secondary ability.
4.3 Shell-Out Machine (Loot Boxes)
Located in the lobby, the Shell-Out Machine costs cash and dispenses random items: gear, ability chunks, food tickets, and sometimes exclusive gear (like the Golden Suction Bomb). Each pull costs 2,000 cash. Three pulls per day are available. It’s a secondary source for consumables.
---
5. Collectibles
5.1 Sunken Scrolls (Story Mode)
Sunken Scrolls are hidden collectibles in the Story Mode (Return of the Mammalians) levels. Each Scroll unlocks lore about the world. There are 32 total. Collecting them rewards you with Hero Gear (head, clothes, shoes) after completion. They also contribute to 100% completion.
How to obtain: Explore each level. Scrolls are often in secret alcoves requiring precise ink paths or special means.
When useful: Lore enthusiasts and completionists. No gameplay impact beyond cosmetic gear.
5.2 Sardines (Salmon Run)
Small collectible fish that appear in Salmon Run during special events (e.g., Big Run). Collecting them adds to your total and unlocks unique badges and locker decorations.
How to obtain: In Salmon Run shifts, sometimes Sardines spawn. Collect them before they disappear.
When useful: Cosmetic rewards and bragging rights.
5.3 Fish Scales (Salmon Run Currency)
Already covered in currencies, but these are also collectible in the sense that they are earned from Salmon Run and used for special purchases.
5.4 Locker Decorations
Not strictly items, but you can collect decorations for your personal locker in the lobby. These include stickers, figures, and trophies earned from the Catalog, Salmon Run, and special events. They have no gameplay effect.
5.5 Badges
Achievement badges earned for various milestones (e.g., level 50, winning 100 Turf Wars, collecting all Sunken Scrolls). Displayed on your player card. No mechanical influence.
---
6. Materials
6.1 Ability Chunks
Small colored cubes that represent each ability in the game. Use them at Murch’s shop to add a specific secondary ability to a gear piece. You need 10 chunks for common abilities and 20 for rare ones (like Ninja Squid, Stealth Jump, etc.).
How to obtain:
When useful: To perfect your gear builds. Always useful for competitive play.
6.2 Super Sea Snails
Rare items that allow you to upgrade gear slots (add a third slot to any gear that has fewer) or reroll all secondary abilities on a gear piece. Rerolling costs one snail and returns random abilities.
How to obtain:
When useful: To create perfect gear sets. Save snails for high-level gear you intend to use long-term.
6.3 Sheldon Tickets
Used to unlock main weapons (see Currencies). Technically a material needed for purchase.
---
7. Key Equipment
7.1 Hero Gear
A complete set of headgear, clothing, and shoes unlocked by completing the Story Mode (Return of the Mammalians). Each piece has a fixed primary ability and two empty secondary slots. The abilities are:
How to obtain: Collect all Sunken Scrolls? Actually, you get the Hero Gear after defeating the final boss and completing the story. Some pieces are given at specific levels.
Synergies: The set provides a well-rounded baseline. You can customize secondaries with chunks.
7.2 Amiibo Gear
Scanning compatible amiibo (such as Inkling Girl, Inkling Boy, Octoling, Octoling Girl, Octoling Boy, or any of the Squid amiibo) unlocks exclusive gear. Each amiibo gives one headgear, one clothing, and one shoes after scanning on different days. Examples:
How to obtain: Scan amiibo once per day until all three pieces are earned. Only one scan per day per amiibo.
When useful: Unique cosmetic looks and sometimes useful abilities. No gameplay advantage over regular gear, but the abilities are fixed and cannot be changed for primary.
7.3 Grizzco Weapons (Salmon Run)
During Salmon Run special rotations, you get temporary weapons such as:
These are only usable in Salmon Run and are not permanent.
How to obtain: Randomly appear in Salmon Run shifts. Not purchasable.
When useful: To efficiently defeat Salmonids and achieve higher quotas.
7.4 Locker Furniture
While not equipment, your personal locker in the lobby can be decorated with items earned from the Catalog, Salmon Run, and shops. These include stickers, figures, and shelves. No gameplay effect.
---
Summary
This guide covers every significant item in Splatoon 3. To maximize your efficiency:
Remember, no single item is essential; flexibility and practice are more important than gear. Yet understanding each item’s purpose allows you to optimize your builds and enjoy the game to its fullest.