Game Tips
Comprehensive Game Tips Guide for Splatoon 3
Beginner Tips (Turf War & Navigation)
1. Always Ink Your Spawn Area First
- Why it works: Inking your own base (the platform around the spawn point) gives you a safe zone to retreat, builds your Special Gauge quickly because un-inked ground yields high ink coverage points, and denies the enemy from easily flanking behind you.
- When to use: At the start of every match (Turf War) or after respawning when returning to the front line.
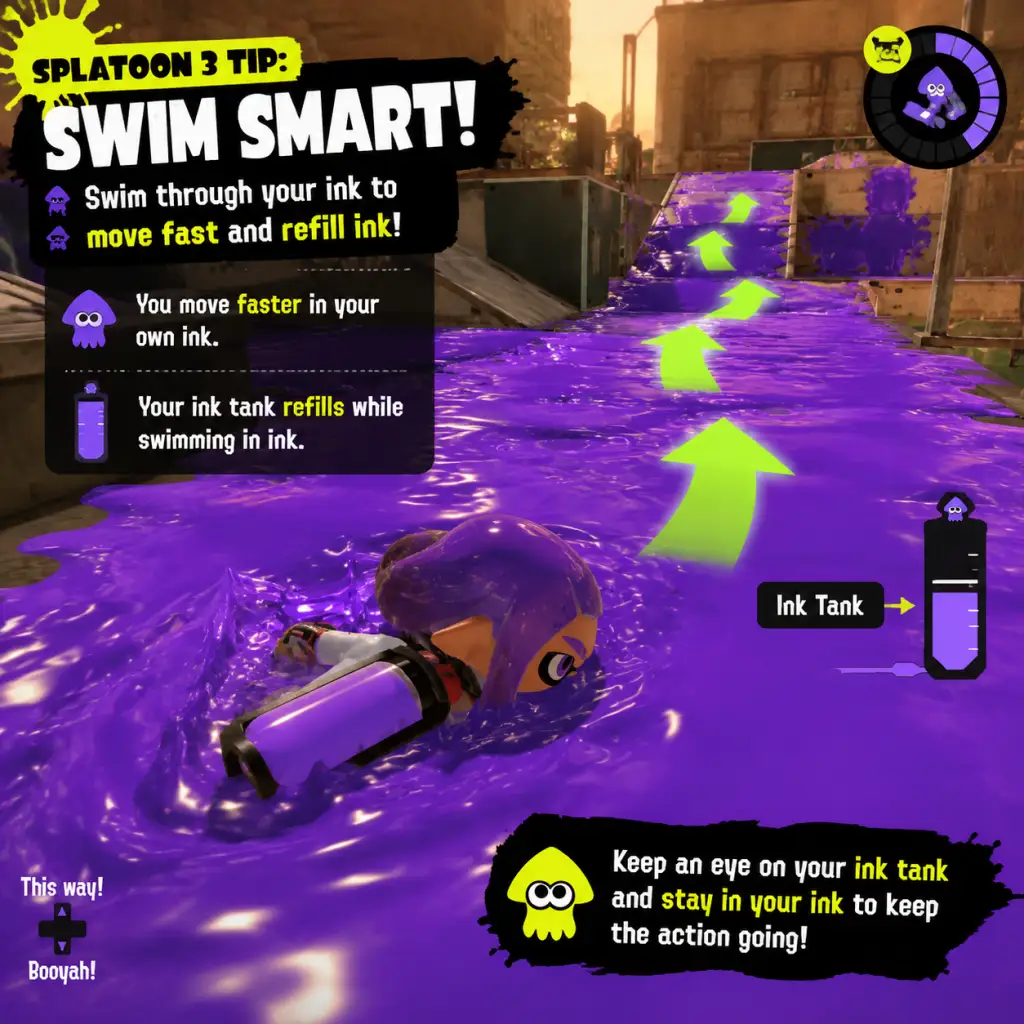
- Why it works: Swimming in your own ink hides you from enemy ink on the mini‑map, refills your ink tank faster, and lets you move faster than on foot. On turf that is not your color, you cannot swim and are an easy target.
- When to use: Move between positions, retreat, reload, or ambush. Always try to ink a path before advancing.
- Why it works: Motion controls (gyro) allow much finer aiming than the right stick alone. Most top players use motion + stick combo (stick for coarse turns, motion for fine aim).
- When to use: Start with the default sensitivity and adjust gradually. Practice in the training room (Shooting Range) every session.
- Why it works: The Recon mode lets you freely roam any stage without enemies. You can learn shortcuts, perches, and flank routes.
- When to use: Before jumping into a ranked mode or a new rotation. Spend 5–10 minutes per stage.
- Why it works: Sub weapons like Splash Wall create temporary barriers that block enemy shots. They protect you while charging a special or holding a chokepoint.
- When to use: Place a Splash Wall at the edge of a corridor or in front of a tower/painbrush zone. Retreat behind it when pressured.
- Why it works: While swimming in ink, press the jump button to perform a Squid Roll, which instantly changes direction and gives temporary invincibility frames during the roll. It breaks enemy aim tracking.
- When to use: When you are being chased or when you need to dodge a one‑hit‑KO weapon (e.g., E‑liter 4K). Also useful for re‑positioning after firing a few shots.
- Why it works: Splatoon 3 is about map control. A direct frontal assault often gets splatted. Taking a wide flank using walls and swim paths lets you attack enemies from behind or the side, catching them off guard.
- When to use: In Turf War, when your team is holding mid, instead of pushing further, swim around to the enemy base. In Ranked, flank the opposing team while they are focused on the objective.
- Why it works: Each weapon consumes ink at a different rate. Shooting empty ink pods leaves you defenseless. Manage your ink by tapping fire instead of holding down (unless continuous fire is needed).
- When to use: Use short bursts to ink turf or chip damage. With weapons like the Splattershot, four‑shot kills are common – fire only enough bullets to splat, then swim to refill.
- Why it works: Sub weapons like Autobomb, Ink Mine, or Suction Bomb force enemies to move away from advantageous positions. They also reveal enemies if they get hit.
- When to use: Throw a Suction Bomb onto a high perch that the enemy often occupies. Place an Ink Mine in a narrow hallway or near a splat zone. This creates “no‑go” zones.
- Why it works: A poorly timed Super Jump can land you directly in enemy fire. The landing marker is visible to everyone. Use Stealth Jump ability to hide the landing point.
- When to use: Only Super Jump to a teammate who is safe and not in combat. Jump to spawn if you need to escape. Use squid‑surge landing (press B while in air) to bounce off the ink and avoid standing still.
- Why it works: Each gear piece has main and sub abilities. Stacking the same ability (e.g., three Swim Speed Up subs) provides diminishing returns but still improves the effect. Drink Tickets from the Crust Bucket guarantee ability gains in the chosen slot.
- When to use: Build a set for one weapon: e.g., “Comeback” main ability for fast respawn boosts, “Special Saver” to lose less special gauge on death, and “Ink Resistance Up” for moving through enemy ink. Use tickets while rolling abilities (at Murch) to save chunks.
- Why it works: After throwing a bomb, you can tap the squid button to instantly enter swim form without a delay. This allows you to throw a bomb and immediately hide or relocate.
- When to use: When you want to pressure an objective (e.g., tower) and then hide behind cover. Also useful for Curling Bombs to quickly retreat after launching them.
- Why it works: Ink Storm creates a large cloud of slow‑firing ink that damages enemies over time and covers ground. The cloud moves slowly in the direction you aimed when activated. It can block sight lines and force enemies out of cover.
- When to use: Before pushing a splat zone, throw Ink Storm to deter the enemy team from defending. During Tower Control, shoot the storm on top of the tower to chip away at the rider. In Clam Blitz, use it to block pathways around the clam basket.
- Why it works: While swimming up an inkable wall, press the jump button to launch upward and gain a height advantage. You can then shoot from above or land onto a ledge.
- When to use: To reach perches quickly, to surprise an enemy camping a ledge, or to escape a threat from below. Practice timing to avoid hitting the lip of the wall.
- Why it works: Eggs are heavy; carrying them slows you down. Tossing eggs (using A) toward the egg basket or toward a teammate who is near the basket saves travel time. A teammate can catch and deposit while you collect more.
- When to use: Always prioritize throwing eggs over carrying them if you are far from the basket. In high tide, you can throw eggs over walls or directly into the basket from a short distance.
- Why it works: Certain bosses (e.g., Stinger, Flyfish) can quickly overwhelm the crew. Stingers fire from far away and can wipe a team if not dealt with. Flyfish launch missiles that require two ink bombs to destroy each bucket.
- When to use: In the first 30 seconds of a wave, identify and target high‑priority bosses. Use your special like Booyah Bomb or Splat Bomb (for Flyfish) immediately.
- Why it works: A Power Clam (gathered from 10 small clams) can break the enemy basket and allow your team to throw clams inside while it’s open. But if you die while holding it, the Power Clam drops as 3 small clams.
- When to use: Only grab a Power Clam when you have a clear path to the basket or when your team is pushing. Pass the Power Clam to a teammate with a better position using a careful toss.
- Why it works: Special Power Up increases the effectiveness of many specials. For Tenta Missiles, it increases the number of missiles launched. For Ink Vac, it extends suction radius. Stacking this can break certain thresholds (e.g., more missiles can hit more enemies).
- When to use: Use on weapons that rely on their special to secure kills or zones. Check the Splatoon 3 wiki for exact breakpoints.
- During Splatfest (Pro vs. Fun), pay attention to the “Splatfest Battle” rules. The Turf War format adds a special 10x or 100x battle that awards major points. Queue with a pre‑made team to increase odds of matching against another team and unlocking these multiplier matches.
- Use the “Splatfest Tee” with triple “Special Charge Up” to farm specials quickly in the final battle. Conch shells earned from leveling up can be used to roll gear abilities – save them for the end of the Splatfest when you know which ability you want.
- How it works: Murch (the merchant in the lobby) can add a sub ability to a gear slot using 30 chunks of that type, or reroll all slots for 20,000 gold. Sea Snails (from Splatfests and leveling) allow rerolls for free.
- Tip: Save your Sea Snails until you have a full set of three gear pieces with the perfect main abilities. Then use Snails to reroll until you get the desired subs. Drink Tickets bias certain abilities to appear more often.
- Efficient farming: Use the “Crust Bucket” (lobby NPC) to order gear from other players that has good abilities. It costs money but saves chunk farming.
- Money in Splatoon 3 is used to buy gear from shops (Hotlantis, Crust Brothers, and the Nautlouis catalog). You also need money for re‑rolling gear.
- Fast money: Sell duplicate gear from Salmon Run rewards. Also use the “Food Ticket” from the Crust Bucket to increase experience and gold earned.
- Inventory: Buy all gear that appears in the shop (even duplicates) to increase the chance of finding gear with the abilities you want later.
- The seasonal catalog (every 3 months) contains exclusive gear, emotes, and titles. Leveling it requires experience points from matches. Use a “Catalyst” food item (from the Crust Bucket) to double catalog experience.
- Tip: Play in the Salmon Run (which also gives catalog XP) on busy rotations to level faster.
- Shooters: Versatile, balanced – good for beginners. Use the Splattershot or Tentatek Splattershot.
- Rollers: Good for turf coverage and close combat. The Carbon Roller is fast; the Splat Roller is heavier with higher burst damage.
- Chargers: Long‑range sniping. Requires good aim. E‑liter 4K is lethal but slow. Bamboozler is fast but lower damage.
- Blasters: Explosive shots that deal splash damage. Good in tight corridors.
- Dualies: Roll to dodge and then fire rapidly. High skill cap but excellent mobility.
- Splat Dualies: A good starting dualie.
- Weapon: Splattershot Jr. (or standard Splattershot)
- Gear Main Ability: “Comeback” or “Last‑Ditch Effort” for comeback boosts.
- Sub Abilities: Two Swim Speed Up, two Ink Resistance Up, and one Special Charge Up. This gives a balanced setup for mobility and survival.
- On certain weapons, Main Power Up increases damage (e.g., Splat Dualies become a 3‑shot kill instead of 4). Check specific breakpoints for your weapon. For the vanilla Splattershot, one main MPU increases damage from 35 to 36 (still requires 3 hits to kill).
- When to use: On weapons that benefit from a damage threshold. For example, the Splat Roller (vertical swing) does 150 damage – one MPU makes it 153, enough to OHKO foes with slight defense. Test in the training room.
- Splat Roller + Suction Bomb: Use bomb to force enemies out of ink, then roll over them.
- N‑ZAP 85 + Autobomb: Autobomb chases enemies, revealing their location, then finish with N‑ZAP’s fast fire rate.
- Splat Charger + Sticky Bomb: Stick a bomb on a wall to create a delayed explosion, then peek around the corner to charge your shot.
- In open turf wars, sometimes players stop fighting to have a “party” (dance). This is not helpful in competitive play. Avoid it unless you are in the practice lobby with friends.
- Camera Sensitivity: Many pros use +5 horizontal and +5 vertical motion, with stick sensitivity at -1 or -2 for fine control. Experiment.
- Rumble: Disable HD Rumble if it distracts you. Enable it for weapons that tell you when you’re out of ink (some weapons rumble when empty).
- Button Layout: Left stick jump on ZL and squid on L is common. You can change “squid” and “jump” buttons in the system settings (but not in‑game). Consider mapping ZL to jump (for easier squid rolls).
- Use the Shooting Range to practice aiming at the moving dummies, test bomb trajectories, and learn weapon kill times. Also use the “Glowfly” target for tracking practice.
- The X button opens the full map. The mini‑map in the top‑right shows enemy ink and your team’s positions. If an area is suddenly covered in enemy ink, expect an ambush. Check it frequently.
- Pressing up on the D‑pad says “Booyah!” which can be used to signal “I’m ready” or “attack here!”. In Salmon Run, it can indicate “I’m incoming with an egg” or “need help here”. Use it sparingly to coordinate.
- In ranked modes, it’s better to fall back and regroup than to die and feed the enemy special gauge. If you’re low on health or ink, retreat to a safe area and heal.
- On stages like Walleye Warehouse, wait for an enemy to come to you rather than chasing them. This works especially with chargers or blasters. Let your team’s specials turn the tide.
- Many stages have multiple floors. Use the “Inkrail” to quickly ascend or descend. In Skalop Wing, the moving platforms can be inked for shortcuts. Study each stage’s vertical layout.
- Splatoon 3 is a unique game with a vibrant community. Don’t be afraid to try all weapon classes. Use the “Replay” feature to watch matches from opponents’ perspectives and learn new tactics.
2. Squid Form is Your Best Friend
3. Learn to Use the Motion Controls
4. Use the “Recon” Feature to Memorize Stages
Intermediate Strategies (Combat & Movement)
5. Master the “Inkwall” – Sub Weapons as Cover
6. Squid Roll (Snap‑Turn) for Evasion
7. Flanking over Frontlining
8. Ink Efficiency – Don’t Over‑Shoot
9. Use Sub Weapons to Zone Out Enemies
10. Super Jump with Caution
Advanced Techniques & Optimizations
11. Gear Ability Stacking & Brewing (Drink Tickets)
12. The Art of “Bomb Throw Canceling”
13. Special Timing – “Ink Storm” Zone Control
14. Squid Surge (Vertical Launch)
15. Dropping Eggs in Salmon Run – Throw to Teammates
16. Boss Priority in Salmon Run
17. Clam Blitz – “Power Clam” Carrying
18. Gear Ability “Special Power Up” for Autobombs
19. Splatfest Strategies
Economy & Resource Management
20. Farming Ability Chunks (Sea Snails & Rerolling)
21. Money – “Golden Eggs” and “Reserves”
22. Catalog Leveling – Unlock Items
Weapon & Build Advice
23. Choosing a Main Weapon Class
24. Recommended Beginner Build
25. Advanced Build: “MPU” (Main Power Up) Stacking
26. Sub Weapon Synergy
General & Miscellaneous Tips
27. Use the “Squid Party” Cautiously
28. Adjust Your Settings
29. The Training Room is Your Dojo
30. Watch Your Mini‑Map
31. Communication with “Booyah!”
32. Avoid Overcommitting
33. Use the “Camp Triggerfish” Strategy (Patience)
34. Learn the “Stratosphear” (Verticality)
35. Final Tip – Have Fun and Experiment
This guide covers the core of Splatoon 3’s gameplay. Keep practicing and adapting to the meta – the best weapon is the one you enjoy the most!