Game Tips
Game Tips for The Legend of Zelda: Tears of the Kingdom
A comprehensive collection of tips organized by category, from beginner to advanced.
---
General Beginner Tips
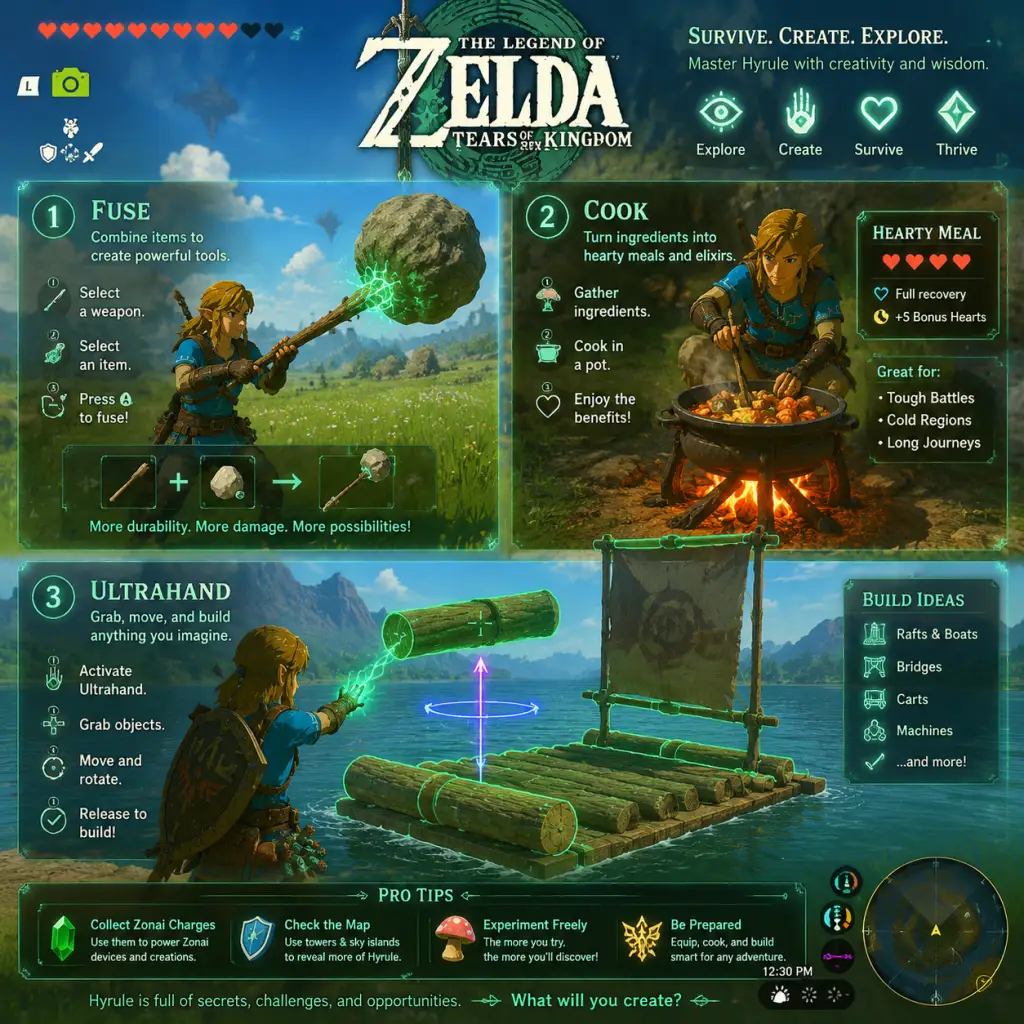
- Complete the Great Sky Island thoroughly. This tutorial area teaches you the core mechanics: Ultrahand, Fuse, Ascend, and Recall. Pick up every treasure chest, explore every cave, and activate all four shrines to ensure you have the Paraglider before leaving. Skipping content here makes the early game much harder.
- Talk to every NPC twice. Many characters give side quests or hints after first meeting them. Some repeat important information, while others reward you with items or map markers.
- Always carry a mix of weapons, shields, and bows. You can quickly cycle through equipment. Having at least one weapon that deals high damage (e.g., fused with a monster part) and one with long reach (spear) keeps you ready for any situation.
- Mark points of interest on your map. Use stamps (skull, star, leaf, etc.) for locations you want to return to: mining spots, Hinox camps, Korok puzzles, or far-off quest markers. You can pin up to 100 stamps—use them wisely.
- Cook meals and elixirs early. Food restores hearts and provides buffs. Always cook with raw ingredients rather than eating them separately—the buffs are multiplied. For example, cooking five Hearty Radishes creates a full-hearty meal that also grants temporary extra hearts.
- Upgrade your inventory by finding Hestu (the large Korok). You can expand weapon, bow, and shield slots by trading Korok Seeds. Prioritize weapon slots first because you break weapons often.
- Use Fuse on weak weapons. Early game, fuse a rock or monster part (like a Bokoblin horn) to a branch or rusty sword. This dramatically increases durability and damage. Even a single rock added to a stick makes it viable for a few fights.
- Headshot with arrows. Stunning enemies with an arrow to the face (or eye) gives you a few seconds to attack or flee. Use bullet time by pulling out your bow while in mid-air (e.g., launching with a spring or using a Zonai hover stone).
- Parry and Flurry Rush. Perfect parry (block right before a hit) stuns enemies. Perfect dodge (backflip or side hop) triggers Flurry Rush, a slowdown where you can land several hits. Practice on low-level Bokoblins in the Great Plateau.
- Use elemental weaknesses. For example, Fire Lizalfos are weak to ice weapons, Ice Likes weak to fire. A Frost Emitter fused to a shield will freeze enemies that hit it, giving you free attacks.
- Remote bomb plus Recall. Drop a bomb, use Recall on it as it rolls toward an enemy, then detonate when it’s next to them. This allows you to place explosives exactly where you want, even in tight spaces.
- Use Puffshrooms for stealth. Attach a Puffshroom to an arrow for a smoke screen that makes enemies lose sight of you. You can then sneakstrike for 8x damage (if you have the Sheikah armor set bonus). It works on most grounded enemies, including Lynels.
- Lynel strategy. Lynels are among the toughest enemies. Use bullet time from high ground or a Zonai glider to land a few headshots, then mount the Lynel and attack with your strongest melee weapon. Weapons don’t lose durability while mounted, so use your best. Repeat until defeated.
- Fuse gemstones to arrows. Ruby, Sapphire, Topaz, and Diamond arrows cause area-of-effect explosions (fire, ice, electric, and piercing damage respectively). Useful against crowds or armor. Electric arrows stun for follow-ups.
- Weapon durability management. Keep a designated "disposable" weapon for breaking ores or cutting trees—like a fused boulder. Save your rare weapons (like Royal Guard’s Sword) for tough bosses. Use the Octorok “repair” trick: feed a rusted weapon to a Rock Octorok in Death Mountain (after it sucks it up, it spits back a buffed version with more durability). You can repair any weapon once per Octorok per blood moon.
- Elemental weapon combos. Use a frost weapon to freeze an enemy, then quickly switch to a shock weapon to trigger “Wet + Electric” stun damage. Or use fire to light grass for updrafts to gain bullet time. Advanced: use a Zonai flame emitter on your shield to create updrafts on command.
- Mount Lynels for easy kills. Once you stun a Lynel, run behind it and press A to mount. While mounted, you can attack without consuming weapon durability. Equip your highest damage one-handed weapon (e.g., a silver Lynel horn fused to a Scimitar of the Seven). Mount attacks ignore durability cost. This makes Lynel farming very efficient for rare parts.
- Activate all Skyview Towers early. These towers reveal the map and also act as fast travel points. Some towers are guarded by enemies or require puzzles—stock up on stamina food to climb them fast.
- Glide from high points. Paraglider is essential. Use towers or tall mountains to launch yourself. You can also use the Super Mushroom (Tunnel throwing) or a Zonai wing for longer flights. Always keep stamina recovery meals (Endura Carrots or Courser Bee Honey) for long glides.
- Use Ascend in caves and shrines. Ascend lets you phase through thin ceilings. This shortcut can save huge amounts of climbing. Look for ceilings with a light—that indicates an Ascend point.
- Travel medallion (from Robbie). After completing the “To the Wind” quest series, you can get a Travel Medallion. Place it anywhere on the map to create a fast travel point. Great for marking a hard-to-reach mining spot or a high-view summit. You can have up to one placed at a time, but can recall it.
- Use Zonai devices for mobility. Build a simple hoverbike (steering stick + two fans stacked) to fly almost anywhere. This consumes small battery but is fast and fuel-efficient. A sled with fans is great for flat surfaces. A hot air balloon (flame emitter + balloon) can lift you high for exploration.
- Caves and wells. Every cave contains Bubbul Gems (exchange with Koltin at the cave’s exit for cool items like Misko armor or a horse). Wells often have hidden chests or secret entrances. Light up caves with a Zonai light or a torch fused to a shield.
- Skydiving to specific regions. Use the paraglider in the sky to spot important landmarks: dragon tears, geoglyphs on the ground, or large enemy camps. Dive straight onto them to save walking time.
- Navigate the Depths with Brightbloom Seeds and Large Zonaite. The Depths are pitch dark. Shoot Brightbloom Seeds onto the ground or walls to create light zones. Collect Large Zonaite nodes (blue deposits) to refill battery. Also, every Depths area has a Yiga hideout with usable schemas for Zonai devices.
- Zonai device stacking for unlimited flight. Use two fans and a steering stick with a small battery powered by a Zonai battery cell (collected from schematics). Upgrade your battery cells at Forge Constructs using Crystallized Charges. Max battery lets you fly across the entire map without landing.
- Dragon farming for parts. Three dragons (Naydra, Farosh, Dinraal) and the Light Dragon (secret) fly through the sky and Depths. You can land on them while gliding to collect shards from their horns, fangs, and claws. Wait for a dragon to appear near a Skyview Tower, then bullet time onto it. Rare item: Light Dragon scales, needed for final armor upgrades.
- Harvest everything. Gather plants, ores, monster parts, and wood. Almost every item can be fused, cooked, or sold. Especially important: apples for health, hearty radishes for extra hearts, rushrooms for speed boosts, and luminous stones for rupees (sell at mineral trader).
- Use bombs or fused weapons for ore deposits. Smashing a Talus’s ore node or a rocky outcrop yields gems (ruby, sapphire, diamond). Attach a rock to a spear to create a mining pick. Or use the Zonai cannon—it destroys ore in one shot.
- Fishing with electric attacks. Throw a Shock Fruit into a body of water to stun all fish nearby. Then pick them up. This is much faster than using a spear or arrows.
- Tree cutting for wood. Trees drop apples when cut down. But you want wood for building? Chop multiple trees in an area, then use Ultrahand to stack logs and fuse them into a raft or bridge. Wood is also required for upgrading certain armor sets.
- Zonaite farming in the Depths. The Depths are rich in Large Zonaite deposits. A good route: start at the Great Abandoned Central Mine (northwest of the Depths map) and follow the glowing ore nodes. Each Large Zonaite gives about 20-30 charge. With a full battery, you can farm 300+ Zonaite in one loop.
- Star Fragment farming. Star Fragments fall at night (9 PM – 3 AM) and are used for upgrades and elixirs. Find two-star tips: camp under a sky island or tall mountain where you have a clear view of the sky. When you see a shooting star, it marks on the ground. Use a speed potion to reach it before 5 AM when it disappears.
- Luminous Stone farming. These are needed for many armor upgrades (e.g., Sheikah Stealth set). Go to the Talus boss in the Great Plateau (under the lake) or any luminous stone deposit. Use a hammer weapon to break them quickly. Also, certain caves like the East Necluda cave have clusters.
- Fuse a shield with a rocket. This gives you a Rocket Shield. Equip it and parry (or hold block) to launch straight up into the air. Excellent for quick vertical mobility or bullet time. Use before a fight to start with a high ground advantage.
- Fuse a weapon with a spring. A spring-loaded weapon launches enemies into the air when you hit them. This allows for air combos. Works well with fast weapons like one-handed swords.
- Fuse a bow with a Keese Eyeball. A Keese Eyeball attached to an arrow gives you homing arrows. They curve toward the nearest enemy head. Ideal for taking out aerial enemies like Aerocuda or for hitting weak spots like a boss’s eye without aiming precisely.
- Fuse a shield with a minecart (Wing or Cart). This creates a shield that lets you slide on rails or surfaces when you shield surf. Great for traversing the Depths rails quickly.
- Hoverbike (Basic) – Two fans attached to the front and back of a steering stick. It’s the cheapest and most versatile flying device. Requires two fans and one steering stick. Place fans at a slight angle for better lift. Use it for exploring the sky and Depths.
- Land rover – Use four small wheels, a steering stick, and a cart or plank. This is good for crossing flat terrain quickly. Add a battery to power it, or use Zonai charges. You can also attach a spring to jump over small obstacles.
- Canyon bridge – Combine two metal planks with a steering stick to create a makeshift bridge across gaps. You can also use logs. This helps cross narrow chasms without building a vehicle.
- Hot air balloon + sled – Attach a flame emitter to a balloon, then attach the balloon to a sled. This creates a slow but steady vertical lift. Great for reaching sky islands when you run out of stamina or to escape from enemies below.
- Multi-purpose weapon: Fuse a Silver Lynel Mace Horn to a Royal Guard’s Claymore for massive damage (150+ base). Then fuse that with a Frost Ray (Zonai device) so every swing also freezes enemies. This is devastating against bosses. The weapon’s durability is low, but you can repair it (see Octorok trick).
- Zonai “permanent” structures with Autobuild. After unlocking Autobuild from the Zora region (quest: The Hyrule Castle? Actually from the Construct in the Depths near the Great Hyrule Forest), you can save schematics for your vehicles. Use Autobuild to instantly construct a hoverbike for 9 Zonaite (instead of carrying parts). Build a battery pack (multiple battery cells) to extend flight time.
- One-shot kill build for Lynels: Use a 5-shot bow (from a Lynel drop or fused with Octorok buff) with Gibdo Bones (found in the desert). Gibdo Bones increase damage by +40 per arrow. Five shots hitting a Lynel’s head deals insane damage. Combine with a multi-shot bow and a Puffshroom arrow for stealth approach.
- Sell gems sparingly. Rubies, sapphires, and topazes sell for high prices (100-150 rupees each), but you need them for armor upgrades and fusing. Keep at least 10 of each before selling. Diamonds are rare—never sell them early; they are used for the highest level armor upgrades and some key weapons.
- Cooked meals sell for more. Combine raw ingredients into a meal, then sell it. For example, 5 apples sell for 5 rupees individually, but a Simmered Fruit (5 apples) sells for 30 rupees. Better yet, cook meat dishes for higher profits.
- Rupee farming methods: (1) Hunting and cooking prime meat skewers (five pieces of prime meat cooked = about 270 rupees). (2) Harvesting Luminous Stones and selling to the mineral collector in Tarrey Town (he pays more). (3) Break Talus ore deposits for gems and sell duplicates. (4) Complete side quests, especially for fairies, and sell rewards.
- Zonaite usage priority: Spend your Zonaite on upgrading battery cells first (at a Forge Construct) before buying Autobuild schematics or new devices. A larger battery lets you fly longer and use more powerful weapons. After max battery, invest in device schematics for convenience.
- Buy arrows early. Arrows are cheap (5 rupees each at Beedle) and essential for many puzzles and fights. Always keep 100+ arrows. You can also get arrows from breaking crates in towns or from certain chests.
- Great Fairy upgrades. Paying the Great Fairies costs rupees: 100, 500, 1000, 5000? Actually it goes 100, 500, 1000, 2000, then 5000? Check: first fairy 100, second 500, third 1000, fourth 2000, fifth (secret? not sure). But upgrading armor requires rupees and materials. Prioritize upgrading the Champion’s Leathers and Fierce Deity set as they give attack up or defense plus set bonuses.
- Selling rare monster parts. Lizalfos tails, Hinox toenails, and Molduga guts are used for elixirs and armor. Keep at least a few, but you can sell extras for good profit (Hinox guts sell for 150 each, Molduga guts for 200).
- Use bonfires to manipulate time. If you need a certain weather condition, lit a fire at a stable or cooking pot to skip to the next morning/evening. This helps with dragon farming (certain dragons appear only at certain times) or getting a blood moon for respawning enemies.
- Maximizing armor defense. Fully upgraded armor sets (2-star or 4-star) are essential for late-game areas like the Depths. Each upgrade reduces damage significantly. For example, the Soldier’s Greaves at level 2 give +12 defense. Stack with defense-up meals for near invulnerability.
- Shrine completion for Heart Containers and Stamina Vessels. You need to complete 152 shrines total (including the Great Sky Island tutorial shrines). Prioritize stamina first (up to 2 full wheels) then hearts. With enough hearts, you can pull the Master Sword from the Light Dragon’s head (requires full hearts? Actually 13 hearts minimum). But the Master Sword does extra damage against gloom enemies.
- Use amiibo for rare items. If you have compatible amiibo (like the Smash Bros Link, Zelda, or Guardian), scan them once per day for exclusive rewards: extra arrows, weapons, gems, even the Twilight Princess outfit. The Sheikah slate also has a amiibo function.
- Gloom resistance. In the Depths, you face Gloom Hands and Gloom-generated enemies. Eating a sundelion meal or using a weapon/armor with Gloom resistance (like the Depths armor set) prevents damage reduction. The Champion’s Leathers upgraded with special materials provides gloom resistance.
- Perfecting bullet time through slopes. Instead of needing height, you can create a slope by fusing a cart to a shield. Then use the shield surf by pressing A while blocking? Actually shield surf by holding ZL then X? Re clarity: while running, press ZL to shield, then X to jump, then A to surf on shield. On a slope you slide and can pull out bow for bullet time. You can also use a Zonai spring on shield for instant launch.
- Bokoblin camps: Use a puffshroom arrow to stealth, then sneakstrike the strongest (usually a white or silver). Alternatively, drop a bomb from above and detonate with arrow. Use elemental fruits to create explosions.
- Lizalfos: They are fast and can swim. Use ice arrows to freeze them near water, or stun them with a shock arrow while they are in a pool (water conducts electricity). If they are on land, use a polearm to keep distance.
- Moblins: Tall and slow. Use arrows to their face to stun. They drop heavy clubs—fuse with a monster part to make a powerful hammer. Often found with a weapon in hand; steal it by stunning them and then picking it up.
- Hinox: Giant cyclops. Hit them in the eye with an arrow to stun for a few seconds. While stunned, climb on their back and attack with your best weapon. They drop weapons, shields, and sometimes a Hinox tooth when fishing.
- Talus: Stone giants with a ore node on top. Their weak spot is that ore node. Use a hammer weapon or fused boulder to smash it while they are stunned. Climb on them while they are knocked down. Avoid their rolling attacks by running perpendicular.
- Gloom Hands (Hands of the Depths): Appear as five hands that chase you. Use any area-of-effect like a bomb arrow or a gem weapon. They are vulnerable to fire. Once you kill them, a Gloom Spawn (shadow boss) appears. Be prepared with a high-damage weapon and many healing items.
- Molduga (sand worms): Only in the Gerudo Desert. Stand on a sand hill to attract it. When it charges at you, throw a remote bomb or use a bomb arrow to detonate as it emerges. This topples it. Then attack its belly or tail. Repeat.
- Frox (depths frog boss): Large frog-like boss that attacks with ground slams. Use a spear to hit its tongue from a distance, or wait for it to open its mouth and throw a bomb inside. The explosion stuns it. Then shoot its glowing stomach.
- Master Kohga (multiple encounters): He uses a mech with a weak point. Use Ascend to pop up through floors. In phase 1, use a Zonai cannon or bomb to destroy his vehicle. Phase 2, he spits bombs at you—recall them back. Phase 3, use the environment to drop things on his head.
- Map interaction with the Purah Pad: Use the camera to scan new plants or enemies to get information. The Sensor+ (upgrade at Hateno Lab) lets you track specific materials, such as “hearty bass” or “brightcaps”. This helps find rare ingredients for cooking or upgrades.
- Two-Key quests: Many shrines require two keys (matched pair). If you find one key, the other is usually nearby inside the shrines. Don’t leave a shrine without both keys if you want the hidden treasure.
- Full stealth outfit (Sheikah Set) makes you essentially invisible to enemies, even when running. This is great for the Depths where you can avoid Gloom Hands entirely. Also helps with hunting animals for rare meat.
- Time-saver: use the map to locate all cherry trees (Dragon Dorfer? Actually there are 10 cherry trees that when offered an apple, reveal cave entrances). This is a minigame that shows hidden caves. Useful for completing the “Cave” list for Koltin.
- Blood Moon prep:** The Blood Moon happens every 2 hours 50 minutes of gameplay (real time). It respawns all monsters and items (except some treasure chests). Use this timer to plan farming runs: farm Lynels or Hinox right after a blood moon, then again before the next one. You can cook a meal that prevents weather effects? Not directly. But you can force a blood moon by using specific glitches? Not recommended for first playthrough.
---
Combat Tips
#### Beginner: Basic Combat
#### Intermediate: Advanced Combat Tactics
#### Advanced: Efficient Combat and Farming
---
Exploration Tips
#### Beginner: Getting Around
#### Intermediate: Maximizing Exploration Efficiency
#### Advanced: Depths and Sky Exploration
---
Resources & Gathering Tips
#### General Resource Collection
#### Intermediate: Efficient Farming Routes
---
Builds & Crafting (Fuse + Ultrahand Device Building)
#### Beginner: Simple Fuse Combos
#### Intermediate: Ultrahand Vehicle Designs
#### Advanced: Optimized Builds
---
Economy & Zonaite Tips
#### Earnings and Spending
#### Intermediate: Investment
---
Advanced Optimizations
---
Combat Against Specific Enemies
---
Miscellaneous Effectiveness
---
This guide covers the essential tips to thrive in Hyrule. Adjust strategies based on your playstyle—experimentation is rewarded. Remember: everything you can pick up has a use somewhere. Good luck!