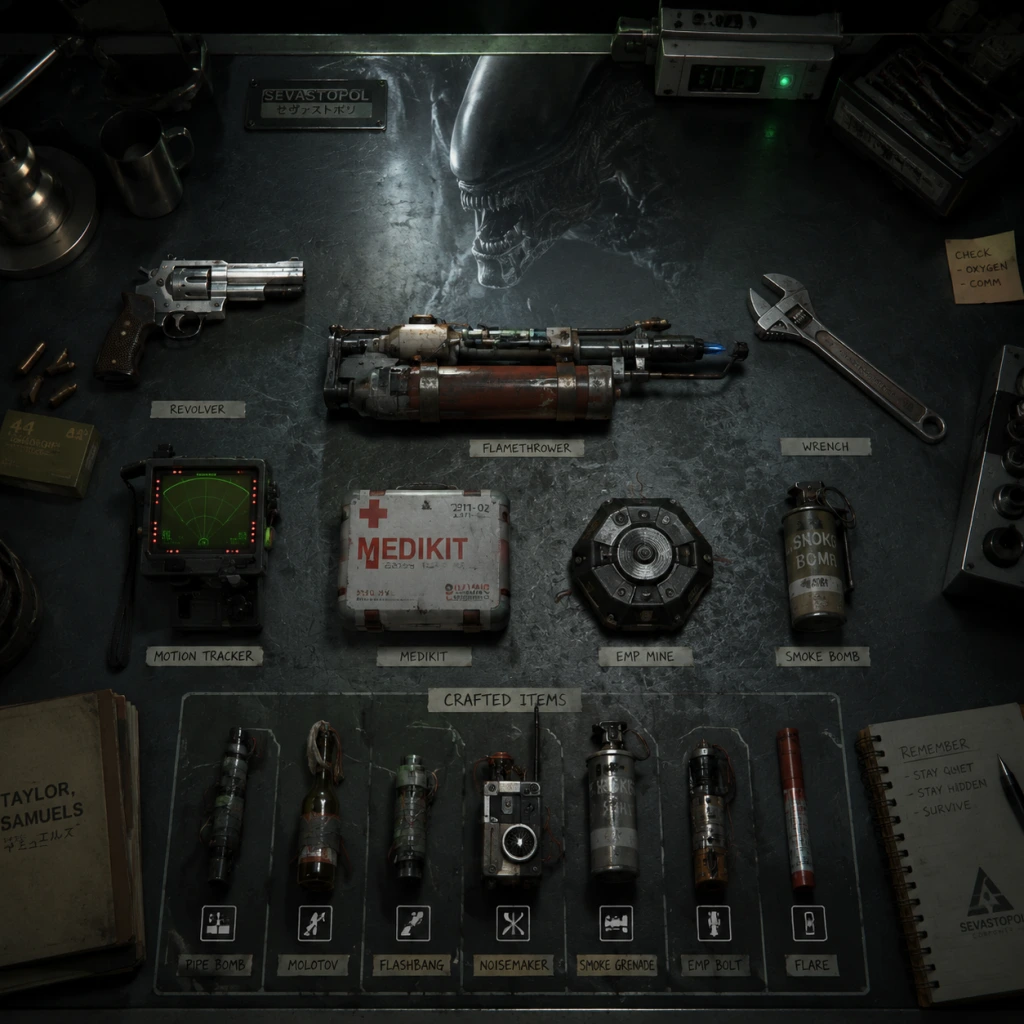
All Game Items
Overview
In Alien: Isolation, your survival depends on careful resource management and improvisation. Items are scarce, and every tool has a specific purpose. This guide covers all major item categories: Weapons & Tools, Consumables & Materials, Key Items & Upgrades, Collectibles, and Currencies. Each entry includes function, acquisition, optimal use, and any upgrades or synergies.
---
Weapons & Tools
1. Revolver
- Function: Low-damage firearm; useful for breaking locks, stunning humans, or creating noise to distract the Alien. Ammo is very limited.
- Obtain: Found in Mission 3 (San Cristobal Medical Facility) on a desk in the treatment room.
- When Useful: Early game against hostile humans; rarely effective against the Alien. Best used as a noise maker.
- Upgrades: None. Ammo can be crafted from scrap (see Crafting).
- Function: Powerful close-range weapon; can stun the Alien for a few seconds, allowing escape. Fires shells, which are rare.
- Obtain: In Mission 6 (Solanos / Lorenz Systech Spire) – located in a locked safe (code 3861) or later in the transit hub.
- When Useful: Last resort against the Alien; one direct shot can force it to retreat. Also effective against humans and Working Joes.
- Upgrades: None. Shells can be crafted from scrap and gunpowder.
- Function: The most effective weapon against the Alien. Fuel blasts cause the Alien to flee and hide in vents, buying you precious time. Can also ignite flares.
- Obtain: Mission 10 (Syndicate / Pioneer) – in the room before the elevator to the reactor.
- When Useful: Primary defense against the Alien after Mission 10. Use short bursts to conserve fuel; longer bursts cause it to retreat further. Also damages Working Joes.
- Upgrades: None. Fuel can be crafted from chemicals and scrap.
- Function: Disables electronic devices (door panels, cameras, Working Joes) in a radius. Can be placed or thrown. Emits a loud noise that can attract the Alien.
- Obtain: Blueprint found in Mission 5 (Sevastopol Station – Engineering). Craft from electronics and metal parts.
- When Useful: Dealing with multiple Working Joes or disabling security cameras. The noise can be used to lure the Alien away from a path. Works on the Alien? No – it is biological.
- Synergy: Combine with a noise distraction to herd enemies.
- Function: Lethal explosive; can kill humans instantly and severely damage the Alien (forces retreat). Loud, attracts enemies.
- Obtain: Blueprint in Mission 5 (Engineering). Craft from explosive powder, metal parts, and chemical components.
- When Useful: Clearing a room of humans or as a last resort against the Alien. Use with caution because of noise.
- Note: The Alien can be killed by a direct hit? No, but it will flee for an extended period.
- Function: Creates a bright flash and loud bang. Stuns humans and Working Joes briefly; attracts the Alien to the location.
- Obtain: Blueprint in Mission 2 (Backup Power Relay). Craft from scrap and electrical components.
- When Useful: Distracting enemies, blinding humans to slip past, or redirecting the Alien. Essential for stealth.
- Synergy: Use while hiding in a locker; the Alien will investigate the noise and leave.
- Function: Creates a cloud of smoke that obscures vision for humans and the Alien. Does not block the Alien's hearing or sense of smell.
- Obtain: Blueprint in Mission 8 (Team Briefing / Cargo Bay). Craft from chemicals and metal parts.
- When Useful: Crossing open areas under surveillance, escaping combat, or blocking line-of-sight for security cameras.
- Function: Illuminates dark areas. Attracts the Attention Meter (not the Alien directly) – enemies can see light.
- Obtain: Equipped from start. Can be toggled on/off.
- When Useful: Essential for navigation but risky. Use sparingly; use the motion tracker to navigate without light.
- Upgrades: None; however, you can find a Flashlight Upgrade in Mission 8 (Projector Room) that increases brightness but also draw more attention – use with discretion.
- Function: Detects moving enemies (humans, Working Joes, and the Alien) within a 30-meter range. Shows distance via blips. Does not detect stationary enemies or unconscious bodies.
- Obtain: Equipped from start.
- When Useful: Vital for situational awareness – always keep on. The Alien can hear the tracker's beeping if you are close; use it in short bursts.
- Upgrades: None.
- Function: Melee tool; used to break vents, open stubborn doors, and as a weapon (weak).
- Obtain: In Mission 1 (Start of game).
- When Useful: Opening shortcuts, breaking vents to create hiding spots, and as a last-resort melee attack against humans.
- Note: The Jack can be used on certain panels to disable alarms temporarily.
- Function: Used to hack datapads and security terminals to unlock doors, turn off cameras, etc. Requires a minigame; higher-level locks need more time or skill.
- Obtain: In Mission 3 (Medical – after meeting Samuels).
- When Useful: Accessing locked rooms, disabling door security, or reading logs. Some terminals can deactivate reactor alarms.
- Upgrades: None; but you can find Hacking Mods (e.g., “Agility” reduces noise during hack) in some lockers.
- Scrap Metal: Most common; used for almost all craftable items (Noise Makers, EMP Mines, flares, revolver ammo, shotgun shells).
- Gunpowder: Found in weapon crates and lockers. Used for revolver ammo and shotgun shells.
- Chemicals: Found in janitor closets and labs. Used for smoke bombs, flamethrower fuel, and pipe bombs.
- Electrical Components: From computers, circuit boards. Used for EMP Mines, flares, hacking mods.
- Metal Parts: From machines and structural debris. Used for pipe bombs and melee upgrades.
- Explosive Powder: Rare; found in military lockers. Used exclusively for pipe bombs.
2. Shotgun
3. Flamethrower
4. EMP Mine
5. Pipe Bomb
6. Flashbang (Noise Maker)
7. Smoke Bomb
8. Flashlight
9. Motion Tracker
10. Maintenance Jack
11. Hacking Device
---
Consumables & Materials
Crafting Materials (Scavenge from environment)
Crafting Recipes (Blueprints automatically learned)
| Item | Materials | Effect |
|---|---|---|
| Revolver Ammo | 2 Scrap + 1 Gunpowder | Ammo for revolver (6 rounds). |
| Shotgun Shells | 3 Scrap + 2 Gunpowder | Ammo for shotgun (4 shells per craft). |
| Flamethrower Fuel | 2 Chemicals + 1 Scrap | Refuels flamethrower (200 units). |
| Flashbang (Noise Maker) | 2 Scrap + 1 Electrical Components | Distraction device. |
| Smoke Bomb | 2 Chemicals + 1 Metal Parts | Obscures vision. |
| EMP Mine | 3 Scrap + 2 Electrical Components | Disables electronics. |
| Pipe Bomb | 1 Explosive Powder + 2 Metal Parts + 1 Chemical | High explosive. |
| Flare | 1 Scrap + 1 Electrical Components | Light source; can be ignited with flamethrower to create fire. |
Medkits
- Function: Restores health to full.
- Obtain: Rarely found in cabinets; less spawn on harder difficulties. Can be crafted with 2 Chemicals + 1 Scrap after collecting the Medkit Blueprint (Mission 6).
- When Useful: After taking damage from Humans, Working Joes, or the Alien (direct attack). Save for emergencies.
- Revolver ammo: 6 rounds per pickup (blue box).
- Shotgun shells: 4 shells per pickup (red box).
- Flamethrower fuel: 200 units per canister.
- Found in weapon lockers, security stations, or on dead bodies.
- Function: Rechargeable health packs in rooms. Use once; they take time to recharge (about 30 seconds). Can only be used if you have a medical kit slot (max 1).
- When Useful: Free healing when you are near a station. Note that using it emits a loud hiss that can attract enemies.
- Access Tuner: Allows you to open certain doors and use lifts. (Mission 1).
- Plasma Cutter: Used to cut through sealed doors and panels. (Mission 2).
- Torch: Used to burn through weak walls and vents. (Mission 4 – Engineering).
- Ion Torch: Upgrade of Torch; can cut through stronger panels. (Mission 9).
- Reluctant Assistant's Keycard: Unlocks various doors in Medical.
- AJ's Keycard: Unlocks Marsh’s office.
- Katherine’s Keycard: Unlocks certain security doors.
- API Access Key: For the reactor override.
- Flashlight Brightness Upgrade: Increases light output but also enemy detection.
- Flamethrower Fuel Efficiency: Reduces fuel consumption per blast (found in Mission 12).
- EMP Mine Range Increase: Larger radius (found in Mission 9).
- Pipe Bomb Damage Increase: More explosive force (rare).
- Melee Damage Upgrade: For the Maintenance Jack – makes it more effective against humans.
- Hacking Speed Upgrade: Reduces time taken to hack terminals.
- Stealth Module (Cloaking): Found in Mission 6 – temporary invisibility when standing still (30 seconds). Consumes power.
- Flares: Can be lit with the Flamethrower to create a fire barrier that deters the Alien for a short time. Can also be thrown as noise distraction.
- Noise Makers: See Consumables.
- Security Cameras: Can be temporarily disabled by hacking or EMP.
- Function: Lore items belonging to dead crew members. Collect all 20 for the “All Clear” Trophy/Achievement.
- Locations: Scattered across all missions. Often in hard-to-reach places or near dead bodies.
- Missable: If you leave a mission area, some become inaccessible. Check guide by mission.
- Function: Audio recordings from the original Nostromo crew. Collect all 10 for an achievement.
- Locations: Most are in Mission 3 (Medical). Others in later missions like the Gemini Exoplanet Solutions lab.
- Missable: Yes, especially the one in the Apollo Core server room (Mission 6).
- Function: Text documents and audio diaries that expand the story. Not required for achievements but provide backstory.
- Locations: Everywhere – desks, bodies, terminals.
- Function: Blueprints for crafting. Some are automatic, but a few have physical blueprints you must pick up (e.g., Medkit blueprint).
- Function: Read on terminals. Some contain codes for safes or side information.
- Primary currency for crafting. Not a literal currency, but the most common resource. Used in almost all recipes.
- How to Obtain: Scavenge from containers, lockers, dead bodies, and environment. Vendors? There are none. Only crafting.
- The game has no shops. All items are scavenged or crafted. There is no currency like credits. The only “currency” is materials.
- Function as keys to unlock doors. Not a currency but essential for progression.
- Common Codes: 1270 (Medical safe), 3861 (Shotgun safe), 4356 (Engineering safe), 8923 (Morley’s safe).
- Flares+Flames: Fire deters the Alien for ~10 seconds. Use before sprinting through an area.
- Noise Makers + Locker: Effective combo to dispatch the Alien to a different room.
- EMP + Working Joes: Disable multiple androids silently, but the EMP attracts the Alien.
- Flashlight + Smoke Bomb: Flashlight through smoke can blind you, but enemies can still see your light – not recommended.
- Always carry a stack of Noise Makers and Smoke Bombs. They are cheap to craft.
- Save Flamethrower fuel for critical moments. Each full tank (200 units) can make the Alien flee about 4-6 times.
- Collect Medkit blueprint early; scrap is abundant but chemicals are rarer.
- Upgrade Flamethrower fuel efficiency ASAP.
- Novice: Abundant ammo and medkits. Crafting materials spawn more frequently.
- Hard / Nightmare: Drastically reduced resource spawns. The Alien is more persistent. Crafting becomes essential.
- General Rule: Resources do not respawn; once taken, they are gone. Plan your crafting carefully.
Ammo Pickups
Health Stations
---
Key Items & Equipment Upgrades
Key Items (Story Progression)
Upgrade Kits (Weapon/Tool Upgrades)
Scattered throughout the station. They improve equipment stats:
Tools (One-Time Use or Environment Interaction)
---
Collectibles
ID Tags
Nostromo Logs
Composite Logs
Schematics
E-Mails
---
Currencies
1. Scrap
2. Credits? Not present – no vendor system.
3. Keycards & Passcodes
---
Special Items & Synergies
The Alien’s Behavior Modifiers
Best Practices for Item Use
---
Item Rarity & Availability by Difficulty
---
Summary Table of All Item Types
| Category | Items |
|---|---|
| Weapons | Revolver, Shotgun, Flamethrower |
| Tools | Maintenance Jack, Plasma Cutter, Torch, Ion Torch, Hacking Device, Motion Tracker, Flashlight |
| Explosives & Traps | Pipe Bomb, EMP Mine, Smoke Bomb, Flashbang/Noise Maker |
| Consumables | Medkits, Ammo (Revolver & Shotgun), Flamethrower Fuel, Flares |
| Crafting Materials | Scrap, Gunpowder, Chemicals, Electrical Components, Metal Parts, Explosive Powder |
| Key Items | Access Tuner, various keycards, passcodes |
| Upgrades | Flashlight Brightness, Fuel Efficiency, EMP Range, etc. |
| Collectibles | ID Tags (20), Nostromo Logs (10), Composite Logs, Schematics, E-Mails |
| Currencies | None (only materials) |
This guide covers all items in Alien: Isolation as of the latest version. Always check your inventory and crafting tab for available recipes. Good luck surviving Sevastopol!