Getting Started
Getting Started
Welcome to Squad! This guide will get you through your first hour and beyond, explaining everything from controls to common pitfalls. Squad is a team-first tactical shooter where communication and coordination are more important than individual aim. Read this before your first deployment.
First Hour Walkthrough
1. Launch the Game – After installing, start Squad from Steam or Epic Games Launcher. The main menu appears with options like `Play`, `Training`, `Settings`, and `Server Browser`.
2. Complete the Boot Camp (Mandatory) – Click `Training` → `Boot Camp`. This interactive tutorial teaches movement, aiming, healing, digging, and communication. Do not skip it – it only takes 15 minutes and covers the basics you’ll need immediately.
3. Adjust Settings – From the main menu, go to `Settings`:
- Video: Set resolution to your monitor’s native, enable fullscreen, adjust graphics quality for stable FPS (60+ recommended).
- Audio: Enable voip (Voice over IP) and set voice chat volume to 100%.
- Controls: Review key bindings (default are fine for now).
4. Join a Server – Click `Play` → `Server Browser`. Filter for servers with low ping (<100) and moderate queue (0-5). Look for servers labeled “New Player Friendly” or “Beginners Welcome”. Avoid servers with high player counts (100/100) or those running competitive mods like Squad-ops.
5. Spawn and Find Your Squad – Once in-game, press `Enter` to join a squad from the deployment screen (explained below). If no squads are open, wait for one to appear or create your own (not recommended for your first game). Press `M` to bring up the map – find your squad’s spawn point (usually a red circle with a “HAB” icon). Click to spawn there after a 10-second timer.
6. First 10 Minutes in Game – You’ll spawn near your squad’s radio. Listen to your Squad Leader (SL) – if they speak, respond. Follow the green markers on your compass (top of screen). Your SL will likely say “move to attack marker” or “defend this point”. Stay within 50m of your squad. Do not run off alone. If you see enemies, use the ping system (double-tap `Middle Mouse Button`) to mark them. Do not shoot unless ordered – stealth is crucial.
7. First Firefight – Suppressive fire keeps heads down. If you see squadmates shooting in a direction, join them. Use `B` to change fire mode (semi/auto). If you get hit, call for a medic using `Num 0` or local chat (`V`). Lie prone to reduce profile. If no medic nearby, hold `F` to bandage yourself (must have a bandage).
Character Creation & Role Selection
Squad does not have visual character creation. Your appearance is determined by the faction you’re playing (e.g., US Army, Russian Ground Forces, Militia). However, you choose a role (kit) each time you spawn. This defines your weapons, equipment, and responsibilities.
Best Beginner Roles:
- Rifleman – The most flexible role. Carries an assault rifle, frag grenades, and a bandage. Your job is to follow orders, shoot enemies, and resupply squadmates with ammo bags (`4` key) when they run low.
- Medic – Vital for keeping squadmates alive. You have a medical bag (`4`) to heal and a bandage for revives. Always stay behind cover and heal downed teammates. Avoid being the first to enter a room.
- Automatic Rifleman (AR) – Provides suppressive fire with a light machine gun. You move slower and attract attention, but you can lock down an area. Good for learning positioning.
- Squad Leader – Requires map knowledge, constant communication, and tactical planning. Play at least 20 hours before trying SL.
- Marksman – Often tempts lone-wolf behavior; you lack the ammo and utility of a Rifleman. Not recommended for new players.
- Anti-Tank (AT) / Heavy Anti-Tank (HAT) – Requires understanding of armor weak points and positioning. Wait until you know vehicle types.
Roles to Avoid as a Beginner:
Controls (PC Only)
Squad is only available on PC. Below are the essential default controls. Customize them in Settings.
| Action | Key |
|---|---|
| Move | W, A, S, D |
| Sprint | Left Shift (hold) |
| Crouch | Left Ctrl (hold) |
| Prone | Z (toggle) |
| Jump | Space |
| Lean Left/Right | Q / E (hold) |
| Reload | R |
| Fire | Left Mouse Button |
| Aim Down Sights (ADS) | Right Mouse Button (hold) |
| Change Fire Mode | B |
| Use Bandage | 5 (must have bandage) |
| Place Rally Point | 6 (Squad Leader only) |
| Toggle Map | M |
| Open Scoreboard | Tab |
| Local Voice Chat | V (hold) – talk to nearby players |
| Squad Voice Chat | B (hold) – talk only to your squad |
| Command Voice Chat | G (hold) – Squad Leaders only |
| Ping / Mark Enemy | Middle Mouse Button (double-tap) |
| Use Compass | N (toggle on/off) |
| Interact / Pick Up | F |
| Drop Ammo Bag | 4 (Rifleman) |
| Medical Bag | 4 (Medic) |
| Shovel | 6 (hold to dig/build) |
| Switch Weapon | 1, 2, 3 (primary, secondary, melee) |
| Change Zeroing | Page Up / Page Down |
UI Overview
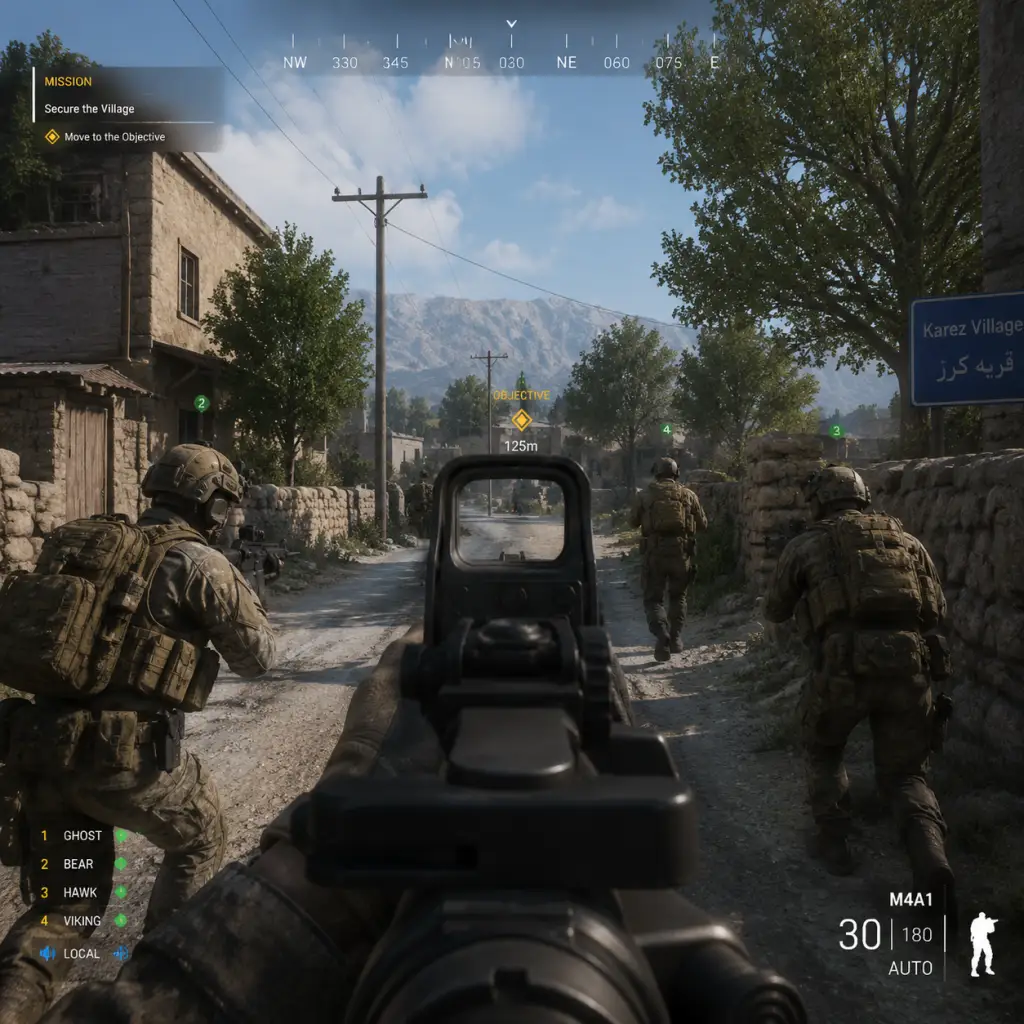
Your screen shows:
- Compass (top center) – Green markers from your SL appear as chevrons. The compass also shows bearing in degrees (e.g., N, NE, 045). Use for navigation: “Enemy at 220”.
- Stamina Bar (bottom left, below health) – Green bar depletes while sprinting. Recharge by walking or standing still.
- Health Bar (bottom left) – Red when low. Below it, ammo count and bandage icon.
- Squad List (left side) – Shows player names. A speaker icon means they have a mic. Their health is shown. If someone is down (X), medic needed.
- Action Area (top-left corner) – Current objective name and distance.
- Map (press M) – Full-screen map showing all friendly units (blue dots), squad markers, vehicles, and known enemy contacts (red). Learn to read map contours and grid coordinates (e.g., F7 keypad area).
- Radio/HAB Icon – A yellow radio symbol near your spawn point indicates the nearest radio (which must be protected). A “HAB” icon is a bunker where you spawn. The color indicates status: green = active, orange = being overrun, red = destroyed.
- VoIP indicator – Small text near the squad list shows who is talking and on which channel.
- Communicate, even if it’s just “enemy spotted”. Use local chat (`V`) for nearby enemies, squad chat (`B`) for longer-range intel.
- Play as Rifleman or Medic.
- Stay on the objective (flag).
- Request a revive from a medic if downed, but don’t spam.
- Dig enemy radios if you find them (#1 priority when behind enemy lines).
- Lone Wolfing – Running off alone gets you killed and wastes tickets. Always stay near teammates.
- Team Killing – Check your fire. Friendly markers (blue dots) appear on your screen at close range; wait to confirm before shooting.
- Ignoring the Objective – The main objective (capture/defend point) is everything. K/D ratio doesn’t matter.
- Taking Vital Roles (SL, HAT, etc.) – Let experienced players handle them until you understand the game flow.
- Spamming Voice Chat – Don’t talk over important comms. Keep chatter situational.
- Shooting at Vehicles with Rifles – You can’t hurt an armored vehicle with small arms. Call out its position to AT players.
- A player dies (1 ticket)
- A vehicle is destroyed (5-20 tickets depending on type)
- An enemy captures an objective (reduces your ticket bleed)
- Not using a microphone – Communication is mandatory. Type chat is too slow for firefights. Plug in a mic and use it.
- Not following the Squad Leader – The SL has the map and plan. Straying away makes you a liability.
- Overextending – Pushing alone into an open field results in death. Move from cover to cover.
- Firing without orders – Shooting alerts enemies to your position. Unless you have a clear shot, hold fire.
- Ignoring the map – The map shows where enemies are likely coming from. Glance at it every 10 seconds.
- Digging friendly radios – Never dig a friendly radio! Only dig enemy radios (they'll have a red icon). Friendly radios are green.
- Standing still while healing – Always crouch or go prone when using medkit/bandage.
- [ ] Complete the Boot Camp tutorial.
- [ ] Adjust settings: video, audio (voip on), controls.
- [ ] Join a low-ping “New Player Friendly” server.
- [ ] Join a squad with at least 4 players and a talking SL.
- [ ] Select Rifleman as your first role.
- [ ] Stay within 20m of your SL for the entire match.
- [ ] Learn to use the map (`M`) to navigate to the objective.
- [ ] Use local chat (`V`) to call out enemy positions.
- [ ] Practice bandaging (hold `F` when hurt).
- [ ] Do not fire your weapon unless you see a confirmed enemy.
- [ ] If you die, ask in squad chat: “Where do I spawn?”
- [ ] Play at least 3 full matches as Rifleman before switching roles.
- [ ] Watch an experienced player’s perspective (optional but helpful).
Essential Early Objectives
1. Join a Squad with a Mic – A listening squadmate is better than a silent one. If your squad is silent, leave and join another.
2. Follow Your Squad Leader – Stay within 30m of your SL. If they move, move with them. Do not wander off to “flank” alone.
3. Learn to Read the Map & Compass – Identity your squad’s marker (green star), your objective (large diamond), and nearby friendly positions. Type grid coordinates in squad chat if you see enemies (e.g., “enemy east of F7, 2 guys”).
4. Build Spawn Points – If you see a supply crate (large brown box) and your SL gives the order, use your shovel (`6` key, hold left click) to dig a radio (buries into ground) or a HAB (builds a bunker). This is critical for sustainment.
5. Stay Alive – Every death costs your team a ticket. Dying in the open also wastes a medic’s time. Use cover, avoid open fields, and retreat if outnumbered.
What to Do First & What to Avoid
Do:
Avoid:
Early Resource Priorities
Squad uses a ticket system each team has a pool (usually 300-400 per team). Tickets are lost when:
Your focus:
1. Stay Alive – Don’t waste tickets. Play cautiously.
2. Ammo – Riflemen carry an ammo bag. Drop it near teammates who request it. Ammo crates are placed near HABs by Logistics vehicles.
3. Bandages – You start with 1 bandage. Use it only when a medic is far away or you are critically bleeding out.
4. Shovel – Use to dig friendly structures or destroy enemy ones. Do not dig unless ordered.
5. Medical Supplies – Medics have unlimited healing but limited bandages. If you’re a medic, ask a Rifleman for ammo to restock bandages.
Common Beginner Mistakes
Day-One Checklist
Remember: Squad is about teamwork, not individual glory. Your first few hours may be confusing, but as you learn the flow, you’ll appreciate the depth. Good luck, and stay low!