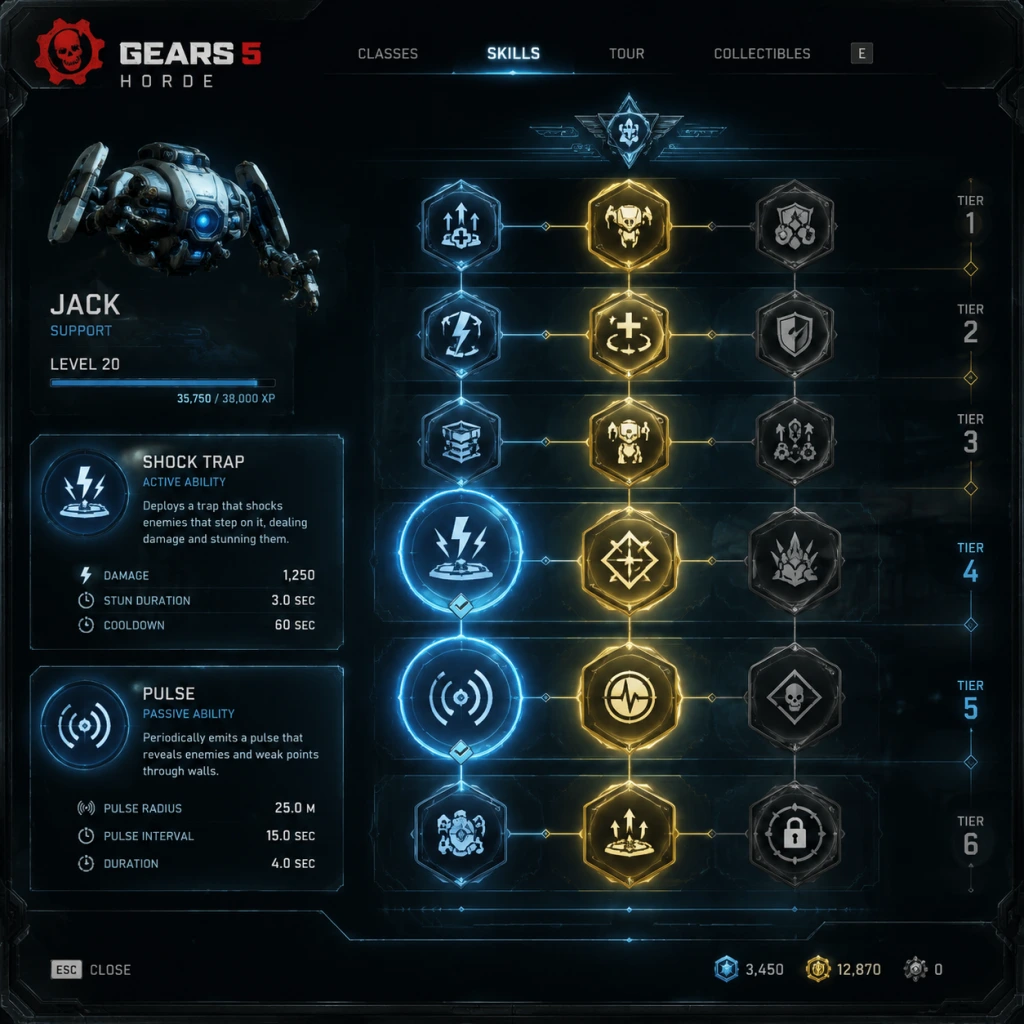
Character Skills
Overview
Gears 5 features multiple modes with distinct character skill systems. In the Campaign, each character has unique Ultimate Abilities and Jack has a full upgradeable skill tree. In Escape, each Hivebuster character has a unique active ability and passive skill cards. In Horde, ten classes each have a class ability and a set of skill cards that determine passive bonuses and tactical options. This guide lists every skill, ability, talent, and special move across all playable characters and roles.
---
Campaign Characters
Kait Diaz
- Ultimate Ability: Blood Resonance
- Ultimate Ability: Tac-Com
- Flash
- Cloak
- Pulse
- Hijack
- Shock Trap
- Juvie Cloud
- Recharge
- Ultimate Cooldown (Passive Ability unique to Jack’s grid)
- Exploration Build: Pulse + Cloak + Recharge + Ultimate Cooldown.
- Combat Support: Shock Trap + Flash + Hijack + Cloak (for revives).
- Boss Fighting: Hijack + Shock Trap + Recharge + Ultimate Cooldown.
- Class Ability: Turret
- Skill Cards:
- Synergies: Stay near Engineer for turret repairs. Pair with Tactician’s Marking for extra damage.
- When to Use: Hold chokepoints during Fabricator defense.
- Class Ability: Heavy Weapon
- Synergies: Engineers can drop ammo boxes; Scout can mark enemies.
- When to Use: Wave clearance, especially against bosses.
- Class Ability: Frag Grenade
- Synergies: Use with Scout’s Mark to amplify explosive damage. Engineer can build Salvo turrets for additional explosives.
- When to Use: Crowded clusters, boss waves, or breaking enemy shields.
- Class Ability: Salvage
- Synergies: Always build sentries, barriers, and weapon lockers. Supply teammates with weapons.
- When to Use: Every wave – focus on base building and repairs.
- Class Ability: Ping
- Synergies: Essential for every team – marks allow Heavy and Soldier to melt enemies.
- When to Use: On every large enemy or boss. Keep marking throughout the wave.
- Class Ability: Stabilizer
- Synergies: Engineer can place weapon lockers for ammo. Scout marks help eliminate targets faster.
- When to Use: Wave 4+ when enemies become tougher. Focus on Scions, Wardens, and bosses.
- Class Ability: Stim
- Synergies: Keep Engineer alive, support Soldier/Hard in frontline.
- When to Use: During intense combat or when multiple teammates are low on health.
- Class Ability: Repair Burst
- Synergies: Pairs with Engineer for rapid base maintenance.
- When to Use: When sentries or barriers are heavily damaged.
- Class Ability: Vanguard
- Synergies: Great for protecting teammates during revives or base defense.
- When to Use: When a teammate is downed or to draw fire from a boss.
- Class Ability: Nightshade
- Synergies: Use with Gnasher shotgun for backstabs. Requires planning.
- When to Use: Flanking priority targets like Wardens or Boomers.
- Active Ability: Static Tackle
- Payload (Chargeable Melee)
- Active Ability: Blitz
- Payload (Chargeable Melee)
- Active Ability: Grapple Shot
- Payload (Chargeable Melee)
- Effect: Kait taps into her connection with the Swarm to emit a high-frequency pulse that reveals all enemies through walls within a large radius (≈30m) for a few seconds. Enemies are highlighted in red and are visible behind cover. Does not damage enemies.
- Duration: 8 seconds (upgradeable via Jack’s upgrades; cannot be upgraded by Kait herself).
- Cooldown: 90 seconds (can be reduced by Jack’s “Ultimate Cooldown” upgrade).
- Upgrades: None directly for Kait. Jack can upgrade “Cooldown Rate” for all campaign Ultimate abilities.
- Combos / Synergies: Perfect for coordinating with Del’s Tac-Com marking for headshots, or for Jack’s shock trap placement. Use before entering a new area to scout turret positions or ambushes.
- Recommended Build: Not applicable (only one ultimate per character). However, pair with team upgrades that reduce cooldown for more frequent use.
- When to Use: Whenever you enter a large room, suspect enemy ambushes, or need to track down fleeing bosses. In open-world sections, use it to locate hidden Swarm pods or loot caches.
Delmont “Del” Walker
- Effect: Del deploys a high-tech targeting system that automatically tags all visible enemies within line-of-sight and a moderate radius (≈20m). Tagged enemies are marked on the HUD for the entire team, and each shot from any team member deals extra damage to marked targets (≈25% increased damage).
- Duration: 12 seconds (upgradeable only by Jack).
- Cooldown: 90 seconds.
- Upgrades: Jack can improve duration and cooldown.
- Combos / Synergies: Pairs extremely well with Kait’s Blood Resonance (reveal enemies so Del can tag them more easily). Also synergizes with Jack’s Shock Trap (marked enemies take extra damage from shock). Great for boss fights like the Matriarch.
- Recommended Build: In campaign, always activate before heavy combat. Use with high-damage weapons like the Gnasher or Longshot.
- When to Use: For crowd control in tight corridors, before ambushing a group, or during boss encounters to maximize team DPS.
Jack (Robot Companion)
Jack has 8 unique abilities that can be unlocked and upgraded throughout the campaign using components found in missions. Each ability has 4 upgrade levels (I, II, III, IV) that enhance effects or reduce cooldown. Jack can equip up to 4 abilities at once (selected via the Component Grid).
#### List of Jack’s Abilities
- Effect: Jack emits a blinding flash that stuns enemies and knocks them out of cover. Stunned duration depends on level.
- Upgrade Levels:
- Level I: Stuns for 2 seconds, cooldown 25s.
- Level IV: Stuns for 4 seconds, cooldown 15s. Also applies a slow effect.
- Combos: Use before charging with Kait or Del; stunning Wardens or Scions stops their attacks. Great for reviving teammates.
- When to Use: Use to break a stalemate, revive a downed teammate, or interrupt a boss’s powerful attack.
- Effect: Makes Jack invisible to enemies for a short duration. While cloaked, Jack can perform actions without breaking stealth (except attacking or picking up items?)
- Upgrade Levels:
- Level I: Duration 8 seconds, cooldown 40s.
- Level IV: Duration 14 seconds, cooldown 25s. Also grants temporary speed boost.
- Combos: Use for safe revives, recharging shields, or placing Shock Traps without being seen.
- When to Use: Stealth sections, flanking large groups, or escaping danger.
- Effect: Jack sends out a pulse that reveals hidden items (collectibles, weapon lockers, upgrade components) in a large radius. Also reveals enemy footprints for a short time.
- Upgrade Levels:
- Level I: Reveals items within 30m, cooldown 60s.
- Level IV: Reveals items within 80m, cooldown 30s. Also marks enemies for 3 seconds.
- When to Use: Exploration, farming components, finding secret areas. Use in every new area to uncover collectibles.
- Effect: Jack takes direct control of a powerful enemy (Scion, Drone, or even a Swarm Boomer) for a short time. Controlled enemy can attack others.
- Upgrade Levels:
- Level I: Control duration 5 seconds, cooldown 90s.
- Level IV: Control duration 10 seconds, cooldown 45s. Also gains damage bonus.
- Combos: Hijack a Boomshot Scion to destroy his comrades. Great for turning the tide in large fights.
- When to Use: Against large groups, especially when outnumbered. Avoid hijacking bosses unless it’s a lower-tier boss like the Snatcher.
- Effect: Jack deploys a proximity landmine that deals shock damage and stuns enemies within a small area.
- Upgrade Levels:
- Level I: Deals 100 shock damage, stun 2 seconds, cooldown 30s.
- Level IV: Deals 300 shock damage, stun 4 seconds, cooldown 20s. Also chains to nearby enemies.
- Combos: Place near active reload stations or chokepoints. Use with Flash for guaranteed stun lock.
- When to Use: Defense missions, holding positions, protecting objectives.
- Effect: Jack releases a group of Juvies (small Swarm creatures) that attack nearby enemies. Juvies are weak but provide distraction.
- Upgrade Levels:
- Level I: Summons 3 Juvies, duration 15 seconds, cooldown 60s.
- Level IV: Summons 6 Juvies, duration 30 seconds, cooldown 35s. Juvies do more damage and move faster.
- Combos: Great for drawing enemy fire while you flank. Use with Hijack to create chaos.
- When to Use: Open battlefield engagements, drawing aggro from heavy weapons.
- Effect: Jack rapidly recharges nearby teammates’ shields and health. Affects all players in a small radius.
- Upgrade Levels:
- Level I: Heals 50 health and full shield, cooldown 60s.
- Level IV: Heals 150 health and full shield, cooldown 30s. Also grants temporary damage resistance.
- When to Use: After intense firefights, before a boss fight, or when a teammate is downed.
- Effect: Reduces cooldown of Kait and Del’s Ultimate abilities. Also reduces Jack’s own ability cooldowns slightly.
- Upgrade Levels:
- Level I: Reduces all cooldowns by 10%.
- Level IV: Reduces all cooldowns by 30%.
- When to Use: Always keep equipped in any combat-focused build.
Jack’s Build Recommendations:
---
Horde Classes (PvE Cooperative)
Each Horde class has a unique Class Ability (active) and a deck of Skill Cards (passive). Players choose 5 skill cards to equip. Below are all base-game classes (including DLC classes unlockable via Tour of Duty).
Soldier
- Effect: Deploy a mounted turret that fires high-damage bullets. Turret has limited ammo and can be picked up and moved. Cooldown: 120 seconds (reduced by skill cards).
- Upgrades: Skill cards affect damage, ammo capacity, movement speed while carrying, and fire rate.
- Perks: Increased Assault Rifle Damage, Increased Turret Damage, Turret Ammo Capacity, Reduced Turret Cooldown, Increased Health.
- Legendary: “The Hammer” – Turret fires explosive rounds (area damage).
Heavy
- Effect: Carry a heavy weapon (Trishot or Mulcher) with unlimited ammo for a short time. Weapon overheats if fired too long. Cooldown: 90 seconds.
- Skill Cards:
- Increased Heavy Weapon Damage, Reduced Overheat, Movement Speed while carrying, Extra Heavy Ammo capacity, Damage Resistance while using heavy weapon.
Demolitions
- Effect: Throws a powerful frag grenade with larger blast radius and guaranteed gibs. Can carry up to 3 at once. Cooldown per grenade: 60 seconds (recover one every 60s).
- Skill Cards:
- Explosive Damage Increase, Explosive Radius, Extra Frag Capacity, Frag Drop on Down, Self-Defense explosives.
Engineer
- Effect: Collect scrap from destroyed enemy fortifications and weapons. Scrap used to build fortifications at the Fabricator. Also: Engineer has cheaper build costs and faster build time.
- Skill Cards:
- Increased Build Speed, Reduced Build Cost (per level), Fortification Durability, Fortification Damage, Upgraded Repair Tool.
Scout
- Effect: Fire a marker that tags enemies and highlights them. Marked enemies take extra damage from all sources (like Del’s Tac-Com). Cooldown: 30 seconds. Mark lasts 10 seconds.
- Skill Cards:
- Increased Mark Damage %, Mark Duration, Faster Cooldown, Extra Damage to Marked Enemies, Sprint Speed.
Sniper
- Effect: Activate to reduce weapon sway and zoom in farther for a few seconds. Perfect for long-range shots. Cooldown: 45 seconds. Duration: 8 seconds.
- Skill Cards:
- Increased Longshot Damage, Headshot Damage Multiplier, Faster Stabilizer Recharge, Explosive Headshots, Increased Magazine Capacity.
Tactician
- Effect: Deploys a healing area that provides health regeneration and damage reduction to all allies. Can be upgraded to revive downed teammates. Cooldown: 120 seconds. Duration: 20 seconds.
- Skill Cards:
- Heal Rate Increase, Damage Reduction %, Stim Duration, Faster Cooldown, Area Size.
Mechanic (DLC)
- Effect: A short-range blast that repairs all fortifications within 5m. Also restores a small amount of shield to teammates. Cooldown: 90 seconds.
- Skill Cards:
- Repair Amount, Increased Burst Radius, Fortification Armor, Cooldown Reduction, Self-Heal on Repair.
Veteran (DLC)
- Effect: A defensive stance that gives damage resistance and lets you taunt enemies to focus on you. Cooldown: 60 seconds. Duration: 10 seconds.
- Skill Cards:
- Damage Reduction %, Vanguard Duration, Health Regen during Vanguard, Cooldown Reduction, Increased Taunt Range.
Infiltrator (DLC)
- Effect: Become invisible and move faster for a short time. Breaking stealth with an attack deals bonus damage. Cooldown: 75 seconds. Duration: 8 seconds.
- Skill Cards:
- Invisibility Duration, Movement Speed, Damage Bonus on Break, Cooldown Reduction, Stealth Kill (instant kill on regular enemies while stealthed).
---
Escape Characters (Hivebusters)
Each Hivebuster has a unique active ability and can equip passive skill cards (similar to Horde). They also have a class-specific Ultimate-like ability called “Payload” which is a charged melee attack? Actually in Escape, each character has a unique ability on a cooldown, plus they have a “Payload” which is a super heavy melee attack that charges over time. Below are the three core Hivebusters:
Lahni Kal
- Effect: Lahni rushes forward a short distance, knocking down enemies in her path and dealing shock damage. Enemies hit are stunned briefly. Cooldown: 12 seconds.
- Skill Cards:
- Passive: Increased Shock Damage, Knockback Distance, Static Tackle Cooldown, Health on Knockdown, Shock Aura (discharge on revive).
- Effect: When fully charged (3 segments), unleash a powerful shockwave that damages and stuns all enemies in a cone. Charge is built by dealing damage.
- When to Use: Crowd control, pushing through tight corridors, interrupting enemies.
Mac Turner
- Effect: Mac activates a short burst of speed and damage resistance. During Blitz, his melee attacks do high damage and can gib enemies. Duration: 6 seconds, Cooldown: 20 seconds.
- Skill Cards:
- Blitz Duration, Damage Resistance during Blitz, Melee Damage Increase, Speed Boost, Blitz Cooldown.
- Effect: When charged, Mac delivers a powerful uppercut that launches enemies into the air, dealing high single-target damage.
- When to Use: Boss killing, breaking enemy formations.
Keegan Price
- Effect: Keegan fires a grappling hook that pulls himself to a target (enemy or location). If used on an enemy, he kicks them, stunning them briefly. Cooldown: 15 seconds.
- Skill Cards:
- Grapple Range, Stun Duration, Kick Damage, Cooldown Reduction, Grapple Pull Speed.
- When to Use: Mobility, escaping danger, or to close distance on a priority target.
---
Versus (Multiplayer) Note
Gears 5’s Versus mode does not have character-specific skills or abilities. All player characters have identical movement and weapon capabilities. The only differentiation is cosmetic via character skins. Some modes like Control have class-like respawn systems (e.g., one player can be a Scout with faster movement), but these are temporary buffs tied to map objectives, not permanent skills. Therefore, no skills guide is provided for Versus.
---
This guide covers all skill-based elements in Gears 5. Use these details to optimize your gameplay in Campaign, Horde, and Escape modes.