Game Settings
Game Settings Guide for Monster Hunter: World
This guide covers all game settings in Monster Hunter: World (including Iceborne), with platform-specific notes and recommendations for balancing performance and visual quality. Settings are grouped into Graphics, Audio, Controls & Accessibility, Language & Network, and Gameplay. Optimal settings for different hardware tiers are provided for PC; console players will find pre-set options but can still adjust brightness, audio, and controls.
---
Graphics Settings (PC)
Graphics settings are the most impactful. The game has a built-in benchmark tool (accessible from the title screen menu) – use it to test changes. Capcom’s engine (MT Framework) can be CPU-heavy, especially in crowded locales like the Ancient Forest or during multiplayer.
#### Resolution & Display
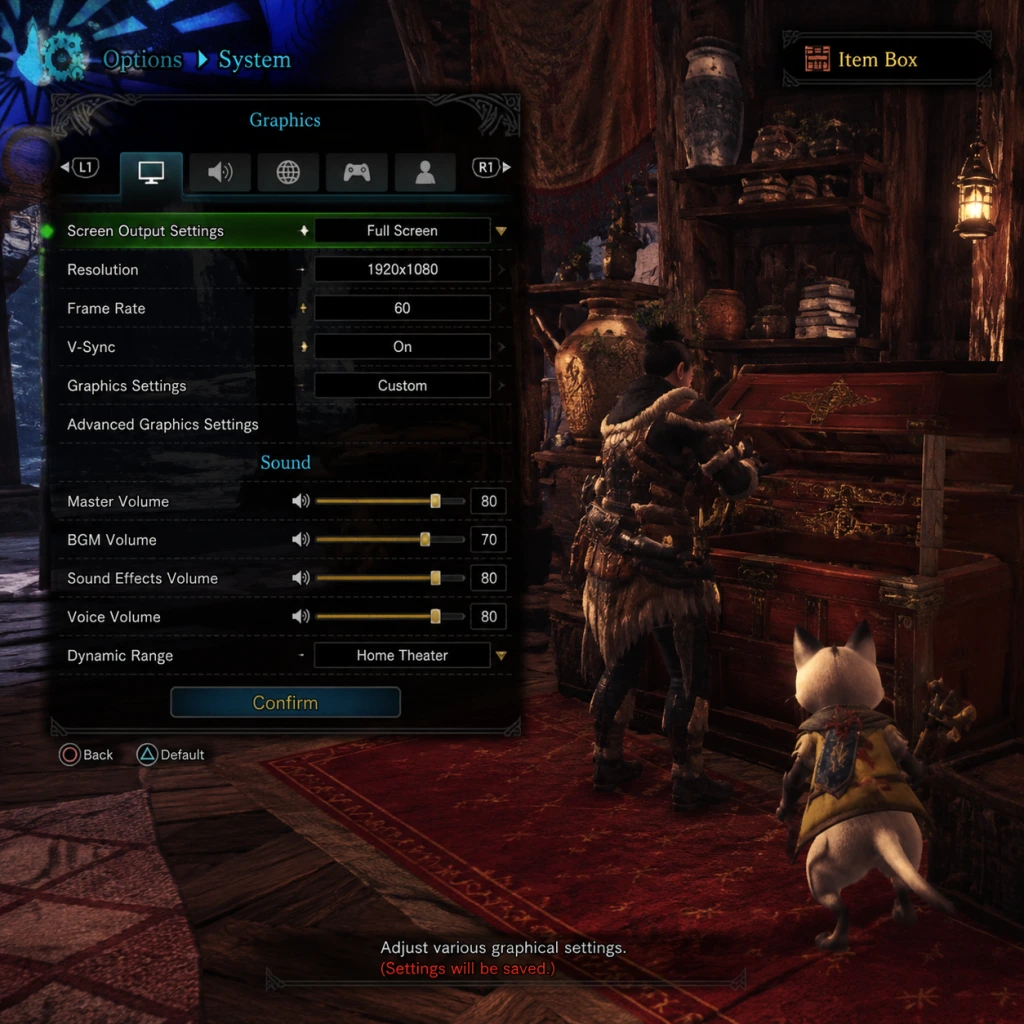
- Resolution: Set to native monitor resolution. Lowering this improves performance significantly but blurs the image. For 1080p low-end rigs, consider 720p or dynamic resolution.
- Screen Mode: Fullscreen is recommended for stability and performance. Borderless Windowed can cause slight input lag and performance loss; use only if alt-tabbing frequently.
- Framerate Limit:
- Vertical Sync: Enable to eliminate screen tearing, but introduces input lag. For competitive play, disable and use Fast Sync (NVIDIA) or Enhanced Sync (AMD).
- Display Brightness: Adjust until the logo on the calibration screen is barely visible. Overly dark settings hide detail; too bright washes out shadows.
- If your monitor is 60 Hz, cap at 60 to avoid screen tearing (use in-game limiter or NVIDIA/AMD control panel).
- For 144 Hz+, cap at your refresh rate or leave uncapped if V-Sync is disabled (see below).
#### Graphics Quality Presets (Quick Reference)
| Tier | Preset | Description |
|---|---|---|
| Low | Low (or minimum scalars) | 60+ FPS on old GPUs (GTX 960/1050 Ti) |
| Mid | Medium with some High | 60 FPS on GTX 1060 / RX 580 |
| High | High | 60 FPS on GTX 1070 / RTX 2060 |
| Ultra | Highest custom | 60+ FPS on RTX 2070+ or for 1440p/4K |
| Setting | Impact | Recommended (Low)<br>60 FPS target | Recommended (Mid)<br>60 FPS target | Recommended (High)<br>60 FPS target | Notes |
|---|---|---|---|---|---|
| Image Quality (Scaled Resolution) | Directly controls internal resolution. 1.0 = 100%. | 0.8 – 0.9 (sharpening helps) | 1.0 | 1.0 or 1.1 (if GPU headroom) | Values above 1.0 supersample but cost heavily. Keep at 1.0 for clarity. |
| Texture Quality | VRAM usage. Higher = sharper surfaces. | Low (512 MB) | High (1024 MB) | High or Highest (2048 MB) | High textures require 4 GB VRAM. Lowest causes blurry walls and ground. |
| Anti-Aliasing | Smooths edges. TAA blurs; FXAA is lighter. | TAA (Low) or FXAA | TAA | TAA + TAA Sharpen (optional) | TAA Sharpen adds cost but reduces blur. For sharpness, use Resolution Scale >1.0 instead. |
| Ambient Occlusion (SSAO) | Adds shadow contact. | Off | Low or SSAO (HDAO) | HBAO+ (if NVIDIA) or SSAO | HBAO+ is heavy but looks best. Ambient occlusion hides flat lighting. |
| Volumetric Fog | Atmospheric fog/light shafts. | Off | Low | High | Heavy cost in forest/desert zones. Low still looks okay. |
| Dynamic Range | Controls HDR. Standard or HDR (if monitor supports). | Standard | Standard | Standard (or HDR if calibrated) | HDR mode requires proper SDR/HDR calibration; otherwise colors may look washed. |
| Depth of Field | Blurs distant background. | Off | Off | On (cinematic; not gameplay relevant) | Costs little, but some find it disorienting. Turn off for clarity. |
| Motion Blur | Blurs fast motion. | Off | Off | On (personal preference) | Performance impact negligible. Many turn off for competitive clarity. |
| Bloom | Glow from bright sources. | Off | Off | On | Light performance hit. Can obscure monster tells in bright areas. |
| SSReflections | Screen-space reflections on water/wet surfaces. | Off | Low | High | Helps immersion but not critical. Low is fine. |
| Subsurface Scattering | Skin/hair light bleed. | Off | Off | On | Only noticeable on characters and monsters close up. Minor performance cost. |
| Ambient Light | Global illumination bounces. | Off | Low | High | Heavy. Low still looks good. |
| LOD Bias | Level of detail distance. | -1 | 0 | 0 or +1 | Negative reduces LOD pop-in. +1 lowers quality but improves FPS at distance. |
| Max Foliage (Grass/Trees) | Vegetation density. | Low | Medium | High | High in forest areas can tank FPS on mid-range GPUs. Adjust as needed. |
| Shadow Quality | Shadow resolution and distance. | Low (512 or 1024) | Medium (1024) | High (2048) | Shadows are costly. Low still works but may flicker. |
| Texture Filtering | Anisotropic Filtering. | 4x | 8x | 16x | Impact on performance is minimal; always use at least 4x for crisp textures. |
| DirectX 12 | DX12 API (experimental). | Off (use DX11) | Off (DX11 stable) | On (if stable) | DX12 can improve CPU multi-threading but may cause crashes on some systems. Test thoroughly. |
| Variable Rate Shading (VRS) | Reduces shading where detail low. | N/A (requires Turing+) | Off | On (if supported) | Slight performance gain, minimal visual loss. Only on RTX 20 series and newer. |
- Texture Quality & VRAM: The game will warn if you exceed your VRAM. High textures require 4+ GB. If you have 2 GB, stay on Low. Ignoring warnings causes stuttering.
- DirectX 11 vs 12: Start with DX11 for stability. DX12 can provide 5-10% CPU improvements on 6+ core processors, but some users report random crashes. Use the benchmark to test.
- NVIDIA/AMD Control Panel: For extra performance, force "Power Management Mode" to "Prefer Maximum Performance" (NVIDIA) or equivalent (AMD). Disable Shader Cache if you have SSD space; otherwise keep default.
- Modded Settings: The .ini files (located in `steamapps/common/MHW/graphics_option.ini`) allow tweaks like disabling individual effects. Not recommended for new players.
- Master Volume: Set to comfortable level. The game has dynamic range – quiet moments like camp ambience and loud monster roars. Adjust to avoid ear damage.
- BGM Volume: Controls background music. During hunts, music swells when monster is enraged. Some players lower BGM to hear audio cues (roars, footsteps).
- SFX Volume: Most important for gameplay. Kept at 100% to hear monster tell sounds (e.g., Rathalos tail flip, Nergigante divebomb).
- Voice Volume: For cutscenes and handler dialogue. Lower if annoying; keep for important story hints.
- Audio Output:
- Audio Quality: Dynamic Range can be set to Low (compressed), Medium (default), or High (wide dynamic). Headphones: High recommended for immersion. Speakers: Medium to avoid explosive roars drowning out dialogue.
- Volume Equalization: In Windows/console audio settings, disable "Loudness Equalization" – it masks quiet sounds (like monster footsteps) crucial for gameplay.
- Controller Type: Xbox, PlayStation, or Switch Pro (PC). The game shows button prompts based on controller.
- Button Mapping: Customizable through in-game menu. Default is fine. Common changes:
- Camera Speed: Adjust between 5-8 (scale 1-10). Faster for big monsters; slower for precision.
- Invert Y-Axis: Optional – most leave default.
- Vibration: Enable for immersion; disable for battery saving or if it causes distraction.
- Gyro Aiming: Available on Switch Pro/PS5 controller on PC? Limited. Only for certain slinger ammo aiming; not essential.
- Key Bindings: Fully customizable. Default is awkward for some. Popular changes:
- Mouse Sensitivity: Set independent for aiming and general camera. Values 5-20. Lower for precision.
- Raw Input: Enable for consistent mouse movement (bypasses Windows sensitivity). Recommended.
- Enable Mouse Acceleration: Disable in Windows mouse settings as it interferes.
- Subtitle Display: On by default. Can be toggled off. No additional customization (e.g., background opacity, size) in base game – mods needed for larger text on PC.
- Colorblind Modes: None included. Monster parts (tail cuts, break marks) are visually distinct; rely on damage numbers and glowing red wounds. Mods exist for PC.
- Chat Text Size: In multiplayer, chat font is small. No adjustment – use voice chat or Discord.
- HUD Scaling: Can scale HUD size (Settings > Miscellaneous > HUD Scale). Increase if playing at 4K or far from screen. Range 0.5 to 1.5.
- Camera Auto-Center: Off by default. Turn on if you want camera to follow monster when locked on; off for manual control.
- Voice Language: English, Japanese, Monster Hunter Language (fake gibberish). Choose Japanese for authenticity (many prefer). English voice acting is fine.
- Text Language: Determines UI, menus, subtitles. Multiple languages available. Note: Changing text language requires restart.
- Region Lock: For matchmaking. Can be set to Worldwide (larger player base) or to your region (lower ping). The game uses peer-to-peer sessions; region preference affects who you connect with.
- Session Options:
- Steam/PSN/Xbox Live Settings: Ensure you are online to use SOS flares and multiplayer.
- NAT Type: For console, ensure NAT Type 1 or 2 for stable connections. PC: Forward ports 27015-27030 (Steam) and UDP 3074 (Xbox/PS4).
- Connection Quality: In-game indicators (green/yellow/red). Red means high latency – avoid SOS flares. Use filter options when joining quests (e.g., language, quest type).
- Auto-Decline SOS: Optional – prevents random players from joining your quest without invite.
- Auto-Sheath: When out of combat, character automatically sheathes weapon after a few seconds. Disable for immediate unsheathed response (e.g., using items).
- Self-Improvement (Weapon): Auto-activate certain buffs (like Hunting Horn song queuing). Keep default.
- Radial Menu Type: Choose between type 1 (drag) or type 2 (click). Type 2 is faster for item use. Set in Options > Controls > Radial Menu.
- Quick Item Switch: Use item cycling with L1+face buttons (customizable). Assign potions, whetstone, dung pods for quick access.
- Target Camera:
- Lock-On Toggle: Choose between hold (hold button to lock) or toggle (press once to lock, press again to release). Most use toggle.
- Zoom in/out while aiming slinger: Adjustable slider. Set to fast for quick aiming.
- Controller Vibration: Affects haptic feedback when taking damage or landing hits. Disable if it interferes with rhythm (e.g., Great Sword charge timing).
- Auto-Equip Items / Mantles: In Options > Controls, you can enable auto-equip of mantles when reusing the same slot. Often turned off for manual control.
- Endemic Life: Not a setting but note that you can adjust the palico's gadget behavior; not in main settings but in Buddy Board.
- Use Low preset.
- Set Image Quality to 0.8.
- Turn off Volumetric Fog, SSAO, SSR, Subsurface Scattering, Depth of Field, Motion Blur, Bloom.
- Shadows: Low.
- Texture Quality: Low (to save VRAM).
- Anti-Aliasing: FXAA.
- Resolution: 1600x900 if needed.
- Use Medium preset, tweak:
- Custom High:
- PS4 Base: Runs at 30 FPS dynamic 1080p. No graphics options except brightness and HDR.
- PS4 Pro: 30 FPS with higher resolution (approx. 1800p checkerboard) or 1080p 60 FPS? Note: MHW on Pro is capped at 30 FPS in 4K mode; no 60 FPS mode exists base game. Iceborne added a Graphics vs Performance mode (uncapped 30-45 FPS). Set to Performance mode for smoother gameplay.
- Xbox One X: Same – prioritize performance mode.
- PS5/Xbox Series X (backward compatible): 60 FPS with high resolution (dynamic 1800p). No settings menu.
- Always run the benchmark after changing settings. It simulates a hunt and shows average FPS and bottlenecks.
- Update GPU drivers – Capcom released specific optimizations for MHW in driver updates. GeForce 461.00+ or Radeon Adrenalin 21.2.3+ recommended.
- Disable Steam overlay? Some users report stutter with overlay enabled. Try disabling if you experience hitches.
- Mods that improve settings: Skyrim-like .ini tweaks to disable individual post-processing effects, increase LOD, or fix TAA. Search Nexus Mods for "MHW settings" – but use at your own risk.
---
Audio Settings
- Speakers: For TV/desktop speakers (stereo).
- Headphones: Enables spatial audio (virtual surround). Better for directional audio like monster positions.
- 5.1/7.1: For surround sound systems. Ensure correct config.
---
Controls & Accessibility
#### Controller (Recommended)
- Lock-On Target Switch: Change from R3 (right stick click) to L1/LB to avoid accidental camera reset.
- Sprint/Dodge: Default R1/RT for sprint, X/A for dodge. Some swap to L3 for sprint (like Dark Souls).
#### Keyboard & Mouse (PC)
- Slinger Aim: Change from left Ctrl to right mouse button (RMB).
- Special Action (clutch claw): Map to a thumb mouse button or middle click.
- Dodge: Usually left Shift or Space. Space also used for climbing/vaulting; separate bind for dodge (e.g., right click).
#### Accessibility Options
---
Language & Network
#### Language Settings
#### Network Settings
- Public Session: Anyone can join via SOS or search.
- Private Session: Only friends/invites.
- Squad Session: For pre-formed groups.
---
Gameplay Settings
#### Beginner-Friendly Options
#### Camera & Lock-On
- Type 1: Focus camera on monster when pressing lock-on button (default).
- Type 2: Camera only faces monster when you press lock-on again (toggle). Type 2 recommended for manual aiming.
#### Combat-Related
---
Settings That Are Easy to Misconfigure
1. Volume Equalization: Windows (or console) audio processing that compresses dynamic range. In Monster Hunter, subtle audio cues like a monster's breathing before a charge or the glint of a tail attack are crucial. Turning on loudness equalization flattens these. Must be disabled both in OS and in-game if available (some sound cards have it).
2. Anti-Aliasing / TAA Sharpen: TAA blurs the image significantly. Many players complain it causes motion blur effect. Recommendation: Use TAA + TAA Sharpen (if available) or try FXAA and use resolution scaling (1.0 or 1.1). Alternatively, use NVIDIA DLDSR (if supported) and set lower resolution with high DSR for sharpness.
3. Volumetric Fog: Set to Low or Off for competitive advantage – it reveals monsters earlier in smoke/fog areas (e.g., Elders Recess, Coral Highlands). High looks pretty but hides monsters behind thick fog.
4. DirectX 12: As mentioned, can cause crashes on certain systems. Many guides recommend DX11 for stability. Test thoroughly with the benchmark before committing.
5. HDR Settings: If you enable HDR without calibrating your display, the game may look washed out or too dark. Use in-game calibration slider. On PS4 Pro/PS5, HDR is generally well-implemented; on Windows, ensure HDR is enabled in OS first.
6. Texture Filtering (Anisotropic): Default is often low. Set to at least 4x or 8x. The performance impact is negligible (1-2 FPS) but visual improvement is drastic for ground textures. Many assume it's turned up automatically – it's not.
7. Control Scheme (Keyboard): Capcom’s default keyboard bindings are infamous for being clunky (e.g., slinger aim on left Ctrl, special action on C). Spend time remapping to feel natural – many guides recommend using mouse side buttons.
8. Radial Menu Type: Type 1 (drag) requires precise mouse/thumbstick movement; Type 2 (click) is faster for controller. New players often stick with default (Type 1) and struggle mid-hunt. Switch to Type 2 immediately.
---
Recommended Settings Summary
#### Low-End PC (e.g., GTX 1050 / Ryzen 3, 1080p 30-60 FPS)
#### Mid-Range PC (e.g., GTX 1060 / RX 580, 1080p 60 FPS)
- Volumetric Fog: Low.
- Ambient Occlusion: SSAO (not HBAO+).
- Shadows: Medium.
- Texture: High (if 6GB VRAM).
- Anti-Aliasing: TAA.
- Image Quality: 1.0.
#### High-End PC (e.g., RTX 2060+ / Ryzen 5, 1440p 60 FPS or 1080p 144 FPS)
- Texture: Highest.
- Shadows: High (2048).
- Ambient Occlusion: HBAO+.
- Volumetric Fog: Low (for visibility) or High (for eye candy).
- Anti-Aliasing: TAA + TAA Sharpen.
- Image Quality: 1.0, or 1.1 if GPU headroom.
- Subsurface Scattering: On.
- Depth of Field: Off.
#### Consoles (PS4, PS4 Pro, Xbox One X)
---
Final Tips
With these settings and adjustments, you can enjoy Monster Hunter: World smoothly across all platforms, with clarity and responsiveness essential for hunting monsters effectively.