Getting Started
Getting Started Guide for Kerbal Space Program
First Steps: The First Hour Walkthrough
1. Launch the Game: After installation, start KSP. You'll see the main menu with options like "Start Game", "Settings", and "Credits".
2. Create a New Save: Click "Start Game", then "New Game". Name your save (e.g., "My First Rocket") and choose a game mode:
- Sandbox: All parts unlocked, unlimited funds. Recommended for pure experimentation.
- Science Mode: Unlock parts by performing experiments and gaining science points. Good for learning progression.
- Career Mode: Full economy with contracts, reputation, and funds. Most complex; avoid for your first hour.
For beginners, choose Science Mode – it gives structure without financial pressure.
3. Initial Load into Space Center: The game loads you into the Kerbal Space Center (KSC) view. You see a flat starfield with buildings. The tutorial pop-up may appear; read it or skip if desired.
4. Locate the VAB (Vehicle Assembly Building): Hover over the main building with a rocket icon – it’s the Vehicle Assembly Building (VAB). Click it to start building your first rocket.
5. First Rocket Build:
- Drag the Mk1 Command Pod into the center of the workspace (it’s the capsule).
- Attach a TR-18A Stack Decoupler below the pod.
- Attach a T800 Fuel Tank below the decoupler.
- Attach a LV-T45 Swivel Liquid Fuel Engine below the fuel tank.
- Add TT-38K Radial Decoupler and four Mk1 Sidepods? Actually, keep it simple: use the Basic Fin – attach four fins around the bottom.
- Click the Parts Catalog icon (left side) to find these. Use the search bar.
6. Check Stats: Click the "Engineer's Report" button (wrench icon) – ensure no warnings (like insufficient control). Add a SAS module (e.g., Inline Reaction Wheel) if needed – place it between decoupler and fuel tank.
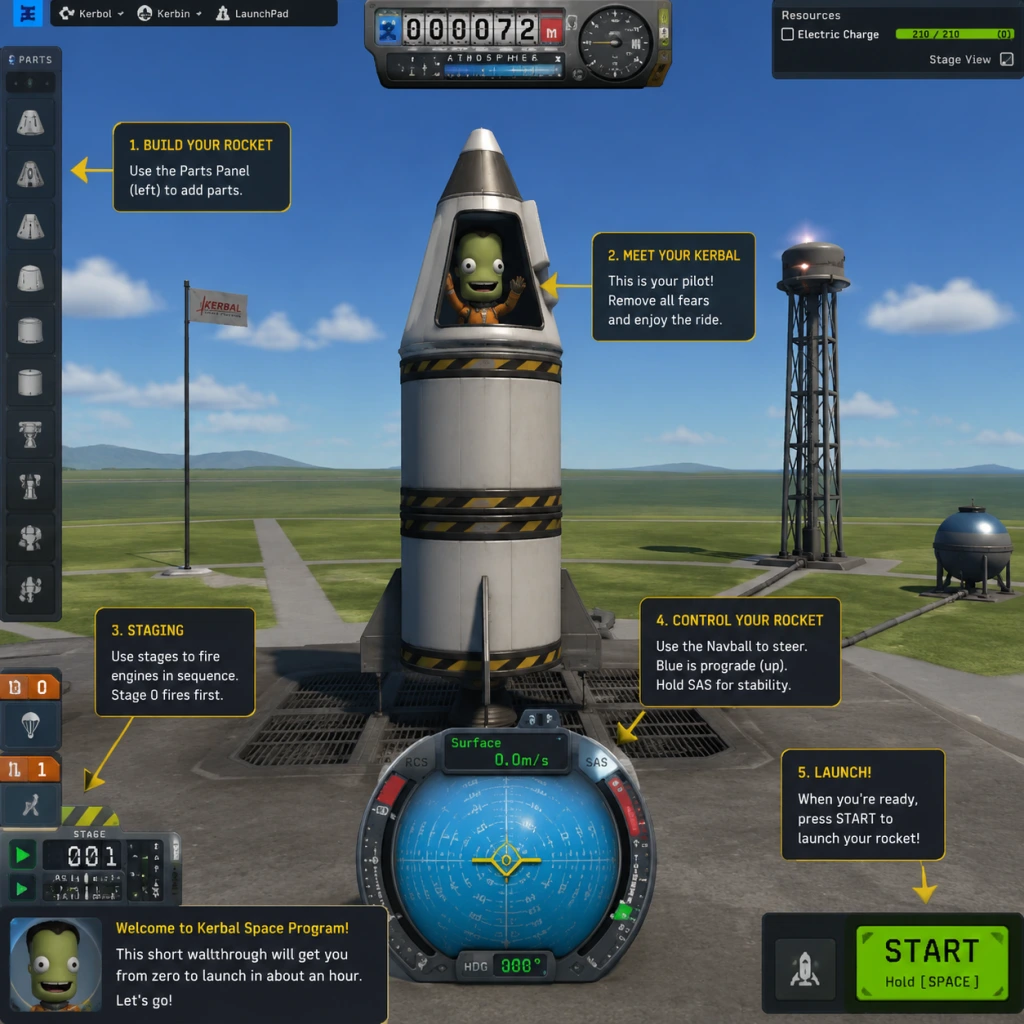
7. Launch: Click the green "Launch" button. You enter the control scene. Press Spacebar to activate the engine. Press Spacebar again to stage (if you have decouplers).
8. Basic Flight: As you climb, throttle up (Left Shift on PC) to full. Use W to pitch (tilt) east (right) once you’re stable. Aim for a gravity turn – tilt slowly toward 45° by 10 km altitude.
9. First Orbital Attempt (optional but fun): Continue burning until your apoapsis (Ap marker) is above 70 km. Then cut throttle (X key). When near Ap, burn prograde to circularize. This is tough for first hour; don’t worry if you crash.
10. Return to KSC: If you survive, you can revert flight via the escape menu → “Revert to Launch” or “Revert to VAB”. This lets you try again without losing parts.
Character Creation (There Is None!)
KSP does not have character creation. You control Kerbals – cute green astronauts – but they have preset names and appearances. You can rename them in the astronaut complex (building with a flag) after unlocking, but it’s cosmetic only. No stats or customization exist.
Controls on All Platforms
| Action | PC (Keyboard & Mouse) | Xbox / PlayStation | Nintendo Switch |
|---|---|---|---|
| Throttle Up | Left Shift (hold) | RT (hold) | ZR (hold) |
| Throttle Down | Left Ctrl (hold) | LT (hold) | ZL (hold) |
| Stage (Activate next stage) | Spacebar | A | A |
| Pitch (Up/Down) | W / S | Left Stick (up/down) | Left Stick (up/down) |
| Yaw (Left/Right) | A / D | Left Stick (left/right) | Left Stick (left/right) |
| Roll (Rotate) | Q / E | LB+Left Stick / RB+Left Stick | L+B Button+Left Stick / R+B Button+Left Stick |
| SAS (Stability Assist) On/Off | T | Y | X |
| RCS (Reaction Control) On/Off | R | B | Y |
| Time Warp | . (period) / , (comma) | D-pad Up/Down (hold to engage) | D-pad Up/Down (hold to engage) |
| Map View | M | View button (Select) | Minus (-) |
| Zoom in/out (VAB/SPH) | Scroll wheel | Right stick (click + drag) | Right stick (click + drag) |
| Camera Orbit (flight) | Middle mouse button (hold + drag) | Right stick (drag) | Right stick (drag) |
UI Overview (Key Elements)
- Navball (center top): Shows orientation and velocity vector (prograde/retrograde). Prograde (yellow marker) = direction of travel; retrograde (pink) = opposite. Use SAS to point to them.
- Altitude Display (left): Shows altitude above sea level (ASL) and above terrain (AGL) when near surface.
- Velocity (left): Shows speed relative to surface (surf) or orbit. Use map mode to see orbital velocity.
- Staging Display (left): Shows your stage sequence. Green indicates active stage; click an icon to activate it early.
- Resource Panel (top right): Shows current fuel levels, electricity, monopropellant, etc. Click to expand.
- Mission Clock (top center): Displays elapsed time. Click to open time warp options.
- App Launcher (top right toolbar): Includes buttons for Maneuver Nodes, Alarms, etc. Customizable.
- Build a stable first rocket that reaches the upper atmosphere (30–50 km) and safely parachutes back.
- Learn basic orbital mechanics: launch east (90° heading) to exploit Kerbin’s rotation.
- Unlock basic parts in Science Mode: Get science from the launch pad and low atmosphere.
- Perform your first EVA (Extra-Vehicular Activity) on a Kerbal – but wait until you have a stable orbit to avoid losing them.
- Understand the Transfer Window for reaching the Mun (moon) – but that’s day 2 or 3.
- Run the basic tutorials from the main menu. They cover moving, staging, and landing.
- Start a Sandbox save to crash rockets freely without penalties.
- Watch the navball – keep your direction aligned with prograde for efficient burns.
- Use symmetry mode (press R) when attaching fins, boosters, or solar panels to ensure balance.
- Revert flights often while learning – it’s your safety net.
- Don’t build huge, complex rockets your first hour. Keep it under 10 parts.
- Don’t skip adding fins – they prevent flipping during atmospheric flight.
- Don’t attempt a Mun landing until you can reliably achieve a 75 km circular orbit.
- Don’t engage time warp while in atmosphere (below 30 km) unless you want to explode.
- Don’t forget parachutes on return capsules. Click the parachute part and set its deploy altitude (default 1000 m).
- Science Points: Your primary resource in Science Mode. Collect them by doing experiments (Mystery Goo, Thermometer, etc.) at various altitudes and biomes. Focus on the launch pad (surface) and low altitudes (0–18 km) first.
- Funds: Only matter in Career Mode. Avoid Career until you grasp basics.
- Reputation: Also Career only. Early failed contracts lower rep but not disastrous.
- Building Upgrades: In Career/Science, you upgrade buildings to unlock larger parts. Priority: VAB first (more part count), then Tracking Station (more orbits), then Mission Control (more contracts).
- [ ] Complete the first three in-game tutorials (Basic, Staging, and Orbiting).
- [ ] Build and launch a simple rocket that reaches at least 30 km.
- [ ] Successfully deploy parachutes and land safely back on Kerbin.
- [ ] Collect science data from the launch pad and low altitude (2–18 km).
- [ ] Unlock your first new part (e.g., Basic Jet Engine or more fuel tanks) in Science Mode.
- [ ] Perform a gravity turn to 45° by 10 km and maintain it.
- [ ] Understand the navball markers (prograde, retrograde, normal, anti-normal).
- [ ] Practice reverting a flight and making adjustments in the VAB.
- [ ] Watch a beginner video (optional) – search “KSP beginners guide 2025”.
- [ ] Set aside 2–3 hours for uninterrupted learning. KSP rewards patience.
Essential Early Objectives
What to Do First and What to Avoid
DO FIRST:
AVOID:
Early Resource Priorities
Common Beginner Mistakes
1. Throttling too early/late: Stage activation must have engine running. Always set throttle to full (Shift) before hitting Space.
2. Not using SAS: Toggle SAS (T key) to keep stable. Without it, your rocket spins.
3. Forgetting antennas: For probes (unmanned), you need an antenna to transmit science. Kerbals can transmit without one, but probes can’t.
4. Over-engineering: More delta-v doesn’t always help; adding too much weight reduces efficiency. Aim for 3400 m/s delta-v to reach orbit.
5. Ignoring center of mass: When building, check the blue ball (CoM). Keep it forward relative to center of pressure (purple) to avoid flipping.
6. Panicking and reverting too late: Use “Revert to Launch” before you lose all parts; you can’t revert after a crash if you quit.
7. Not saving: Manual save (F5) before critical maneuvers. Quickload with F9.
Day-One Checklist
Remember: Failure is part of the fun. Every explosion teaches you something. Keep a notebook of what worked and what didn’t. The Kerbal motto: “Fly safe… or fly spectacularly!”